Description
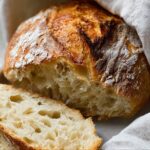
This World’s Easiest Yeast Bread recipe is a no-knead artisan loaf perfect for home bakers seeking simplicity without sacrificing flavor. Using just flour, yeast, salt, and warm water, this recipe requires minimal hands-on time and yields a crusty, golden bread with a tender crumb. Oven-baked in a hot Dutch oven, it develops a crisp exterior and soft interior, making it ideal for sandwiches, toasts, or enjoying fresh out of the oven.
Ingredients
Scale
Dry Ingredients
- 3 cups (450g) bread or plain/all-purpose flour
- 2 tsp instant or rapid rise yeast
- 2 tsp kosher salt (not table salt)
- 1 1/2 tbsp flour (for dusting)
Wet Ingredients
- 1 1/2 cups (375 ml) very warm tap water (up to 55°C/130°F, not boiling)
Instructions
- Mix Dough: In a large bowl, combine the flour, yeast, and kosher salt. Add the very warm water and mix with the handle of a wooden spoon until all the flour is incorporated. The dough will be wet and sticky, not kneadable but not runny like batter. Adjust water or flour slightly if needed to achieve the right consistency.
- Rise: Cover the bowl with cling wrap or a plate and leave it on the counter for 2 to 3 hours until the dough doubles in size, becomes wobbly like jelly, and shows bubbles on the surface. If after 1 hour the dough isn’t rising, move it to a warmer spot.
- Optional Refrigeration for Flavor: At this point, you can either proceed to bake immediately or refrigerate the dough for up to 3 days to develop deeper flavor.
- Bring Dough to Room Temperature: If refrigerated, remove the dough from the fridge and let it sit at room temperature for 45 to 60 minutes while preheating the oven to take the chill off and encourage rising.
- Preheat Oven and Dutch Oven: Place a Dutch oven (minimum 26cm/10″ diameter) with its lid inside your oven and preheat to 230°C/450°F (220°C fan) for at least 30 minutes prior to baking. If you don’t have a Dutch oven, see special note in Step 10.
- Shape Dough: Sprinkle 1 tablespoon of flour on your work surface. Scrape the dough out of the bowl onto the floured surface, then gently sprinkle the top with 1/2 tablespoon flour.
- Fold and Form Shape: Using a dough scraper or similar tool, fold the dough’s sides inward about six times to roughly form a round, deflating some bubbles. Perfection isn’t required, as the shape will change during baking.
- Transfer Dough to Parchment Paper: Place a large piece of parchment paper beside the dough, then flip the dough seam-side down onto the paper. Slide the dough to the middle and reshape it round-ish; a lopsided shape is fine and will create more crunchy edges.
- Place Dough in Hot Dutch Oven: Carefully remove the hot Dutch oven from your oven. Using the parchment paper as a sling, transfer the dough into the Dutch oven and cover with the lid.
- Bake Bread: Bake the covered dough for 30 minutes. Then remove the lid and bake uncovered for an additional 12 minutes or until the crust is deep golden and crispy. If you don’t have a Dutch oven, bake the dough on a heavy baking sheet or cast iron skillet covered loosely with a large mixing bowl or foil, then uncover for the last 12 minutes.
- Cool and Serve: Remove the bread from the oven and transfer it to a cooling rack. Let it cool for at least 10 minutes before slicing to allow the crumb to set properly.
Notes
- Use bread or all-purpose flour as preferred; bread flour yields a chewier bread.
- If using normal or active dry yeast, dissolve it in the warm water first and let it activate before mixing with flour and salt.
- Use kosher or cooking salt, not table salt, for best flavor and texture.
- Water should be warm but not hot, ideally up to 55°C/130°F to activate the yeast properly without killing it.
- Adjust water or flour to achieve a wet, sticky dough consistency; it should not be doughy or batter-like.
- If dough lacks rise after 1 hour, move to a warmer place such as near a radiator or in an oven with the light on.
- Preheating the Dutch oven is critical to create steam and a crispy crust.
- If you don’t have a Dutch oven, use a heavy baking sheet and cover the dough with a large oven-proof bowl or foil during the initial bake.
- Refrigeration enhances flavor, resulting in a more complex, tangy taste as the yeast ferments slowly.