
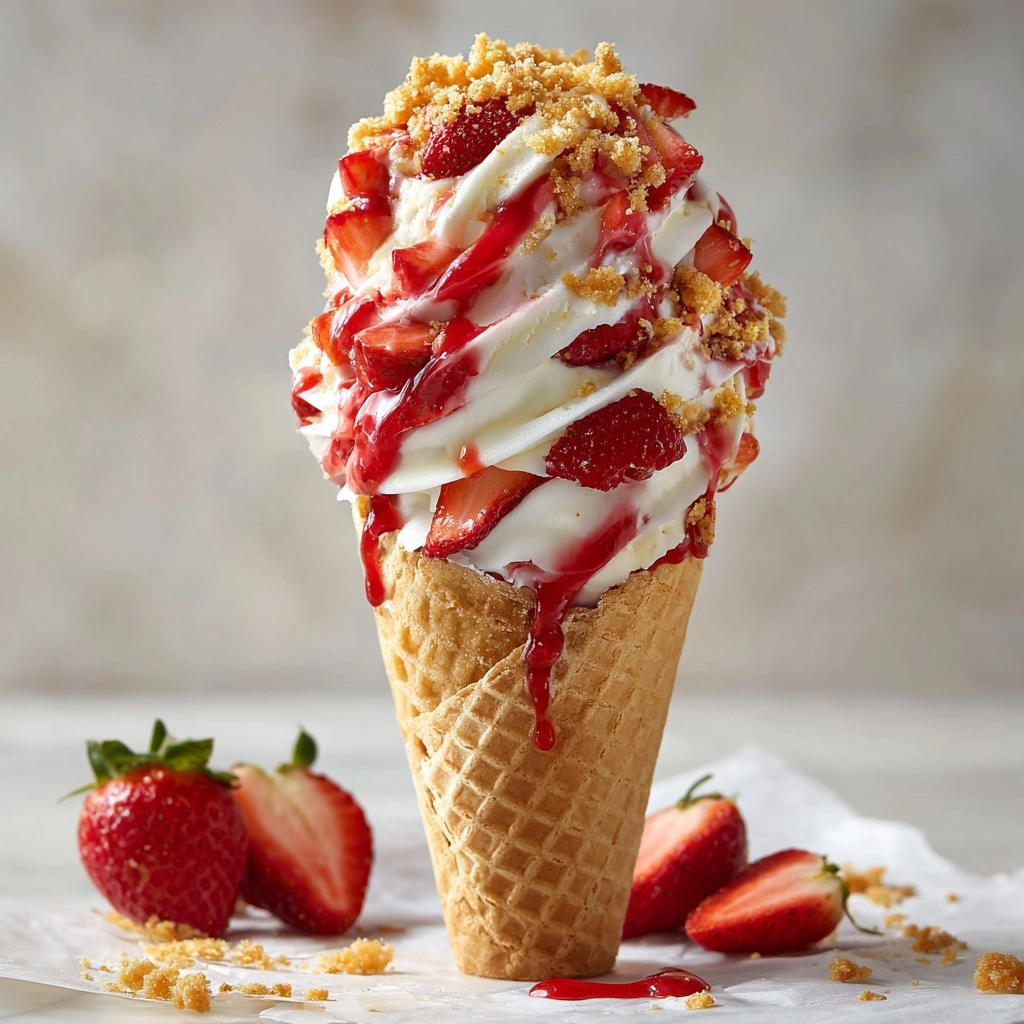
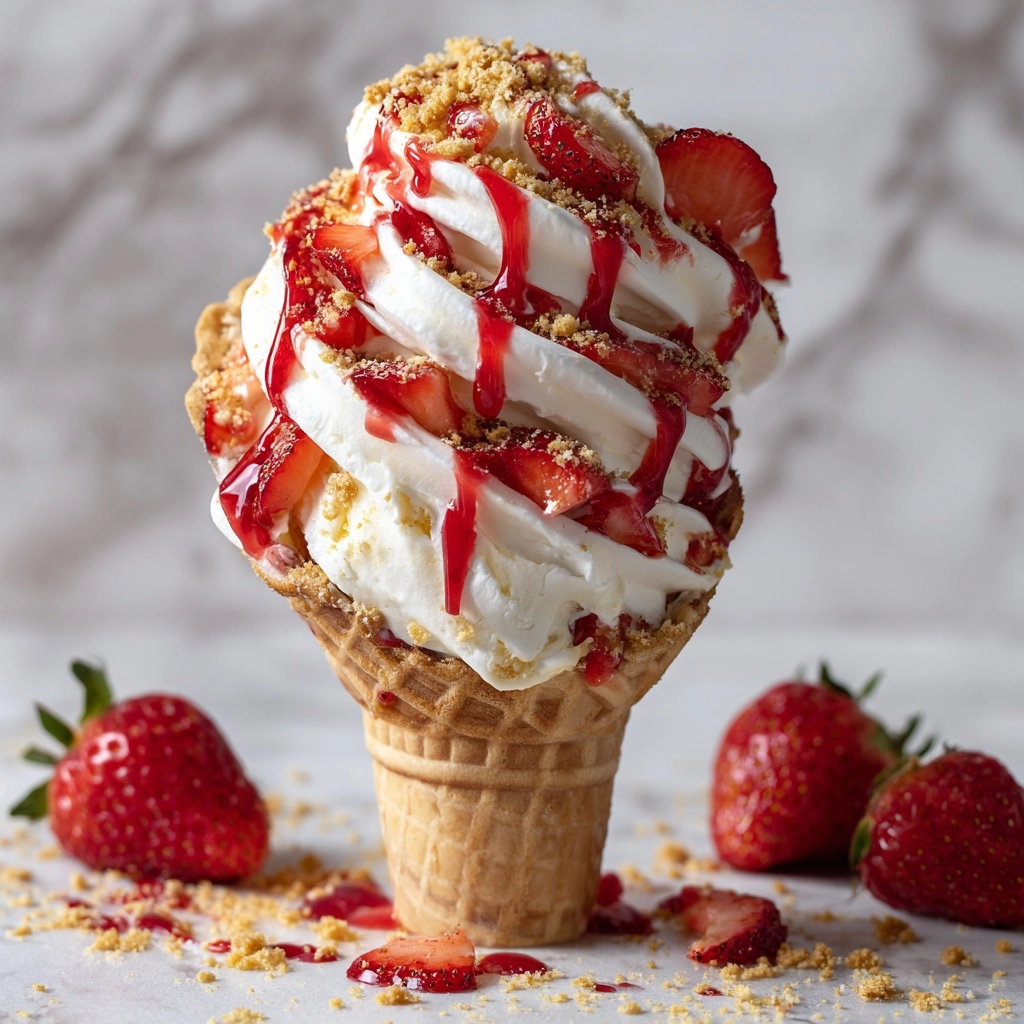
Get ready to fall in love with dessert hour! The Strawberry Crunch Cheesecake Cones Recipe delivers everything you adore about fruity cheesecake and the satisfying crunch of classic ice cream cones, all in a fun, hand-held treat. Luscious cheesecake filling, juicy strawberries, and a crave-worthy strawberry crunch topping combine for an explosion of flavors and textures that’s bound to turn heads at picnics, parties, or any summer afternoon. Whether you’re a seasoned baker or just looking for a no-fuss, no-bake sweet fix, this stunning creation is destined to become your new go-to showstopper.
Ingredients You’ll Need
This whimsical recipe calls for just a handful of joyful, easy-to-find ingredients, each selected to layer flavor and deliver maximum delight. From the creamy base to the vibrant strawberries and crispy toppings, every component matters to create these unforgettable cones. Gather everything first, and you’re halfway to dessert bliss!
- Waffle Cones: These crisp cones are the edible vessel, offering a sweet crunch and plenty of room for cheesecake goodness.
- Chopped Fresh Strawberries: Their tart-sweet flavor and juicy bursts are at the heart of this dessert’s summery charm.
- Granulated Sugar: Just a sprinkle to help the strawberries macerate, drawing out their juices and intensifying flavor.
- Cream Cheese (softened): Delivers that classic tang and creamy texture you expect from any good cheesecake.
- Powdered Sugar: Adds smooth, gentle sweetness to the filling, dissolving beautifully into the cream cheese.
- Vanilla Extract: A splash of vanilla provides warmth and rounds out all the other flavors.
- Heavy Whipping Cream (cold): Whipped to fluffy perfection, it lightens the cheesecake filling to dreamy heights.
- Crushed Golden Oreos: These cookies provide that iconic crunch and a buttery, golden flavor that pairs perfectly with the cheesecake.
- Freeze-Dried Strawberries (crushed): Intensify the strawberry hit and add a pretty pop of color to the crunch topping.
- Optional White Chocolate or Strawberry Syrup (for drizzling): If you love to finish with a flourish, a drizzle takes things totally over the top!
How to Make Strawberry Crunch Cheesecake Cones Recipe
Step 1: Macerate the Strawberries
Start by combining your freshly chopped strawberries with granulated sugar in a small bowl. Give them a good stir to coat the fruit evenly. While they sit, they’ll begin to soften and create a naturally sweet syrup—this amplifies their flavor and keeps them juicy inside your cones. Don’t rush this step, as those syrupy strawberries become pure strawberry magic later on!
Step 2: Whip Up the Cheesecake Filling
In a large mixing bowl, blend the softened cream cheese, powdered sugar, and vanilla extract until the mixture turns completely smooth and velvety. You want a lump-free, silky base for the filling, so take your time here—no one loves a lumpy cheesecake! Set this mixture aside for just a moment while you get the cream ready.
Step 3: Whip and Fold the Cream
In a separate bowl, beat the cold heavy whipping cream until stiff peaks form. This step is where the magic happens; whipped cream transforms your filling into something incredibly light and airy. Gently fold your whipped cream into the cream cheese base. The goal is to keep the mixture as fluffy as possible, so use a light hand—think of it as folding a cloud!
Step 4: Make the Signature Strawberry Crunch Topping
Time for that irresistible strawberry crunch! Grab another small bowl and mix together the crushed Golden Oreos and freeze-dried strawberries. This duo brings the sweet, tangy, crumbly topping beloved on strawberry crunch bars, and it adds fantastic texture with every bite. If you want an even bolder strawberry color, press some extra freeze-dried berries into the mix.
Step 5: Assemble the Cheesecake Cones
Ready to build? Into each waffle cone, add a spoonful or two of macerated strawberries, letting a bit of syrup seep into those crevices. Gently pipe or spoon in your cheesecake filling, ensuring every cone is decadently full (don’t be shy!). Top generously with more strawberries and a thick sprinkle of your strawberry crunch topping. If you’re feeling fancy, finish with a drizzle of white chocolate or strawberry syrup for maximum wow-factor.
How to Serve Strawberry Crunch Cheesecake Cones Recipe
Garnishes
Dress these cones to impress! After piling on the strawberry crunch topping, a final flourish of white chocolate drizzle, extra freeze-dried strawberry dust, or a few fresh mint leaves will make each cone as photogenic as it is delicious. For special occasions, edible flowers or a dusting of powdered sugar can take them to new heights.
Side Dishes
Pair your Strawberry Crunch Cheesecake Cones Recipe with light summer fare—think sparkling lemonade, a citrusy fruit salad, or even a scoop of vanilla ice cream if you’re leaning into full dessert mode. These cones are the star, so keep sides simple and brightly flavored to complement (not compete with) their creamy, crunchy brilliance.
Creative Ways to Present
Give your cones the red-carpet treatment: nestle them upright in mason jars, serve in a cone stand, or tuck them into decorative mugs for easy passing. For a big crowd, offer a cone-building station so guests can customize their cones with various toppings. You can even “mini-size” your Strawberry Crunch Cheesecake Cones Recipe using mini cones for bite-sized versions—guaranteed to wow at parties or buffets!
Make Ahead and Storage
Storing Leftovers
If you find yourself with leftovers (which is rare, to be honest!), store assembled cones in the fridge for up to 2 hours. Any longer, and the waffle cones may lose their lovely crunch. Pro tip: for best texture, keep the cheesecake filling and strawberries separate from the cones until you’re ready to serve, assembling right at the last minute.
Freezing
While the cheesecake filling itself freezes beautifully, assembled cones will become soggy if frozen. If you’d like to prepare ahead, freeze just the cheesecake mixture in an airtight container for up to a month. Thaw overnight in the fridge, give it a gentle stir, and you’re ready to assemble fresh cones whenever the craving hits!
Reheating
No heating required for this no-bake wonder! If you’ve chilled the cheesecake filling or strawberries ahead of time, let them come to room temperature for a few minutes before assembly to keep things extra creamy and easy to scoop.
FAQs
Can I make the Strawberry Crunch Cheesecake Cones Recipe gluten-free?
Absolutely! Just use gluten-free waffle cones and swap out regular Golden Oreos for a gluten-free sandwich cookie of your choice. The rest of the ingredients are naturally gluten-free, so everyone can enjoy this treat.
What’s the best way to keep the cones from getting soggy?
The trick is to assemble the cones right before serving. If prepping ahead, store filling and toppings separately, then fill each cone just before eating. For extra crunch insurance, dip the rims in melted white chocolate before filling, which creates a moisture barrier.
Can I use frozen strawberries if fresh aren’t available?
You can use thawed frozen strawberries in a pinch, but drain them well before using to avoid excess moisture in your cones. The texture and flavor of fresh is unbeatable, but don’t let the season stop your cravings!
Can I make these dairy-free?
It’s possible! Use your favorite dairy-free cream cheese and a plant-based whipped topping instead of heavy cream. Make sure your toppings and cones also fit your dietary preferences, and you’ll have a delicious vegan-friendly treat.
Is this recipe kid-friendly?
Kids absolutely love this dessert—from mixing and assembling to devouring. Just supervise while they fill the cones (things might get deliciously messy), and consider using mini cones for little hands!
Final Thoughts
If you’re searching for a treat that’s as friendly to make as it is impossible to resist, you can’t go wrong with the Strawberry Crunch Cheesecake Cones Recipe. Gather your ingredients, invite someone you love to join you in the kitchen, and get ready for big smiles all around—you’re about to discover your new favorite way to celebrate strawberry season!
Print
Strawberry Crunch Cheesecake Cones Recipe
- Prep Time: 20 minutes
- Cook Time: 0 minutes
- Total Time: 20 minutes
- Yield: 6 cones
- Category: Dessert
- Method: No-Bake
- Cuisine: American
- Diet: Vegetarian
Description
Indulge in these delightful Strawberry Crunch Cheesecake Cones, a no-bake treat that combines creamy cheesecake filling with fresh strawberries and a crunchy topping, all served in a waffle cone.
Ingredients
Waffle Cones:
- 6 waffle cones
Strawberry Filling:
- 1 cup chopped fresh strawberries
- 1 tablespoon granulated sugar
Cheesecake Filling:
- 8 ounces cream cheese (softened)
- 1/2 cup powdered sugar
- 1 teaspoon vanilla extract
- 1 cup heavy whipping cream (cold)
Strawberry Crunch Topping:
- 1/2 cup crushed Golden Oreos
- 2 tablespoons freeze-dried strawberries (crushed)
- Optional: white chocolate or strawberry syrup for drizzling
Instructions
- Prepare Strawberries: Mix chopped strawberries with granulated sugar and set aside.
- Make Cheesecake Filling: Beat cream cheese, powdered sugar, and vanilla until smooth. Whip heavy cream separately and fold into cream cheese mixture.
- Prepare Crunch Topping: Mix crushed Oreos and freeze-dried strawberries.
- Assemble Cones: Fill cones with macerated strawberries, cheesecake filling, more strawberries, and crunch topping. Drizzle with chocolate or syrup.
- Serve: Enjoy immediately or refrigerate for up to 2 hours.
Notes
- Assemble cones just before serving to keep them crisp.
- For extra crunch, dip cone rims in white chocolate and then in the crunch topping.
Nutrition
- Serving Size: 1 cone
- Calories: 380
- Sugar: 28g
- Sodium: 150mg
- Fat: 24g
- Saturated Fat: 14g
- Unsaturated Fat: 8g
- Trans Fat: 0g
- Carbohydrates: 35g
- Fiber: 1g
- Protein: 4g
- Cholesterol: 60mg

