“`html
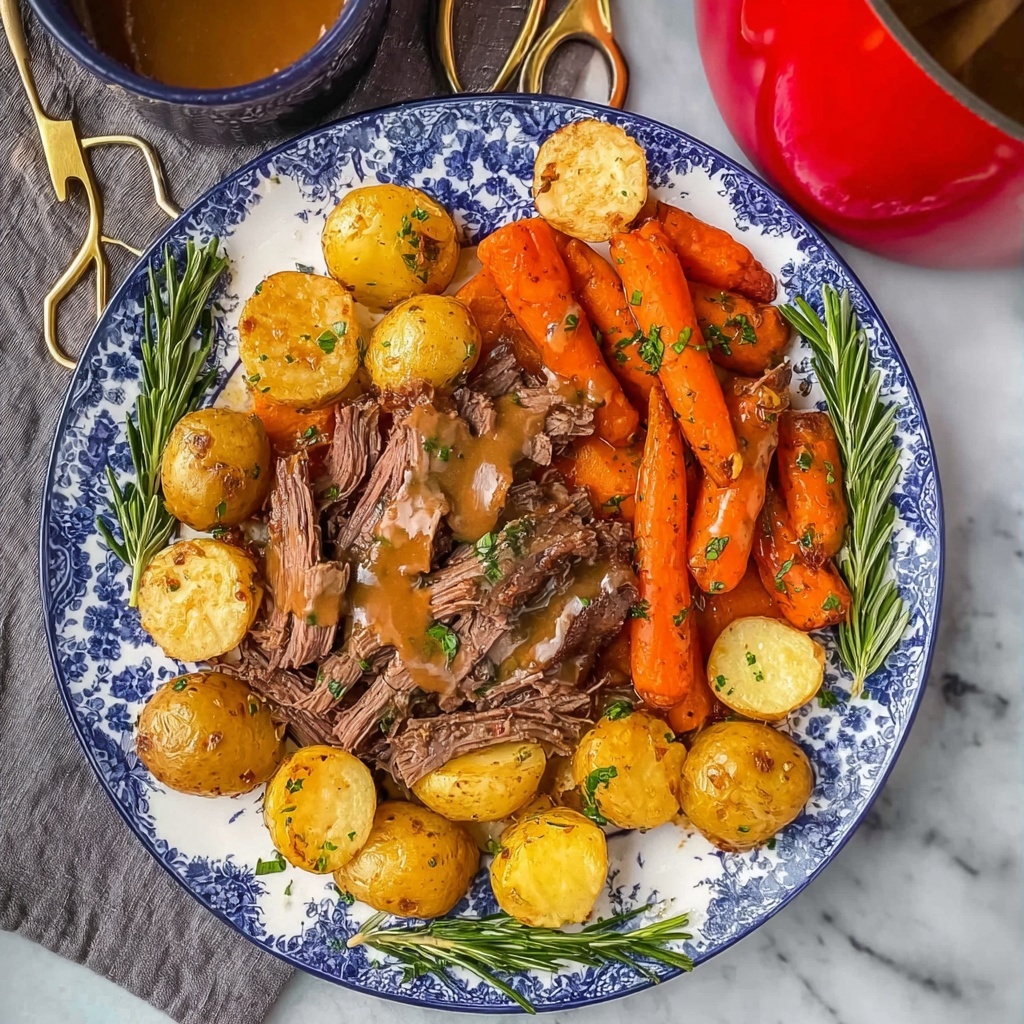
If you’re craving a meal that feels like a warm hug from the inside out, look no further than this Red Wine Pot Roast Recipe. Tender, juicy beef chuck slowly cooked to perfection in rich red wine and savory broth, combined with caramelized vegetables and fragrant herbs, creates a symphony of flavors you’ll want to savor again and again. This dish is a classic comfort food elevated by the deep complexity the red wine brings, making it an absolute showstopper for any family dinner or special occasion.
Ingredients You’ll Need
This Red Wine Pot Roast Recipe calls for straightforward ingredients, each playing a crucial role in building layers of flavor and creating the perfect texture. From the hearty beef chuck to fresh herbs, every component matters and comes together effortlessly.
- 4 lbs beef chuck roast: The star of the show, chuck roast offers great marbling for juicy tenderness after slow cooking.
- 4 tsp kosher salt: Essential for seasoning and drawing out the beef’s natural flavors.
- 2 tsp freshly ground black pepper: Adds a subtle kick that complements the rich meat.
- 1 tbsp smoked paprika: Brings a gentle smoky warmth that deepens the taste profile.
- 2 tbsp olive oil: For a perfect sear that locks in juices and creates a lush crust.
- 2 tbsp unsalted butter (¼ stick): Adds richness and helps with caramelizing the vegetables.
- 2 yellow onions (peeled and quartered): Provides sweetness and body to the gravy.
- 8 carrots (washed and cut into 3-inch pieces): Sweet and earthy, they soften and absorb the savory juices.
- 1 cup red wine (Merlot or Cabernet Sauvignon recommended): Not just any wine, but one that adds depth and complexity to the broth.
- 2-3 cups low-sodium beef broth: Keeps everything moist while intensifying the beef flavors.
- 2 sprigs fresh rosemary: Offers an aromatic piney note that elevates the roast.
- 3 sprigs fresh thyme: Lends a subtle herbaceous touch that balances the dish.
How to Make Red Wine Pot Roast Recipe
Step 1: Prepare and Season the Beef
Begin by preheating your oven to 275°F and removing the beef from the fridge 30 minutes beforehand to bring it to room temperature. Generously season your chuck roast with kosher salt, freshly ground black pepper, and smoked paprika. This seasoning foundation is key to a bursting flavor once the roast hits the heat.
Step 2: Heat the Dutch Oven and Add Fat
Place a Dutch oven over medium-high heat and add the olive oil along with the butter. The combo of oil and butter not only prevents burning but creates a golden, flavorful base for searing your beef and vegetables.
Step 3: Sear the Roast to Lock in Juices
Carefully place your roast in the hot Dutch oven and resist the urge to move it for about 3 minutes to develop a beautiful crust. Flip and repeat on the other side. This caramelized exterior is essential for rich flavor before slow cooking. Once seared, set the roast aside on a platter.
Step 4: Caramelize Onions and Carrots
If the pot looks dry, add a touch more olive oil. Then, add the quartered onions cut side down and the chunks of carrot. Cook these until nicely caramelized, allowing their natural sweetness to deepen and add volume to your ensuing gravy.
Step 5: Deglaze with Red Wine
Reduce the heat to medium-low and slowly pour the red wine into the pan. Use a wooden spoon to scrape up all the delightful browned bits stuck to the bottom. This process releases intense, concentrated flavors that will make your pot roast irresistible.
Step 6: Return Roast and Add Broth
Nestle your roast back into the pot, positioning it atop the flavorful vegetables. Pour in 2 to 3 cups of low-sodium beef broth, enough to come about halfway up the roast, ensuring it stews beautifully and remains juicy.
Step 7: Add Fresh Herbs and Slow Roast
Lay the rosemary and thyme sprigs on top of the roast, cover the Dutch oven, and transfer it to your preheated oven. Let it cook low and slow for 3 to 4 hours until the beef is tender and falling apart, ideally reaching 195-200°F on an instant-read thermometer.
Step 8: Rest and Remove Herbs
Once done, carefully remove the lid (beware of hot steam). Transfer the roast to a rimmed platter and pull out the rosemary and thyme sprigs. Resting allows the juices to redistribute for perfect moisture.
Step 9: Make the Gravy
Using an immersion blender, purée the cooked onions, carrots, and pot juices right in the Dutch oven until your preferred consistency is achieved. Whether silky smooth or delightfully rustic with texture, this gravy is pure comfort in a spoon.
Step 10: Serve
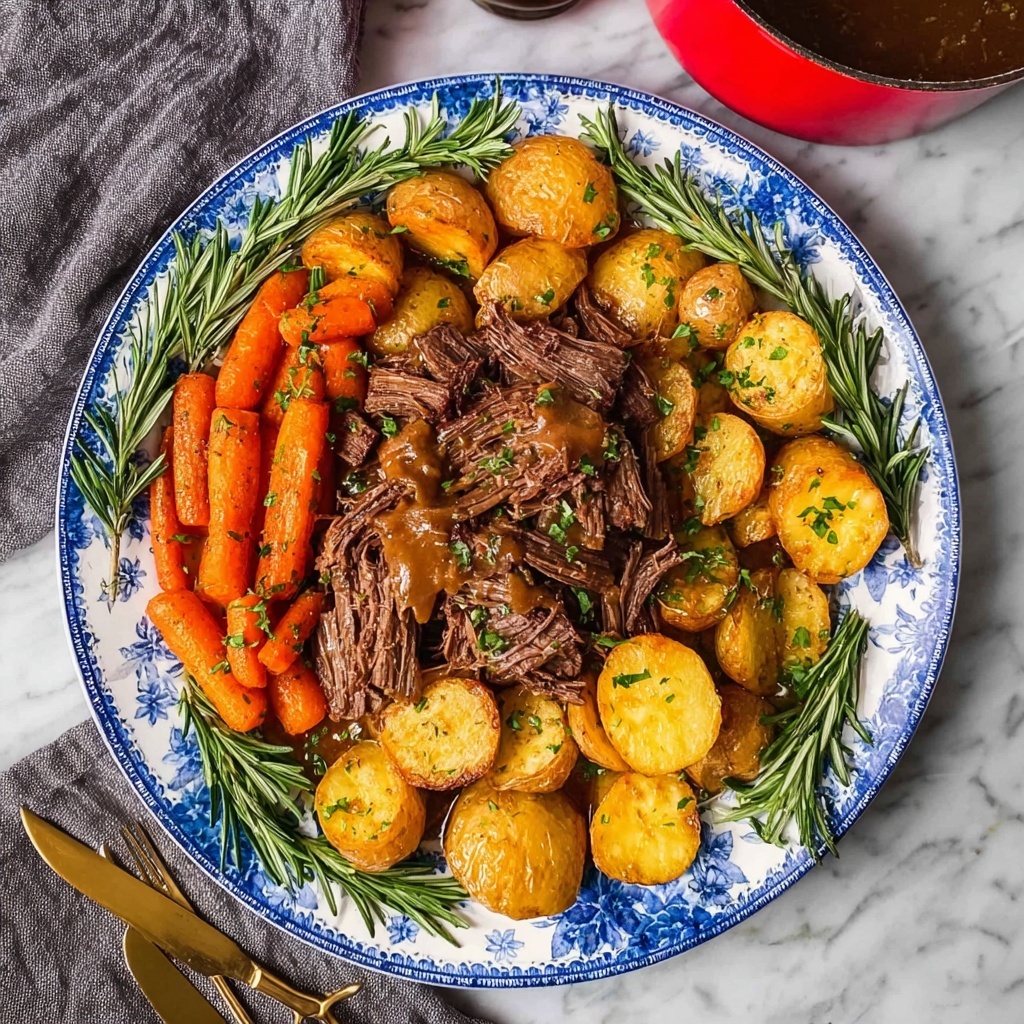
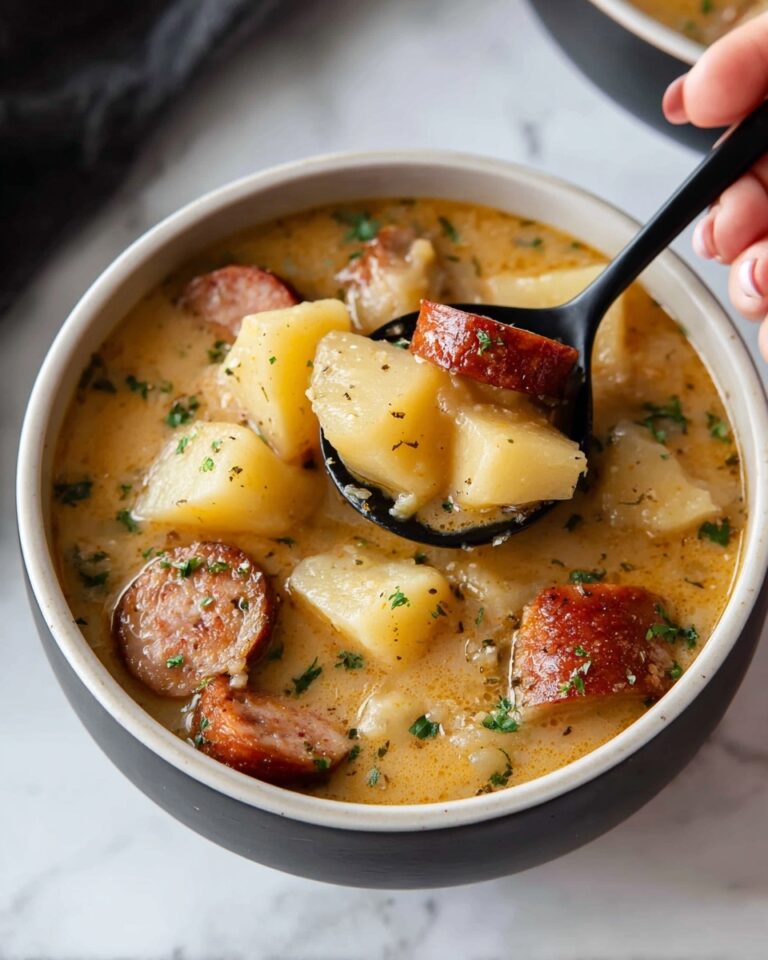
Shred or cut the roast into large, savory chunks and serve with the luscious gravy on the side. Every bite combines tender beef, rich sauce, and vegetables that have soaked up all the flavors.
How to Serve Red Wine Pot Roast Recipe
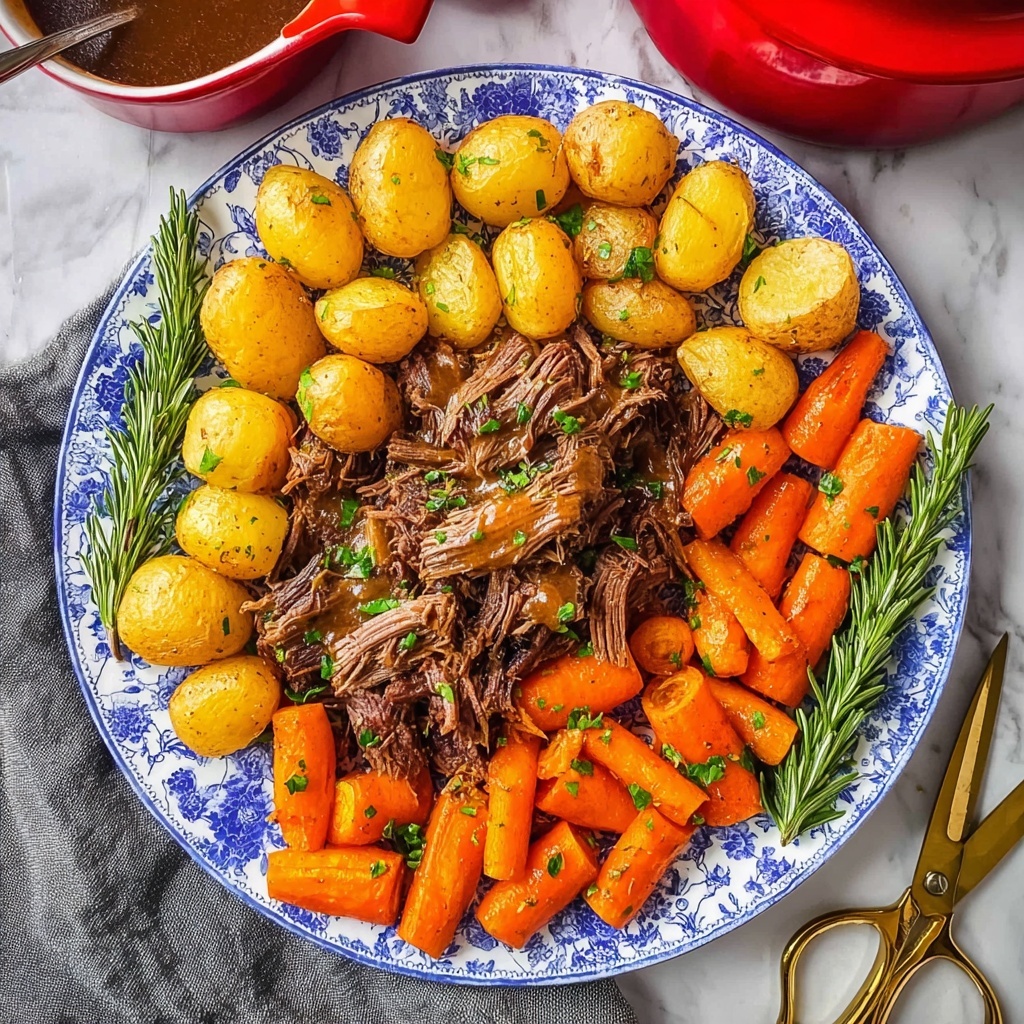
Garnishes
A sprinkle of freshly chopped parsley or a few thyme leaves on top brightens the deep colors and flavors of your pot roast. A dash of cracked black pepper adds a final punch and makes your presentation pop.
Side Dishes
This dish pairs wonderfully with creamy mashed potatoes, buttery egg noodles, or even a slice of hearty crusty bread to sop up every drop of that glorious gravy. Roasted green beans or sautéed mushrooms add both texture and freshness to round out the meal.
Creative Ways to Present
For a family-style presentation, serve the roast on a large wooden board surrounded by roasted vegetables and fresh herbs. Alternatively, plate individual servings atop a bed of mashed potatoes with a generous drizzle of gravy for a cozy but elegant touch.
Make Ahead and Storage
Storing Leftovers
Once cooled, store leftover pot roast and gravy separately in airtight containers in the refrigerator. Properly stored, your leftovers will stay fresh for up to 4 days, making it easy to enjoy each delicious bite the next day.
Freezing
This Red Wine Pot Roast Recipe freezes beautifully. Place cooled meat and gravy in freezer-safe containers or bags, removing as much air as possible. Freeze for up to 3 months, ready to thaw and warm up when you want a comforting meal fast.
Reheating
To reheat, gently warm pot roast and gravy in a covered skillet over low heat or in the microwave, stirring occasionally to ensure even heating. Adding a splash of beef broth or water can help maintain moisture so the meat stays tender.
FAQs
Can I use another cut of beef for this Red Wine Pot Roast Recipe?
While beef chuck roast is ideal for its fat content and tenderness after slow cooking, brisket or rump roast can also work well. Just keep in mind cooking times may vary slightly for optimal tenderness.
What type of red wine is best to use?
Choose a good quality dry red wine like Merlot or Cabernet Sauvignon. Avoid cooking wines or red wine vinegar, as they won’t deliver the depth of flavor that makes this pot roast special.
Is it necessary to sear the roast before cooking?
Yes! Searing creates a flavorful crust on the outside and caramelizes the meat’s natural sugars, adding complexity to your pot roast that slow cooking alone cannot achieve.
Can I prepare this recipe in a slow cooker instead of the oven?
Absolutely. After searing the roast and caramelizing the vegetables on the stove, transfer everything to your slow cooker. Cook on low for 6 to 8 hours or until fork-tender, adjusting liquids if necessary.
How do I know when the pot roast is done?
The roast is perfectly cooked when it reaches an internal temperature of 195 to 200°F. At this point, the meat is fork-tender and easy to shred, ensuring every bite is melt-in-your-mouth delicious.
Final Thoughts
This Red Wine Pot Roast Recipe is the kind of dish that feels like a celebration in your own kitchen yet is simple enough for a weeknight supper. The melding of rich wine, herbs, and slow-cooked beef creates a comforting, unforgettable meal you’ll want to make over and over. So go ahead — give yourself the gift of this cozy classic and watch how it brings everyone around your table a little closer.
“`
Print
Red Wine Pot Roast Recipe
- Prep Time: 20 minutes
- Cook Time: 4 hours
- Total Time: 4 hours 20 minutes
- Yield: 8 servings
- Category: Main Dish
- Method: Baking
- Cuisine: American
Description
This Red Wine Pot Roast recipe offers a tender and flavorful beef chuck roast slow-cooked in a rich blend of red wine, fresh herbs, and caramelized vegetables. Perfect for a hearty family meal, this classic dish boasts a deep, savory gravy made from the roast’s own juices and vegetables, creating a comforting and elegant dinner with minimal hands-on time.
Ingredients
Beef Roast and Seasoning
- 4 lbs beef chuck roast
- 4 tsp kosher salt
- 2 tsp freshly ground black pepper
- 1 tbsp smoked paprika
Cooking Fats
- 2 tbsp olive oil
- 2 tbsp unsalted butter (¼ stick)
Vegetables
- 2 yellow onions, peeled and quartered
- 8 carrots, washed and cut into 3-inch pieces
Liquids and Herbs
- 1 cup red wine (Merlot or Cabernet Sauvignon recommended)
- 2–3 cups low-sodium beef broth
- 2 sprigs fresh rosemary
- 3 sprigs fresh thyme
Instructions
- Preheat and Season: Preheat your oven to 275°F. Remove the beef chuck roast from the refrigerator 30 minutes before cooking to bring it to room temperature. Generously season the roast on all sides with kosher salt, freshly ground black pepper, and smoked paprika. Set the seasoned roast aside.
- Heat Fat and Prepare for Searing: Place a Dutch oven over medium-high heat and add the olive oil and unsalted butter. Allow the butter to melt and the oil to heat until shimmering but not smoking.
- Sear the Roast: Place the beef roast into the hot Dutch oven and let it sear undisturbed for about 3 minutes or until it develops a good browned crust. Flip the roast and sear the opposite side equally well. Once browned, transfer the roast to a platter and set aside.
- Caramelize Vegetables: If needed, add a bit more olive oil to the Dutch oven. Add the quartered onions with the cut side down and the carrot pieces to the pot. Cook the vegetables over medium-high heat until they start to caramelize and develop a rich color and sweetness, stirring occasionally to prevent burning.
- Deglaze with Wine: Reduce the heat to medium-low and slowly pour in the red wine. Use a wooden spoon or spatula to scrape up all the browned bits from the bottom of the pot. These bits add deep flavor to the dish and will enrich the cooking liquid.
- Return Roast and Add Broth: Place the seared roast back into the Dutch oven atop the vegetables. Pour 2 to 3 cups of low-sodium beef broth over the roast, making sure there’s enough liquid to come partially up the sides of the meat.
- Add Herbs and Roast: Lay the sprigs of fresh rosemary and thyme on top of the roast. Cover the Dutch oven with its lid and transfer it to the preheated oven. Roast the beef for about 3 to 4 hours or until it becomes fork-tender. The internal temperature should register between 195-200°F for shredding texture.
- Rest and Remove Herbs: Carefully transfer the pot to a cooling rack and remove the lid—be mindful of the steam. Transfer the roast to a rimmed platter. Remove and discard the rosemary and thyme stems from the pot.
- Make the Gravy: Using an immersion blender, purée the cooked vegetables and the remaining pot juices in the Dutch oven until your desired gravy consistency is achieved. You can blend to a smooth consistency or leave some texture for rustic appeal. If you don’t have an immersion blender, let the mixture cool for 30 minutes and carefully blend in batches in a countertop blender, taking care with the hot liquid.
- Serve: Pull the roast apart into large chunks or shred as desired. Serve the beef alongside or topped with the rich red wine gravy for an impressive and comforting meal.
Notes
- Allow the roast to come to room temperature before cooking to ensure even cooking.
- Do not use red wine vinegar; select a dry red wine such as Merlot or Cabernet Sauvignon for best flavor.
- Seal the roast well by searing to lock in juices and enhance flavor.
- Low-sodium beef broth helps control the salt level in the dish.
- The roasting temperature of 275°F ensures the meat cooks slowly and becomes tender without drying out.
- The internal temperature between 195°F and 200°F ensures the beef is tender enough to shred.
- Carefully handle hot liquids when pureeing gravy to avoid burns.
- This recipe can be made ahead; the flavors improve if reheated gently the next day.


