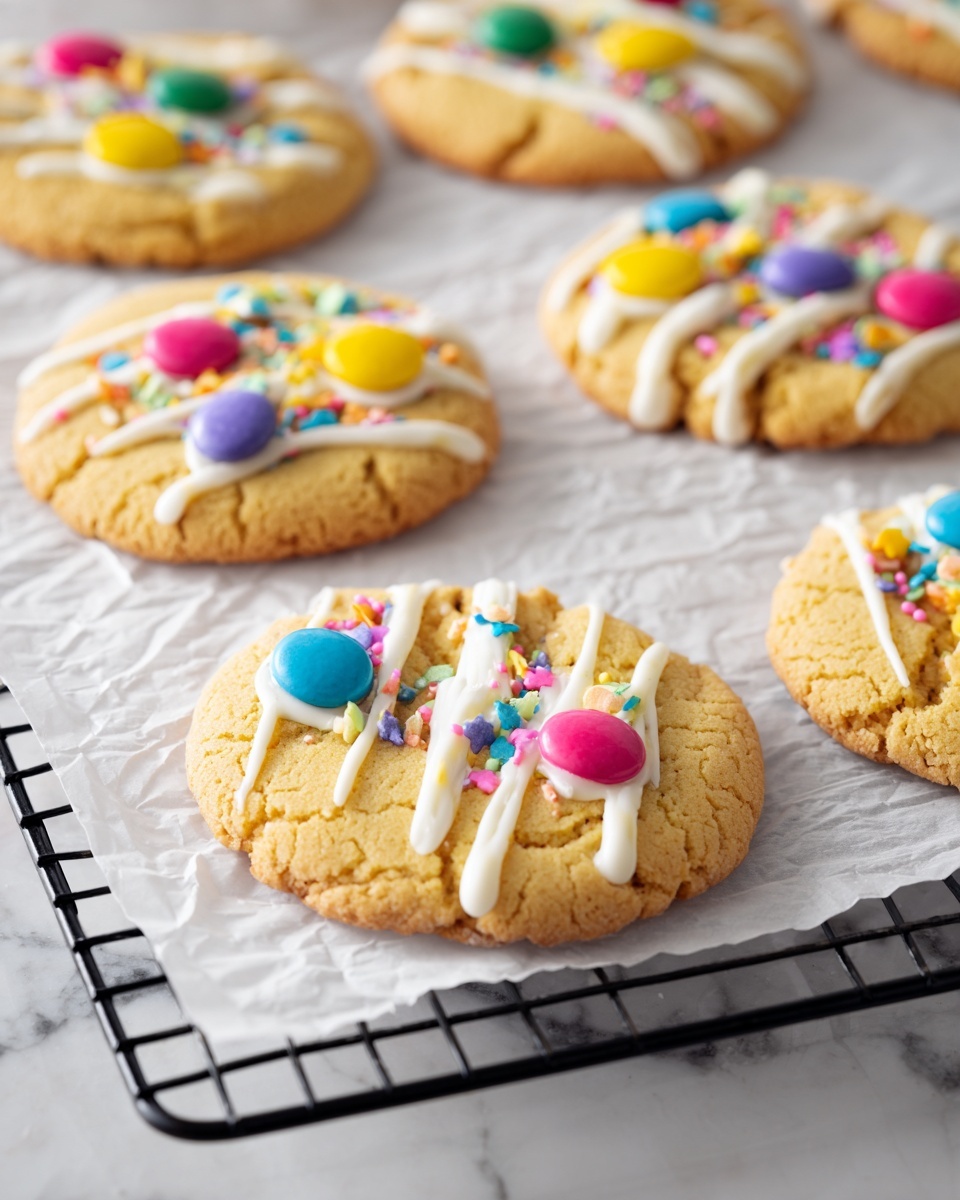
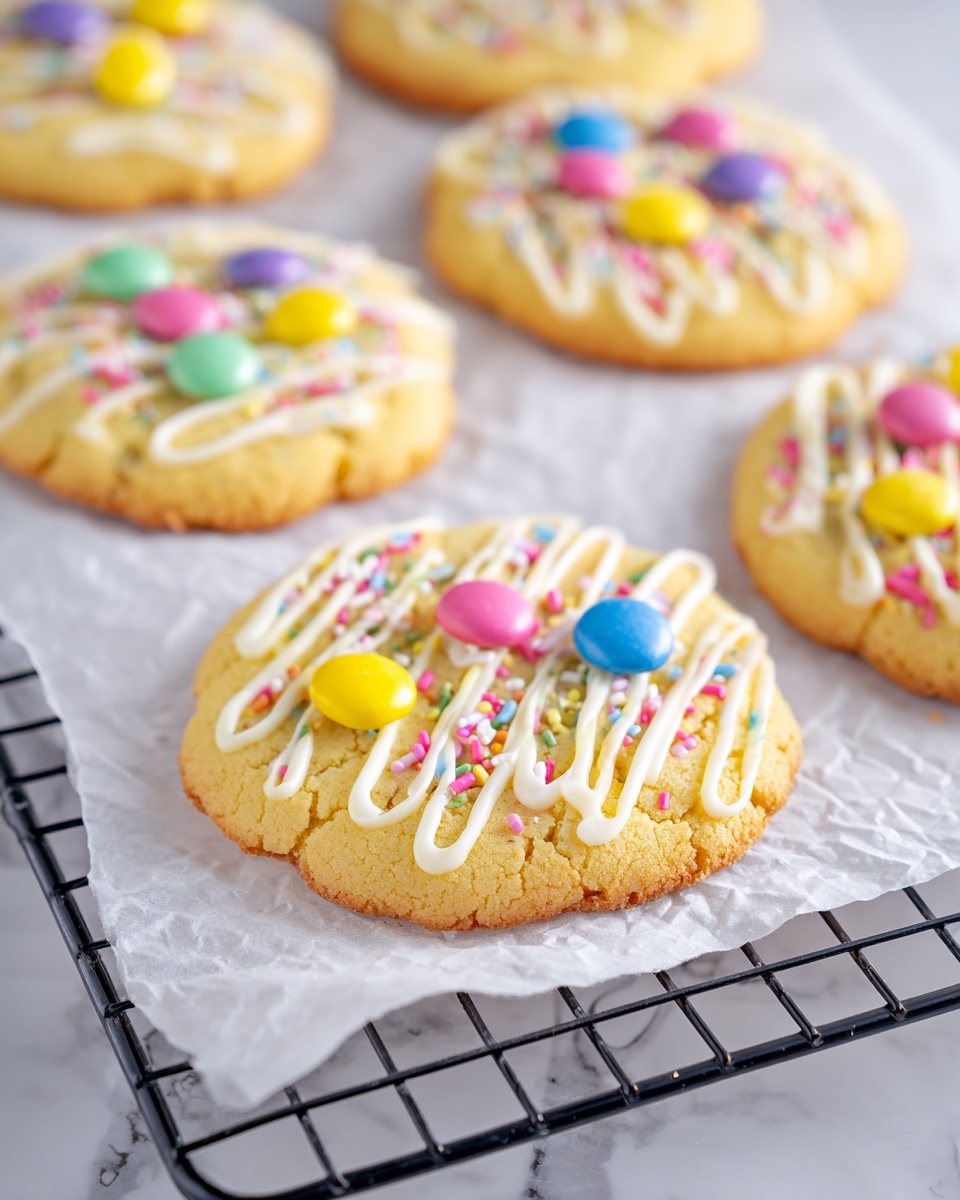
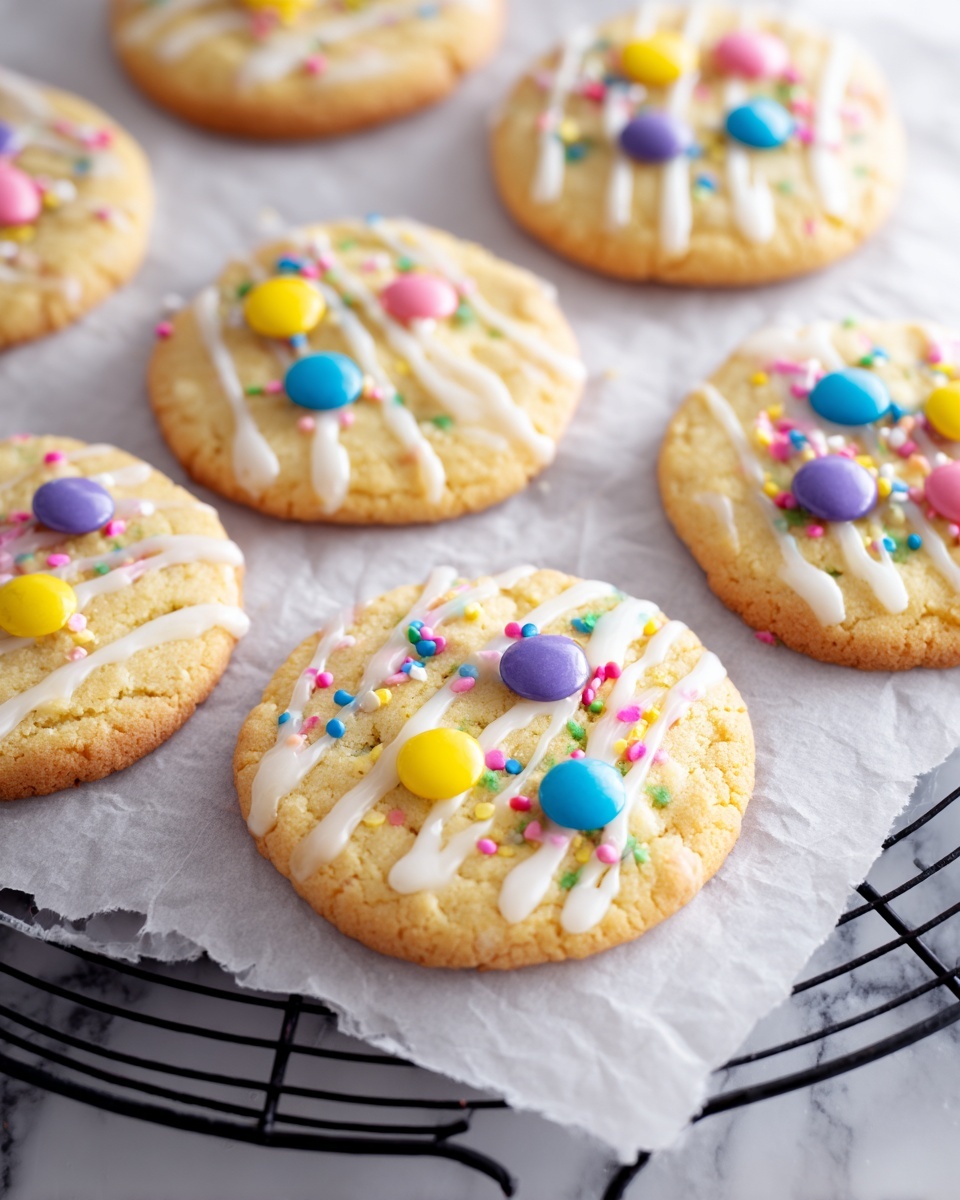
If you’re searching for a delightful treat that’s both charming and full of buttery goodness, this Pastel Candy-Centered Butter Cookies Recipe is absolutely your new best friend in the kitchen. Imagine tender, melt-in-your-mouth butter cookies with a glossy, colorful candy center that catches the light and your eye — a perfect blend of classic comfort with a playful twist. These cookies not only taste incredible but also brighten up any cookie platter or holiday celebration with their beautiful pastel hues. Whether you’re baking for family, friends, or just yourself, this recipe brings joy in every bite.
Ingredients You’ll Need
Simple ingredients come together in this Pastel Candy-Centered Butter Cookies Recipe, each playing a crucial role in crafting the perfect balance of flavor, texture, and stunning appearance. The richness of butter creates a tender crumb, powdered sugar smooths every bite, and crushed pastel candies add that magical pop of color and sweetness.
- 1 cup unsalted butter, softened: Provides rich, creamy texture and helps the cookies spread just right.
- 3/4 cup powdered sugar: Ensures a smooth sweetness that blends effortlessly with butter.
- 1 large egg yolk: Adds moisture and acts as a binder to hold the dough together beautifully.
- 1 teaspoon vanilla extract: Enhances flavor with warm, aromatic notes.
- 2 cups all-purpose flour: The foundation for the cookie’s sturdy yet tender structure.
- 1/4 teaspoon salt: Balances sweetness and deepens flavor complexity.
- 1/2 cup pastel hard candies, crushed: Creates that eye-catching centerpiece with bursts of fruity sweetness and color.
How to Make Pastel Candy-Centered Butter Cookies Recipe
Step 1: Prepare the Oven and Baking Sheets
Start by heating your oven to 350°F (175°C) and lining two baking sheets with parchment paper. This step ensures your cookies bake evenly and cleanly, preventing sticking and making cleanup a breeze.
Step 2: Cream Butter and Sugar
In a large mixing bowl, beat the softened butter together with the powdered sugar until the mixture is light, fluffy, and creamy. This whipping step is essential — it brings out the cookie’s tender texture and keeps each bite feeling irresistibly soft.
Step 3: Add Egg Yolk and Vanilla
Mix in the egg yolk and vanilla extract until fully incorporated. The egg yolk enriches the dough with moisture and silkiness, while vanilla adds depth and warmth to the flavor profile.
Step 4: Incorporate Dry Ingredients
Gradually stir in the all-purpose flour and salt until a soft, slightly sticky dough forms. Take your time to combine everything evenly without overmixing, which keeps the cookies tender rather than tough.
Step 5: Shape the Cookies and Add Candy Centers
Roll the dough into 1-inch balls and set them on your baking sheets, spacing each about 2 inches apart. Use your thumb or the back of a spoon to gently press an indent into the center of each ball. Fill this little well with about 1/2 teaspoon of the crushed pastel candies — this is what makes these cookies so wonderfully unique!
Step 6: Bake to Perfection
Bake for 10–12 minutes, or until the cookies have set and the candy centers melt into a glossy, stained-glass masterpiece. Let the cookies cool completely on the baking sheet; this step prevents the candy centers from cracking and ensures that gorgeous shine remains intact.
How to Serve Pastel Candy-Centered Butter Cookies Recipe
Garnishes
You can elevate your cookies even more by dusting a little powdered sugar around the serving plate for a snowy effect or adding edible glitter on top to catch the light. Fresh mint leaves or small edible flowers nearby add a burst of natural color that complements those pastel candies perfectly.
Side Dishes
Pair these butter cookies with a warm cup of tea, freshly brewed coffee, or even a glass of cold milk for a classic combination. They’re also fantastic alongside a light fruit salad or a scoop of vanilla ice cream when you want an extra indulgent dessert moment.
Creative Ways to Present
Arrange the cookies on a colorful platter in a circular pattern to highlight their candy centers, or package them in cute cellophane bags tied with pastel ribbons for a delightful gift. You can even nestle each cookie in mini cupcake liners to add texture and make serving extra fun and convenient.
Make Ahead and Storage
Storing Leftovers
Store your leftover Pastel Candy-Centered Butter Cookies in an airtight container at room temperature. This keeps the cookie soft and preserves the shiny candy centers from drying out or becoming sticky. They’re best enjoyed within a week for maximum freshness.
Freezing
If you want to save them for later, wrap the cookies individually in plastic wrap and place them in a freezer-safe container. When properly stored, they maintain their deliciousness for up to three months and thaw wonderfully without losing texture.
Reheating
To bring back that freshly baked warmth, pop the cookies in a preheated oven at 300°F for about 5 minutes. Avoid microwaving, as that can soften the candy center too much and make the cookies sticky. The oven method refreshes the cookies perfectly.
FAQs
Can I use different types of hard candies?
Absolutely! While pastel candies like Jolly Ranchers or Lifesavers work best for the colorful effect, you can experiment with your favorite hard candies. Just ensure they’re crushed finely so they melt evenly during baking.
What if I don’t have unsalted butter?
Using salted butter is fine, but reduce the amount of added salt in the recipe slightly to avoid an overly salty cookie. Unsalted butter gives you better control over the flavor balance.
Why do I need to cool the cookies on the baking sheet?
Cooling on the baking sheet allows the candy centers to firm up gradually, preventing cracks or dulling of their shiny appearance. Moving them too soon can disrupt the candy as it sets.
Can I make these cookies gluten-free?
You can try substituting the all-purpose flour with a gluten-free flour blend, but results may vary. Make sure your blend contains xanthan gum or another binding agent to help the dough hold together properly.
How colorful can I make the candy centers?
The sky’s the limit! Using different pastel hard candies or mixing colors can create stunning, jewel-like centers that brighten up your cookies and make them perfect for any festive occasion or season.
Final Thoughts
This Pastel Candy-Centered Butter Cookies Recipe is a whimsical and tasty way to brighten your baking routine. With simple ingredients and straightforward steps, you can create cookies that look as delightful as they taste. Sharing these with friends or enjoying them as a special treat is sure to bring a big smile. Give this recipe a try — your cookie jar will thank you!
Print
Pastel Candy-Centered Butter Cookies Recipe
- Prep Time: 15 minutes
- Cook Time: 12 minutes
- Total Time: 27 minutes
- Yield: 24 cookies
- Category: Dessert
- Method: Baking
- Cuisine: American
- Diet: Vegetarian
Description
These Pastel Candy-Centered Butter Cookies are delightful buttery treats featuring a crunchy candy core that melts into a glossy, colorful center. Perfect for festive occasions or everyday snacking, these cookies combine a soft, rich dough with vibrant crushed pastel candies, delivering both texture and visual appeal.
Ingredients
Cookie Dough
- 1 cup unsalted butter, softened
- 3/4 cup powdered sugar
- 1 large egg yolk
- 1 teaspoon vanilla extract
- 2 cups all-purpose flour
- 1/4 teaspoon salt
Candy Center
- 1/2 cup pastel hard candies (like Jolly Ranchers or Lifesavers), crushed
Instructions
- Preheat and prepare baking sheets: Preheat your oven to 350°F (175°C) and line two baking sheets with parchment paper to ensure the cookies bake evenly and don’t stick.
- Cream butter and sugar: In a large mixing bowl, cream the softened butter and powdered sugar together using a mixer or spatula until the mixture becomes light and fluffy, which creates a smooth base for the dough.
- Add egg yolk and vanilla: Mix in the egg yolk and vanilla extract until fully incorporated, which helps bind the dough while adding richness and flavor.
- Incorporate dry ingredients: Gradually stir in the all-purpose flour and salt until a soft dough forms. Stir just until combined to keep the cookies tender.
- Shape the dough: Roll the dough into 1-inch balls and place them about 2 inches apart on the prepared baking sheets to allow room for spreading.
- Create indentations and add candy: Use your thumb or the back of a spoon to make a small indent in the center of each dough ball. Fill each indentation with approximately 1/2 teaspoon of crushed pastel candies to create the candy centers.
- Bake the cookies: Bake for 10 to 12 minutes, or until the cookies are set and the candy centers are melted and glossy, indicating they are perfectly baked.
- Cool the cookies: Allow the cookies to cool completely on the baking sheets before moving them. This prevents the candy centers from cracking as they set.
Notes
- Use different candy colors to customize for seasonal themes or holidays to make the cookies festive.
- Ensure candies are fully crushed to help them melt evenly and achieve a smooth center.
- Store cookies in an airtight container to preserve the glossy candy centers and maintain freshness.


