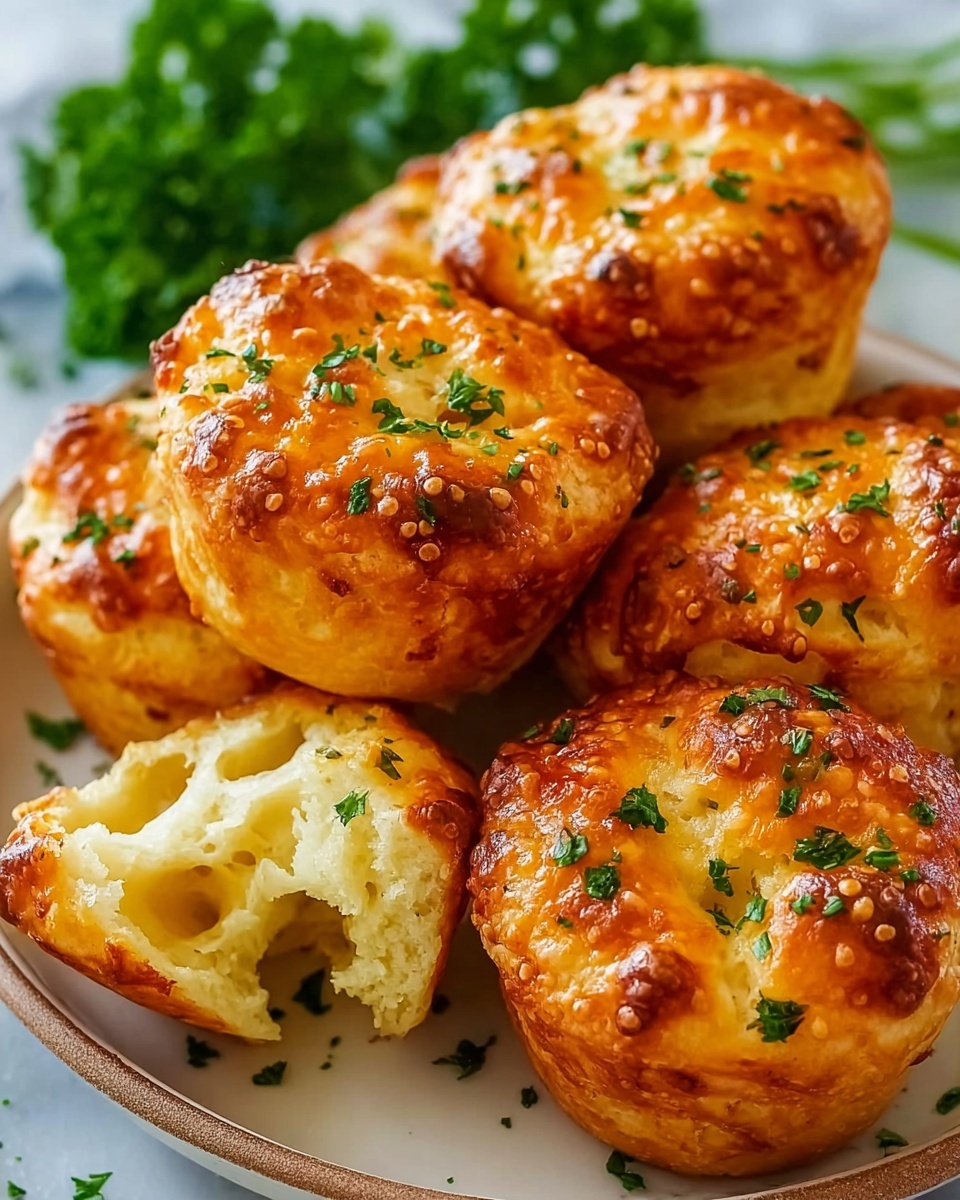
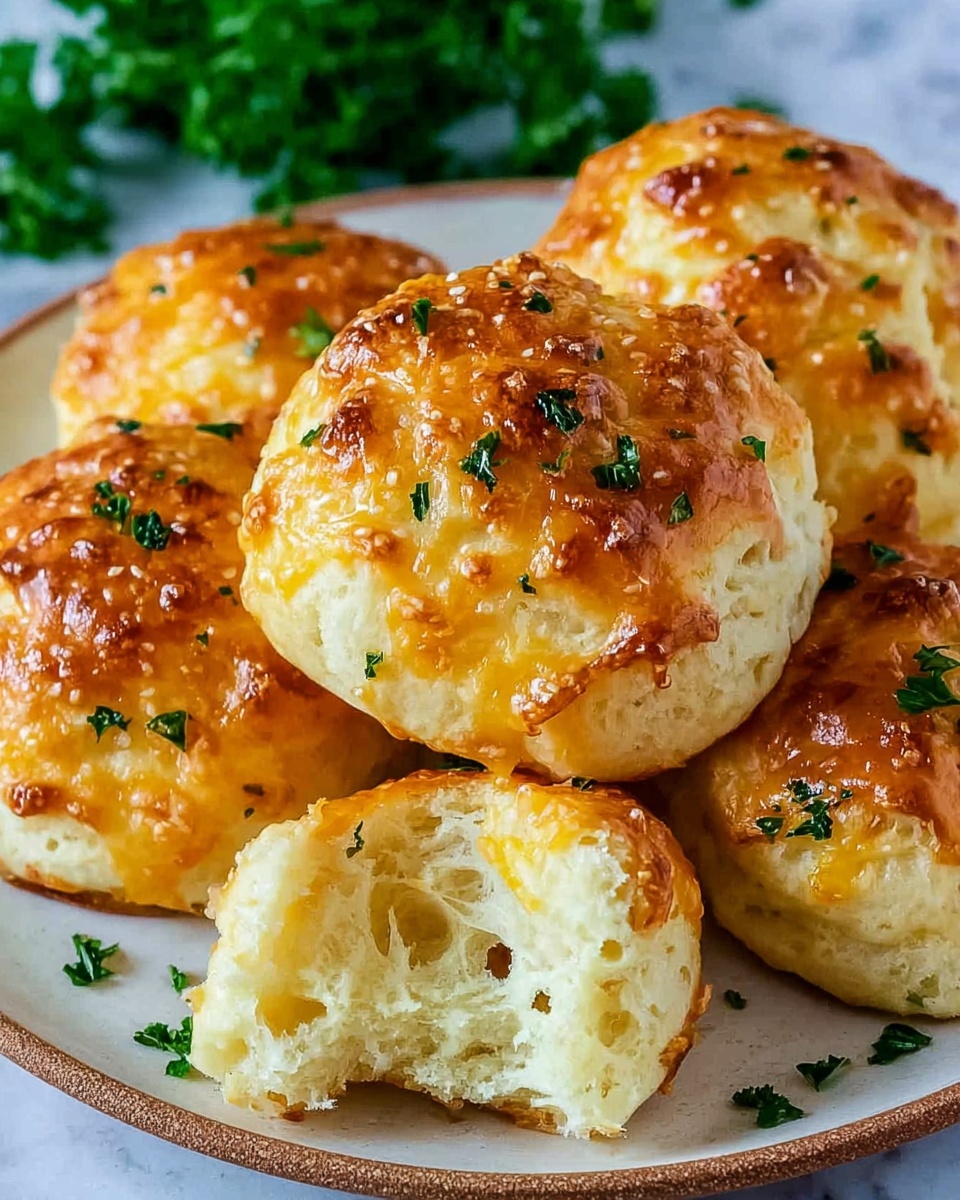
There is something truly comforting about warm, soft rolls loaded with a burst of garlicky flavor, and the Keto Garlic Rolls Recipe nails that craving without any of the traditional carbs. These rolls are not just perfect for anyone following a low-carb lifestyle but also a delicious treat for garlic lovers who want a warm, comforting side that won’t sabotage their diet. Made with simple ingredients like mozzarella, almond flour, and fresh garlic, they offer a delightful chewiness and buttery garlic aroma that will have you reaching for seconds. Whether you’re pairing them with soup, salad, or as an accompaniment to your favorite keto entrée, these rolls are a game changer in the world of keto baking.

Ingredients You’ll Need
This recipe keeps things beautifully simple but purposeful. Each ingredient plays a starring role in creating that perfect balance of soft, cheesy texture and rich garlic flavor, making your rolls irresistible from the first bite.
- Shredded mozzarella cheese: Provides the stretchy, melty base for the dough, giving it that classic soft roll texture.
- Cream cheese: Adds creaminess and moisture, helping bind the dough while keeping it tender.
- Almond flour: Keeps the recipe low-carb while adding a subtle nutty flavor and structure.
- Baking powder: The secret to light and fluffy rolls by giving them a gentle rise.
- Garlic powder: Intensifies the garlic taste within the dough for consistent flavor.
- Salt: Enhances all the flavors and balances the richness of the cheeses.
- Large egg: Acts as a binder and adds richness, helping the dough hold together.
- Melted butter: Brushed on top for a golden, buttery finish that also carries fresh garlic.
- Minced garlic: Fresh garlic ensures that authentic, vibrant garlic flavor that’s absolutely essential.
- Fresh parsley (chopped): Adds color and a fresh herbal note to brighten the rolls.
- Grated Parmesan cheese: Sprinkled on top for a slightly salty crust and extra flavor complexity.
How to Make Keto Garlic Rolls Recipe
Step 1: Prepare the cheesy base
Start by preheating your oven to 375°F (190°C) and lining a baking sheet with parchment paper to prevent sticking. Combine the shredded mozzarella and cream cheese in a microwave-safe bowl and heat in short 30-second bursts, stirring each time until smooth and fully melted. This ensures your cheese mixture is perfectly creamy and ready to form the base of the dough.
Step 2: Mix the dry ingredients
In a separate bowl, whisk together the almond flour, baking powder, garlic powder, and salt. These dry ingredients add flavor, structure, and a fluffy quality that make the rolls satisfying without any wheat or gluten.
Step 3: Combine wet and dry for dough
To the melted cheese mixture, add the dry ingredients along with the large egg. Use a sturdy spoon or your hands to bring everything together into a dough. If it feels too sticky, don’t worry! Lightly oil your hands or chill the dough briefly to make handling easier. The dough should be pliable and ready to shape.
Step 4: Shape the rolls
Divide the dough evenly into 8 portions, rolling each into a small, smooth ball. Arrange these neatly on the prepared baking sheet, leaving a little space between each to allow baking expansion.
Step 5: Add garlic butter topping and cheese
Mix melted butter with minced fresh garlic in a small bowl – this is where the magic happens. Brush the buttery garlic mixture generously over every roll, then sprinkle each with grated Parmesan cheese. This will create a beautifully golden and savory crust as they bake.
Step 6: Bake until golden
Place the baking sheet in the oven and bake the rolls for about 15 to 18 minutes. You’ll know they’re done when they’ve puffed up and turned a gorgeous golden brown on top, tempting you to dive right in.
How to Serve Keto Garlic Rolls Recipe
Garnishes
A simple sprinkle of freshly chopped parsley adds a pop of color and fresh brightness to these rich rolls. It balances the deep garlic flavor and makes them look extra inviting on your table.
Side Dishes
These garlic rolls make an amazing companion to soups, stews, and hearty salads. If you’re serving a low-carb pasta or zoodle dish, these rolls add just the right touch of indulgence. They also pair wonderfully with grilled meats or your favorite keto chili.
Creative Ways to Present
For a fun twist, slice the rolls horizontally and fill them with slices of melted mozzarella and fresh basil for mini garlic roll sandwiches. Or arrange them in a circular baking dish to make pull-apart garlic rolls perfect for sharing. Either way, they’re bound to impress anyone you serve.
Make Ahead and Storage
Storing Leftovers
Once cooled completely, store your leftover keto garlic rolls in an airtight container to maintain freshness. They’ll stay soft and tasty for up to 3 days – perfect for quick snack cravings or a side with any meal.
Freezing
If you’re making a big batch, these rolls freeze beautifully. Wrap each roll individually or store in a freezer-safe container. When ready, thaw overnight in the fridge to keep their texture intact.
Reheating
To bring your rolls back to life, pop them in a preheated oven or air fryer for a few minutes until warm and slightly crisp on the outside. This refreshes the garlic butter aroma and gives you that just-baked feeling again.
FAQs
Can I substitute the almond flour with coconut flour?
Coconut flour behaves very differently than almond flour and absorbs more liquid, so substituting it 1:1 will change the dough’s texture drastically. For this recipe, it’s best to stick with almond flour to maintain the ideal softness and structure of the rolls.
Is it possible to make these rolls dairy-free?
Because mozzarella and cream cheese are essential to this recipe’s texture, making it dairy-free would require a completely different method and ingredients. However, you might experiment with dairy-free cheese options, but expect a different texture and flavor.
How do I make the rolls less sticky to handle?
If the dough feels sticky, lightly oil your hands when shaping the rolls or chill the dough in the fridge for 10-15 minutes. This helps the dough firm up and makes it much easier to roll into neat balls without sticking to your fingers.
Can I add herbs or spices to the dough?
Absolutely! Adding Italian seasoning, dried oregano, or even a pinch of red pepper flakes can elevate the flavors. Just incorporate them with the dry ingredients for an herby or spicy garlic roll experience.
How long do these rolls stay fresh?
Freshly baked keto garlic rolls are best enjoyed the same day for that perfect softness, but they keep well in an airtight container for about 3 days in the fridge. After that, they may start to dry out or lose their softness.
Final Thoughts
There you have it—a deliciously soft, savory, and utterly addictive Keto Garlic Rolls Recipe that proves keto baking can be both simple and indulgent. These rolls are an absolute crowd-pleaser, whether you’re new to keto or just love garlic goodness. Don’t hesitate—whip up a batch, and enjoy that warm, cheesy, buttery comfort at home. Your taste buds will thank you!
Print
Keto Garlic Rolls Recipe
- Prep Time: 10 minutes
- Cook Time: 18 minutes
- Total Time: 28 minutes
- Yield: 8 rolls
- Category: Side Dish
- Method: Baking
- Cuisine: American
- Diet: Gluten Free
Description
These Keto Garlic Rolls are soft, flavorful, and perfect for anyone following a low-carb or gluten-free diet. Made with a combination of mozzarella, cream cheese, and almond flour, they offer a delicious alternative to traditional bread rolls. Enhanced with garlic butter and Parmesan cheese, these rolls bring a warm, cheesy, and garlicky touch to any meal.
Ingredients
Cheese Mixture
- 1 1/2 cups shredded mozzarella cheese
- 2 tablespoons cream cheese
Dry Ingredients
- 1 cup almond flour
- 1 teaspoon baking powder
- 1/2 teaspoon garlic powder
- 1/4 teaspoon salt
Other Ingredients
- 1 large egg
- 2 tablespoons melted butter
- 1 clove garlic, minced
- 1 tablespoon fresh parsley, chopped
- 2 tablespoons grated Parmesan cheese
Instructions
- Preheat Oven: Preheat your oven to 375°F (190°C) and line a baking sheet with parchment paper to prevent sticking.
- Prepare Cheese Mixture: In a microwave-safe bowl, combine the shredded mozzarella cheese and cream cheese. Microwave in 30-second intervals, stirring between each interval, until the mixture is melted smoothly.
- Mix Dry Ingredients: In a separate bowl, whisk together the almond flour, baking powder, garlic powder, and salt to evenly distribute the dry components.
- Form Dough: Add the dry ingredients and the egg to the melted cheese mixture. Stir until a dough forms. If the dough feels too sticky, knead it gently with lightly oiled hands or chill it briefly to make it easier to handle.
- Shape Rolls: Divide the dough into 8 equal portions. Shape each portion into a small roll and place them evenly spaced on the prepared baking sheet.
- Prepare Garlic Butter: In a small bowl, combine the melted butter with the minced garlic. Brush this garlic butter mixture generously over each roll.
- Add Parmesan and Bake: Sprinkle the rolls with grated Parmesan cheese. Bake in the preheated oven for 15–18 minutes, or until the rolls are golden brown and cooked through.
- Garnish and Serve: Remove the rolls from the oven, sprinkle with fresh chopped parsley for added flavor and color, and serve warm.
Notes
- These rolls are best served warm and are perfect fresh out of the oven.
- Store leftovers in an airtight container for up to 3 days.
- To reheat, warm the rolls in the oven or air fryer to maintain their texture.
- For added flavor, try incorporating Italian seasoning or extra Parmesan cheese into the dough.
