If you’re craving a festive, spooktacular dessert that’s both delightful to make and a total crowd-pleaser, then you absolutely must try this Graveyard Pudding Recipe. It’s packed with rich devil’s food cake, creamy white chocolate pudding tinted in eerie neon hues, and topped with crunchy cookie crumbs and Halloween-themed decorations that bring a playful graveyard to life right on your plate. Whether you’re celebrating a Halloween party or just want a fun and unforgettable treat, this recipe is surprisingly simple yet impressively delicious, making it a go-to for spooky season and beyond.
Ingredients You’ll Need
This Graveyard Pudding Recipe relies on a handful of simple, pantry-friendly ingredients that each add their own magic to the final dessert. From the deep, chocolatey base to the colorful, creamy layers and crunchy toppings, every element plays a special role in flavor, texture, and that Halloween wow factor.
- Devil’s food cake mix: Provides a rich, moist chocolate cake foundation that’s quick and fuss-free to bake.
- Water, oil, and eggs: These wet ingredients combine perfectly to bring the cake mix to life with the texture you expect.
- White chocolate instant pudding mix: Creates a smooth, creamy, and sweet contrast layer that balances the chocolate cake beautifully.
- Cold milk: Essential for preparing the pudding and helping it set with the perfect consistency.
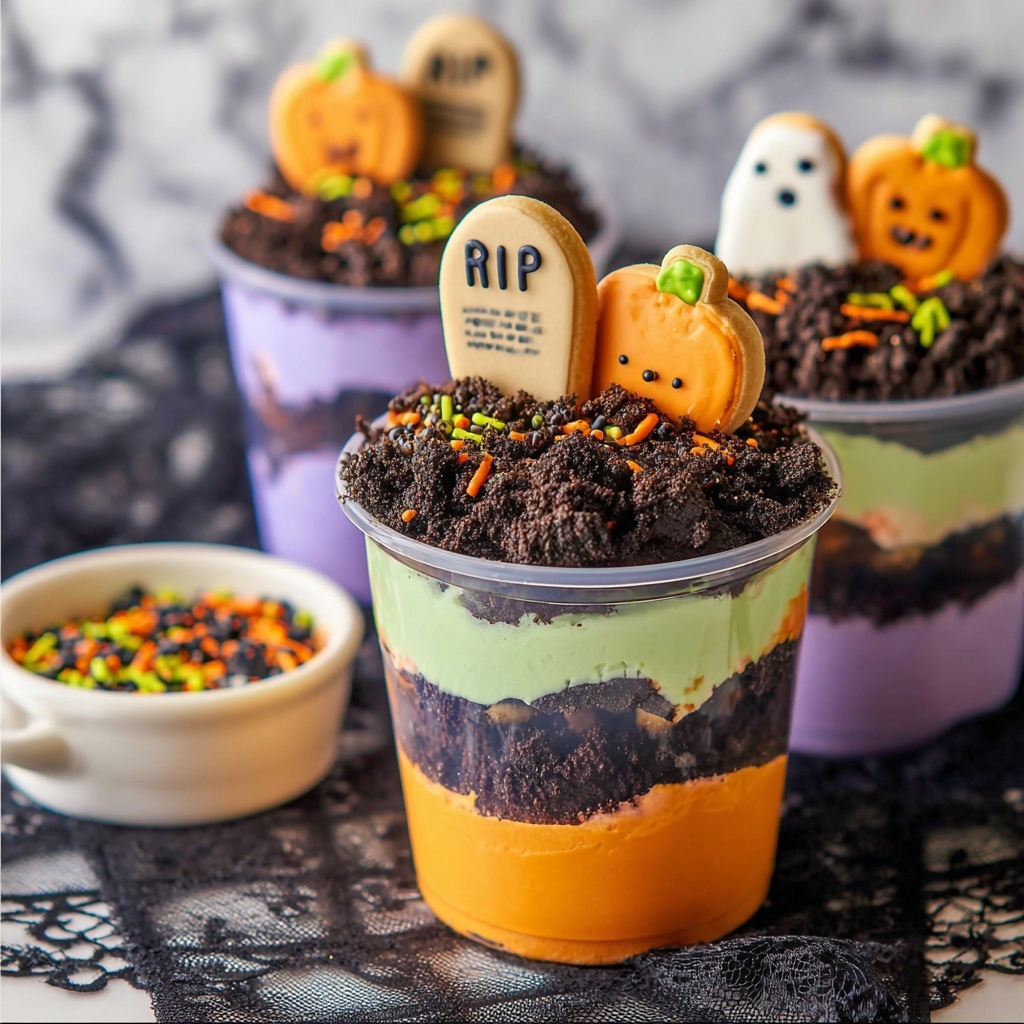
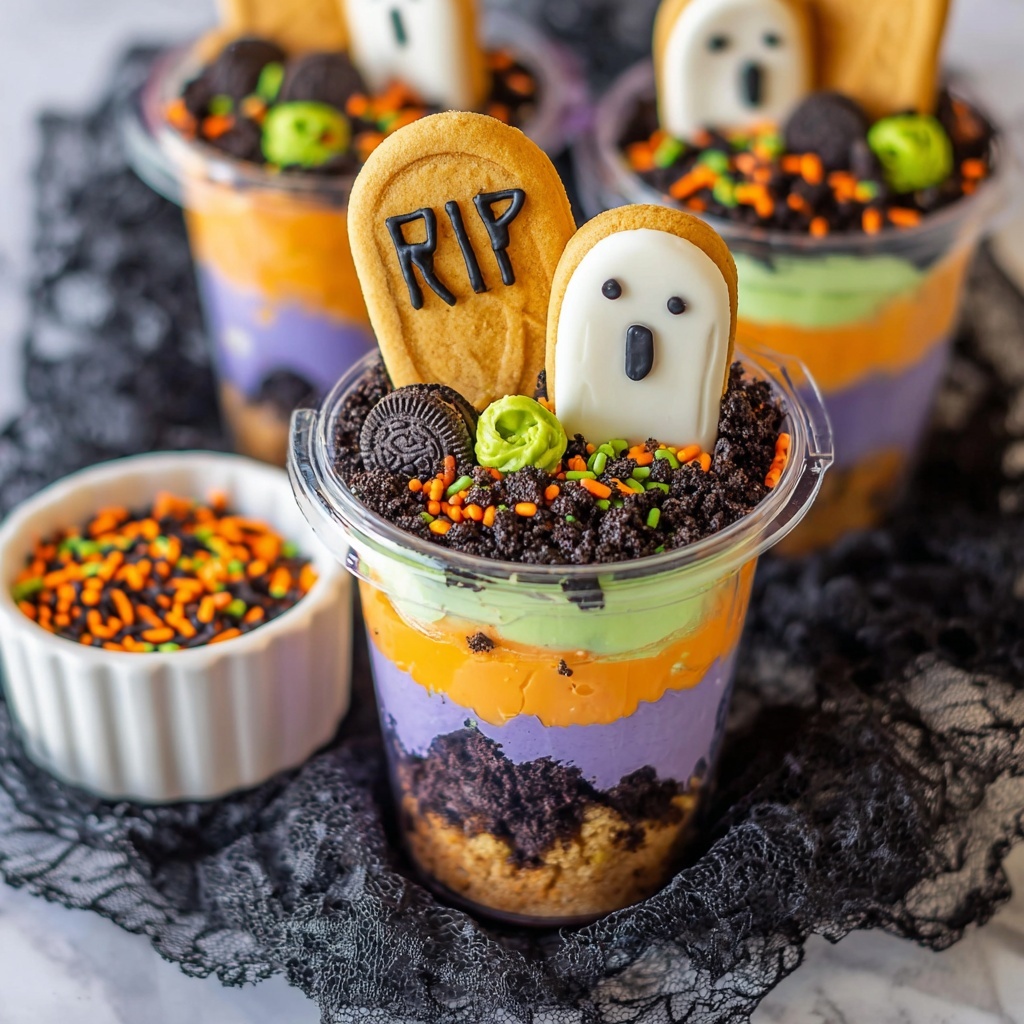
- Neon green, orange, and purple food coloring: Make the pudding layers pop with vibrant, ghoulish colors for a festive look.
- Oreo cookies (crushed): Add a crumbly “dirt” texture topping that enhances both flavor and spooky effect.
- Milano cookies: Serve as brilliant little gravestones once painted and decorated.
- Halloween candy and sprinkles: Bring the whole dessert to life with fun, colorful touches full of festive spirit.
How to Make Graveyard Pudding Recipe
Step 1: Prepare and Bake the Chocolate Cake
Start by preheating your oven to 350 degrees Fahrenheit. In a large bowl, mix together the devil’s food cake mix, water, oil, and eggs according to the package directions. Pour the batter into a greased 9×13 baking dish and bake for about 30 to 35 minutes, or until a toothpick inserted in the center comes out clean. Once baked, slice the cake into bite-size squares and set aside to cool completely — this chocolate base is the heart of your graveyard!
Step 2: Make the White Chocolate Pudding
While the cake cools, whisk together the instant white chocolate pudding mix and cold milk until thickened and smooth. This creamy pudding will be the luscious contrast against the dark chocolate, and it’s the perfect base for your spooky colored layers.
Step 3: Divide, Color, and Fold the Pudding
Carefully separate the pudding into three smaller bowls. Use your neon green, orange, and purple food coloring to tint each bowl to a vibrant, Halloween-perfect shade. Gently fold in whipped topping to lighten the texture and make each layer wonderfully smooth and fluffy—this is what makes your pudding layers irresistibly dreamy and fun.
Step 4: Assemble the Layers
Grab your serving buckets or clear cups, and start layering! Add a small amount of cake crumbs to the bottom, then spoon a layer of one colored pudding on top. Repeat this layering process for each color of pudding so you get three distinct, vibrant layers stacked on top of each other, creating an eerie effect reminiscent of a haunted graveyard.
Step 5: Add Cookie Crumbs and Decorate
Sprinkle the top of each pudding creation generously with crushed Oreo cookies to mimic the “dirt” of your graveyard. Carefully cut the bottoms off Milano cookies and use a little food coloring and a fine paintbrush to write spooky messages like “R.I.P.” on them before standing them upright as gravestones. Complete your eerie scene with Halloween candy and colorful sprinkles spread around for that extra festive pop.
Step 6: Chill and Serve
Place your completed graveyard buckets in the refrigerator for at least an hour to let the pudding set perfectly and the flavors meld together. Once chilled, your Graveyard Pudding Recipe is ready to serve — a frightfully fun and delicious dessert that’s sure to impress!
How to Serve Graveyard Pudding Recipe

Garnishes
Garnishing this dessert is where your creativity shines! Besides the classic crushed Oreos and painted Milano cookies, consider adding gummy worms crawling through the “dirt,” edible glitter for a spooky shimmer, or a drizzle of chocolate syrup for a “muddy” effect. These little touches make the dessert interactive and delightfully playful for kids and adults alike.
Side Dishes
This pudding pairs wonderfully with light, fresh accompaniments to balance its richness. Try serving alongside crisp apple slices, a simple citrus salad, or even a tangy berry compote. These sides refresh the palate and add a contrasting texture and flavor that highlight the pudding’s decadent layers beautifully.
Creative Ways to Present
For an extra spooky presentation, serve your Graveyard Pudding Recipe in mini cauldrons or mason jars decorated with Halloween ribbons and labels. You could even place small plastic skeleton hands or graveyard-themed picks into each jar for that extra eerie atmosphere that will wow your guests at any party or family gathering.
Make Ahead and Storage
Storing Leftovers
If you happen to have any leftovers, make sure to cover the pudding containers tightly with plastic wrap or an airtight lid and store them in the refrigerator. They will keep fresh for up to 3 days, allowing you to enjoy a spooky treat even after the Halloween fun winds down.
Freezing
Freezing is not recommended for this dessert due to the creamy pudding layers, which can separate or become grainy after thawing. It’s best enjoyed fresh or within a few days for optimal texture and flavor.
Reheating
This recipe is ideally served cold and does not require reheating. If you prefer, you can let the pudding sit out at room temperature for 10 to 15 minutes to take the chill off before serving, but avoid warming it as it will lose its perfect creamy texture.
FAQs
Can I make the Graveyard Pudding Recipe vegan?
You can adapt this recipe by choosing a vegan devil’s food cake mix and using plant-based milk and pudding mixes designed for vegan diets. Just be sure to use vegan-friendly cookies and whipped toppings, and you’ll have a delicious, cruelty-free spooky treat.
What can I use instead of food coloring?
If you prefer natural alternatives, you can experiment with beet juice for red, matcha powder for green, or blueberry juice for purple, but the vibrant neon shades are hard to replicate naturally. Just keep in mind that natural colors may slightly change the flavor and the spooky aesthetic.
How far ahead can I assemble the pudding?
You can assemble the pudding layers and decorations up to a day in advance. Just make sure they are well-covered and refrigerated overnight for the best flavor melding and ease of serving on party day.
Can I make this recipe in larger or smaller portions?
Absolutely! This recipe is quite flexible. Simply scale the ingredients proportionally to suit your gathering size, and use containers accordingly. Individual portions in cups or small jars make for easy party servings.
What other toppings would you recommend for Graveyard Pudding Recipe?
In addition to cookies and candy, crushed pretzels can add a salty crunch, toasted coconut flakes can give a ghostly touch, and mini marshmallows can double as little tombstones or ghosts. Have fun mixing and matching to fit your spooky vision!
Final Thoughts
This Graveyard Pudding Recipe is such a joyful way to bring Halloween magic into your kitchen. Its layers of rich chocolate, colorful pudding, and crunchy toppings come together to create a dessert that’s just as fun to make as it is to eat. Trust me, once you try it, it will become a beloved tradition for every spooky celebration you host. So get those ingredients ready, and let’s dig into some hauntingly good pudding fun!
Print
Graveyard Pudding Recipe
- Prep Time: 30 minutes
- Cook Time: 30 minutes
- Total Time: 1 hour
- Yield: 10 servings
- Category: Dessert
- Method: Baking
- Cuisine: American
Description
Graveyard Pudding is a spooky and fun layered dessert perfect for Halloween parties. Featuring layers of moist devil’s food cake, colorful white chocolate pudding, crushed Oreo crumbs, and decorated Milano cookies turned into gravestones, this treat combines rich chocolate flavors with vibrant colors and festive decorations. Ideal for serving in individual buckets or cups, it’s a creative and delightful way to celebrate the season.
Ingredients
Cake
- 1 (15.25 oz) Devil’s Food Cake Mix
- Water, oil, and eggs as called for on the cake mix box
Pudding
- 2 (3.4 oz) packets white chocolate instant pudding mix
- 4 cups cold milk
- Neon green, orange, and purple food coloring
- 1 1/2 cups Oreo cookies, crushed
Decorations
- Milano cookies
- Halloween candy
- Sprinkles
Instructions
- Preheat Oven: Preheat your oven to 350°F (175°C) to prepare for baking the cake.
- Mix Cake Batter: In a large bowl, combine the devil’s food cake mix with the water, oil, and eggs as directed on the cake mix box. Stir until smooth and well incorporated.
- Pour and Bake: Pour the cake batter into a greased or parchment-lined 9×13-inch baking dish, spreading it evenly.
- Bake the Cake: Bake for 30 to 35 minutes, or until a toothpick inserted in the center comes out clean. Remove from oven and allow to cool slightly.
- Slice Cake: Once cooled, slice the cake into bite-sized squares and set aside for assembly.
- Prepare Pudding: In a bowl, whisk together the white chocolate pudding mix and cold milk until thickened according to package instructions.
- Fold in Whipped Topping: Gently fold whipped topping into the pudding mixture until smooth and creamy.
- Color the Pudding: Divide the pudding evenly into three separate bowls. Add neon green, orange, and purple food coloring to each bowl respectively, stirring to achieve vivid colors.
- Layer in Buckets: In small serving buckets or cups, add a layer of cake pieces, followed by a layer of one colored pudding. Repeat with cake and the other pudding colors to create three distinct pudding layers.
- Top with Cookie Crumbs: Finish each layered dessert by sprinkling crushed Oreo cookies evenly over the top layer.
- Prepare Milano Cookies: Cut off the bottom of each Milano cookie to create gravestone shapes.
- Decorate Gravestones: Using food coloring and a small paintbrush, write R.I.P. and other spooky messages on the Milano cookies.
- Decorate Buckets: Place the decorated Milano cookies into the desserts as gravestones, then embellish with Halloween candy and sprinkles for a festive look.
- Chill: Refrigerate the assembled desserts for at least one hour to allow the pudding to set and flavors to meld.
- Serve: Serve chilled and enjoy your spooky Graveyard Pudding treats!
Notes
- For best results, use fresh whipped topping for a light texture in the pudding layers.
- You can use other small serving containers if buckets are not available.
- Adjust food coloring intensity to your preference to make colors more vibrant or subtle.
- Decorate Milano cookies ahead of time to save prep time during assembly.
- Store leftovers covered in the refrigerator for up to 3 days.


