
If you have a serious sweet tooth and a love for that classic campfire treat, you are going to adore this Gooey Baked S’mores Bars Recipe. It takes everything we cherish about s’mores—the crunchy graham cracker, melty chocolate, and fluffy marshmallow—and transforms it into a rich, chewy, oven-baked delight that’s perfect for sharing or savoring all on your own. Each bite is pure nostalgia wrapped in a warm, gooey package that feels both familiar and indulgent. Whether you’re craving a quick dessert or planning a fun treat for a crowd, these bars are sure to please every chocolate and marshmallow lover in your life.
Ingredients You’ll Need
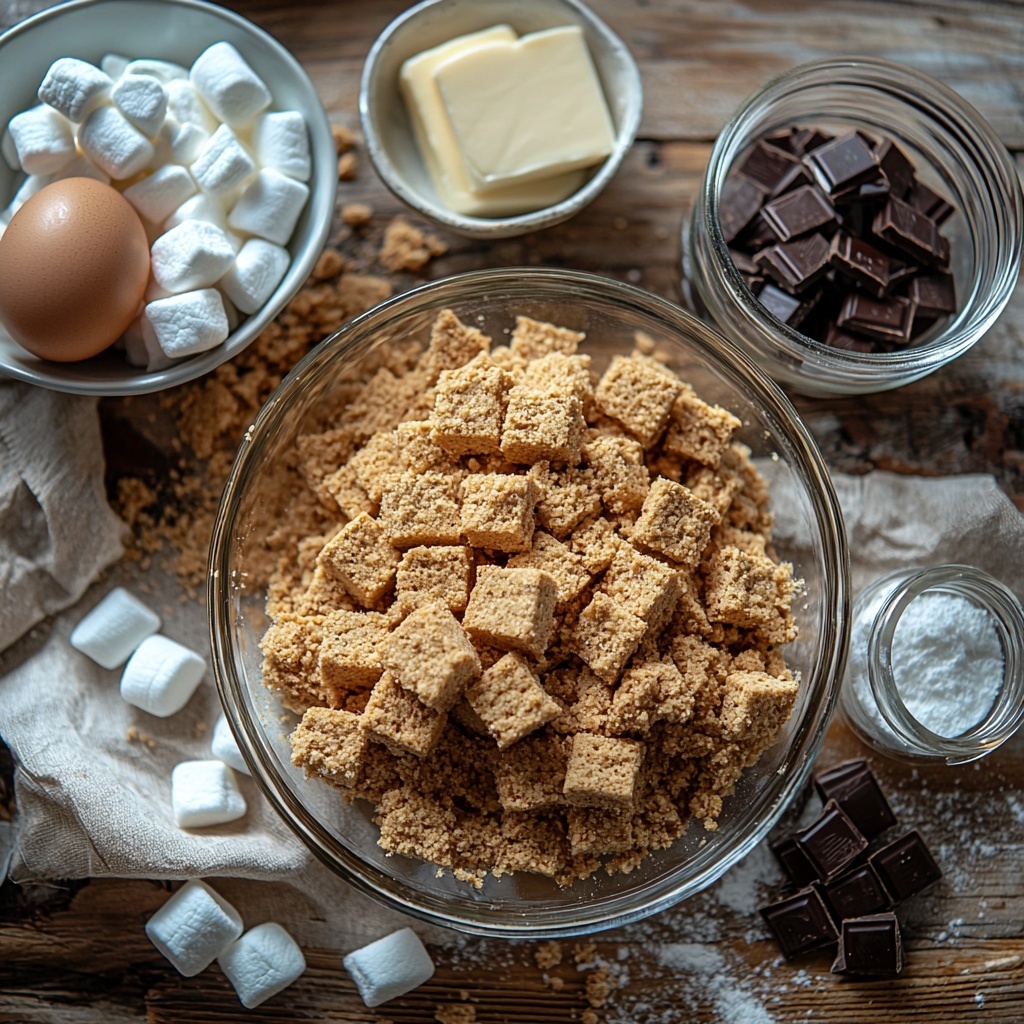
This recipe shines because it keeps things simple but purposeful. Every ingredient plays a vital role in creating the right balance of flavor, texture, and that irresistible gooeyness that makes these bars so special.
- ⅔ cup sugar: Adds the perfect touch of sweetness to balance all the richness.
- ½ cup butter (softened): Provides tenderness and a buttery depth for the graham crust.
- ½ teaspoon vanilla: Enhances all the flavors with its warm, comforting aroma.
- 1 egg: Binds everything together while adding moisture for that chewy texture.
- 2 ⅓ cups graham cracker crumbs: Forms the crunchy, slightly sweet base that’s iconic to s’mores.
- ⅓ cup flour: Gives structure without making the bars tough.
- ¼ teaspoon salt: Balances sweetness and highlights the chocolate’s richness.
- 2 cups milk chocolate chips: Melt into irresistible pockets of creamy, chocolatey goodness throughout the bars.
- 1 (7-ounce jar) marshmallow creme: Adds a rich, stretchy layer of marshmallow sweetness that’s a must-have for gooey magic.
- 1 cup mini marshmallows: Topping the bars for that toasty, melty finish you crave.
How to Make Gooey Baked S’mores Bars Recipe
Step 1: Prepare Your Pan and Preheat the Oven
Start by preheating your oven to 350 degrees Fahrenheit. Line a 9 x 13-inch baking pan with foil, leaving some overhang on the sides for easy removal later, then give it a quick spray with cooking spray. This simple prep step makes cleanup a breeze and ensures your bars come out in perfect shape.
Step 2: Make the Graham Cracker Crust
In a medium bowl, beat together the sugar, softened butter, vanilla, and egg for about two minutes until everything is well combined and creamy. Then, mix in the graham cracker crumbs, flour, and salt until you have a moist, crumby dough. Be sure to save about one cup of this mixture because it will be used as a crunchy topping later. Press the remaining dough down firmly into the bottom of your prepared pan, creating a delicious graham cracker crust foundation.
Step 3: Layer on the Chocolate and Marshmallow Creme
Evenly scatter the 2 cups of milk chocolate chips over the graham cracker crust. Now, dollop spoonfuls of the marshmallow creme over the chocolate. Using the back of a spoon warmed in hot water makes spreading the marshmallow creme easy—it glides smoothly over the chocolate without tearing up the crust. Remember to wipe and rewarm your spoon between spreads to keep it nice and clean for that glossy, even layer.
Step 4: Add Marshmallows and the Reserved Crust Mixture
Sprinkle the mini marshmallows over your marshmallow creme layer. Then, take that reserved graham cracker crumb mixture and sprinkle it evenly on top. This final touch adds a wonderful crunch and extra flavor dimension once baked, giving your bars the perfect balance between gooey and crispy.
Step 5: Bake Until Perfectly Golden
Bake your pan of bars for 18 to 22 minutes, watching closely until the mini marshmallows on top start to turn a lovely light brown. That slightly toasted look signals they’re ready, with melty marshmallows and golden edges. After baking, let the bars cool completely in the pan before lifting them out using the foil overhang and slicing into squares. This cooling is crucial for clean cuts and that gooey texture everyone loves.
How to Serve Gooey Baked S’mores Bars Recipe
Garnishes
Want to take these bars up a notch? A light dusting of powdered sugar or a drizzle of melted chocolate can make each serving look as dreamy as it tastes. You can even sprinkle on some crushed graham crackers or a pinch of flaky sea salt for a sophisticated twist that complements the sweetness perfectly.
Side Dishes
These bars hold their own as a dessert star, but pairing them with a scoop of vanilla ice cream or a dollop of whipped cream brings a cool, creamy contrast that is irresistible. A cold glass of milk or a warm cup of coffee also pairs beautifully, making the Gooey Baked S’mores Bars Recipe an excellent choice for any time of day.
Creative Ways to Present
Serve these bars at your next gathering on a rustic wooden board surrounded by fresh berries or toasted nuts to add color and texture. For a party, try stacking smaller squares on skewers with fresh strawberries or marshmallows in-between for a fun, portable treat everyone can enjoy. It’s a dessert that’s as versatile as it is unforgettable.
Make Ahead and Storage
Storing Leftovers
Wrap leftover bars tightly with plastic wrap or store them in an airtight container at room temperature. They will stay delicious and moist for up to 3 days—perfect for grabbing a quick indulgent snack without any fuss.
Freezing
If you want to keep them longer, wrap individual bars or the whole pan tightly in foil and place them in a freezer-safe bag or container. Frozen bars keep well for up to 2 months. When you’re ready to enjoy, simply thaw at room temperature or warm gently in the oven to bring back that melty goodness.
Reheating
Reheat individual bars in the microwave for about 15 seconds for a warm, gooey treat, or place them on a baking sheet in a 300-degree oven for 5 to 7 minutes to restore that just-baked texture. This little extra step will make your Gooey Baked S’mores Bars Recipe taste like fresh out of the oven every time.
FAQs
Can I use dark chocolate chips instead of milk chocolate?
Absolutely! Dark chocolate adds a rich, slightly bitter contrast to the sweet marshmallow and graham crust, giving the bars a more complex flavor. Feel free to experiment with whichever chocolate you prefer.
Is marshmallow creme the same as marshmallow fluff?
Yes, marshmallow creme and marshmallow fluff are basically the same product, so you can use either one in this recipe interchangeably without issue.
Can I make these bars gluten-free?
Yes, simply substitute gluten-free graham cracker crumbs for the regular ones and ensure your other ingredients are gluten-free as well. The texture and taste will still be delicious!
How do I get the marshmallows on top to brown evenly?
Placing the bars in the middle rack of the oven and keeping a close eye toward the end of baking helps prevent burning. If you want a more toasted look, you can also use a kitchen torch to carefully brown the marshmallows once out of the oven.
Can I double the recipe for larger batches?
Definitely! Just use a larger baking pan and adjust the baking time slightly, checking for the marshmallows to brown and the bars to set. These are perfect for feeding a crowd at any event.
Final Thoughts
If you love the nostalgic flavors of campfire s’mores but want something easier to share and serve, this Gooey Baked S’mores Bars Recipe is an absolute winner. The combination of crispy crust, melty chocolate, and marshmallow gooeyness in every bite will have you hooked from the first taste. I cannot wait for you to try making these bars and experience the joy they bring to any table—get ready to fall in love all over again with this sweet classic reinvented.
Print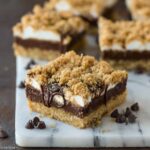
Gooey Baked S’mores Bars Recipe
- Prep Time: 15 minutes
- Cook Time: 20 minutes
- Total Time: 35 minutes
- Yield: 24 servings
- Category: Dessert
- Method: Baking
- Cuisine: American
Description
These Gooey Baked S’mores Bars bring the classic campfire treat into your oven for an easy, indulgent dessert. Layered with a buttery graham cracker crust, melted milk chocolate chips, smooth marshmallow creme, and mini marshmallows, these bars are perfectly gooey and rich with a lightly toasted top. Perfect for a crowd, they offer 24 decadent servings in under an hour.
Ingredients
Crust and Base
- ⅔ cup sugar
- ½ cup butter, softened
- ½ teaspoon vanilla extract
- 1 egg
- 2 ⅓ cups graham cracker crumbs
- ⅓ cup flour
- ¼ teaspoon salt
Layers
- 2 cups milk chocolate chips (about one 11.5-ounce bag)
- 1 (7-ounce) jar marshmallow creme
- 1 cup mini marshmallows
Instructions
- Preheat and Prepare Pan: Preheat your oven to 350 degrees Fahrenheit. Line a 9 x 13-inch baking pan with foil, leaving an overhang on the sides for easy removal. Spray the foil-lined pan generously with cooking spray and set aside.
- Make the Crust: In a medium bowl, beat together the sugar, softened butter, vanilla extract, and egg for about 2 minutes until light and creamy. Stir in the graham cracker crumbs, flour, and salt until the mixture is fully combined. Reserve 1 cup of this crust mixture for topping.
- Form the Base Layer: Press the remaining graham cracker mixture evenly into the bottom of the prepared pan to create a firm crust layer.
- Add Chocolate and Marshmallow Creme: Evenly sprinkle 2 cups of milk chocolate chips over the crust. Dollop spoonfuls of the marshmallow creme over the chocolate chips. Using the back of a spoon warmed in hot water, gently spread the marshmallow creme evenly over the chocolate layer, rinsing and warming the spoon as needed to get a smooth finish.
- Top with Marshmallows and Reserved Crust: Sprinkle the mini marshmallows evenly on top, followed by the reserved 1 cup of graham cracker mixture for added texture and crunch.
- Bake: Bake in the preheated oven for 18-22 minutes or until the marshmallows are lightly browned and the bars are bubbly around the edges.
- Cool and Serve: Allow the bars to cool thoroughly in the pan before using the foil edges to lift them out. Cut into 24 squares and serve.
Notes
- For easier spreading of marshmallow creme, keep dipping the spoon in hot water to prevent sticking.
- Use full-sized marshmallow creme—not marshmallow fluff—for best results.
- Bars can be stored in an airtight container at room temperature for up to 3 days.
- Ensure bars are fully cool before cutting to maintain their gooey texture without crumbling.

