
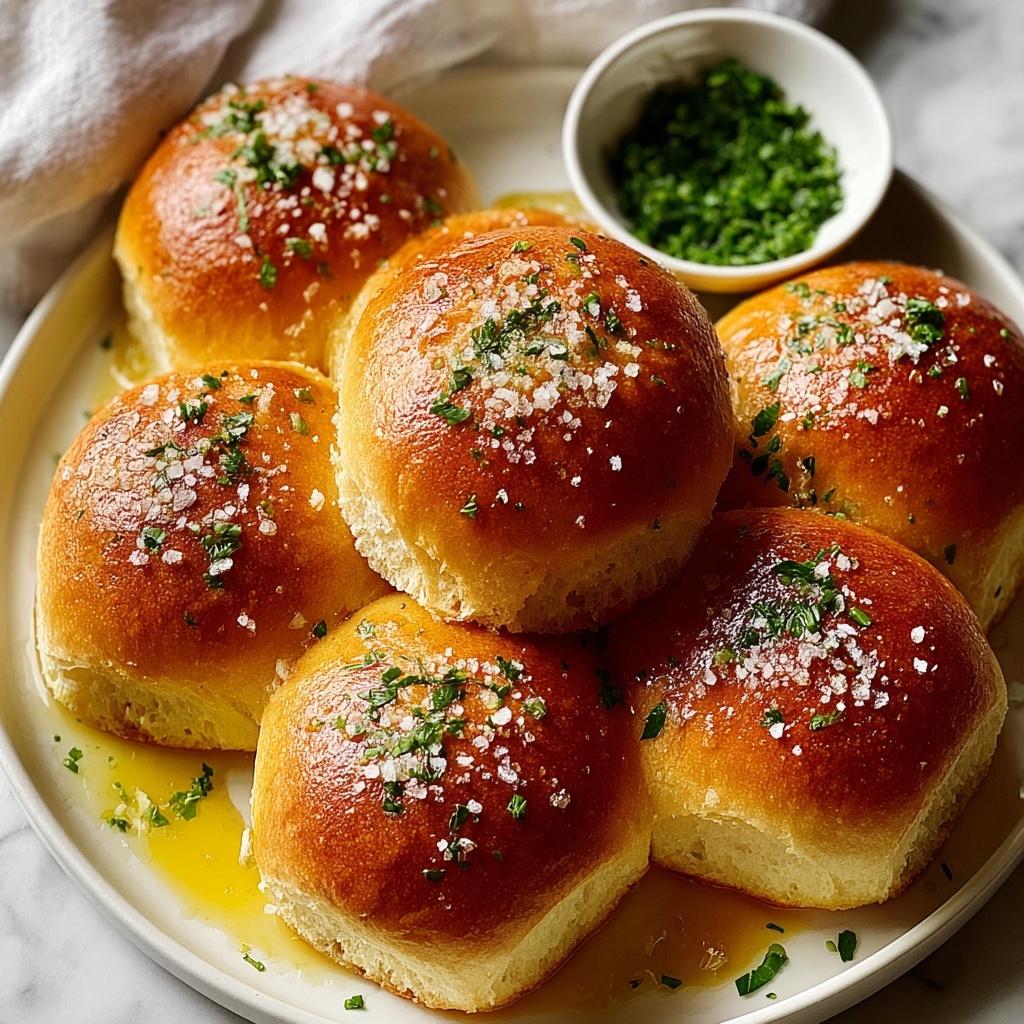
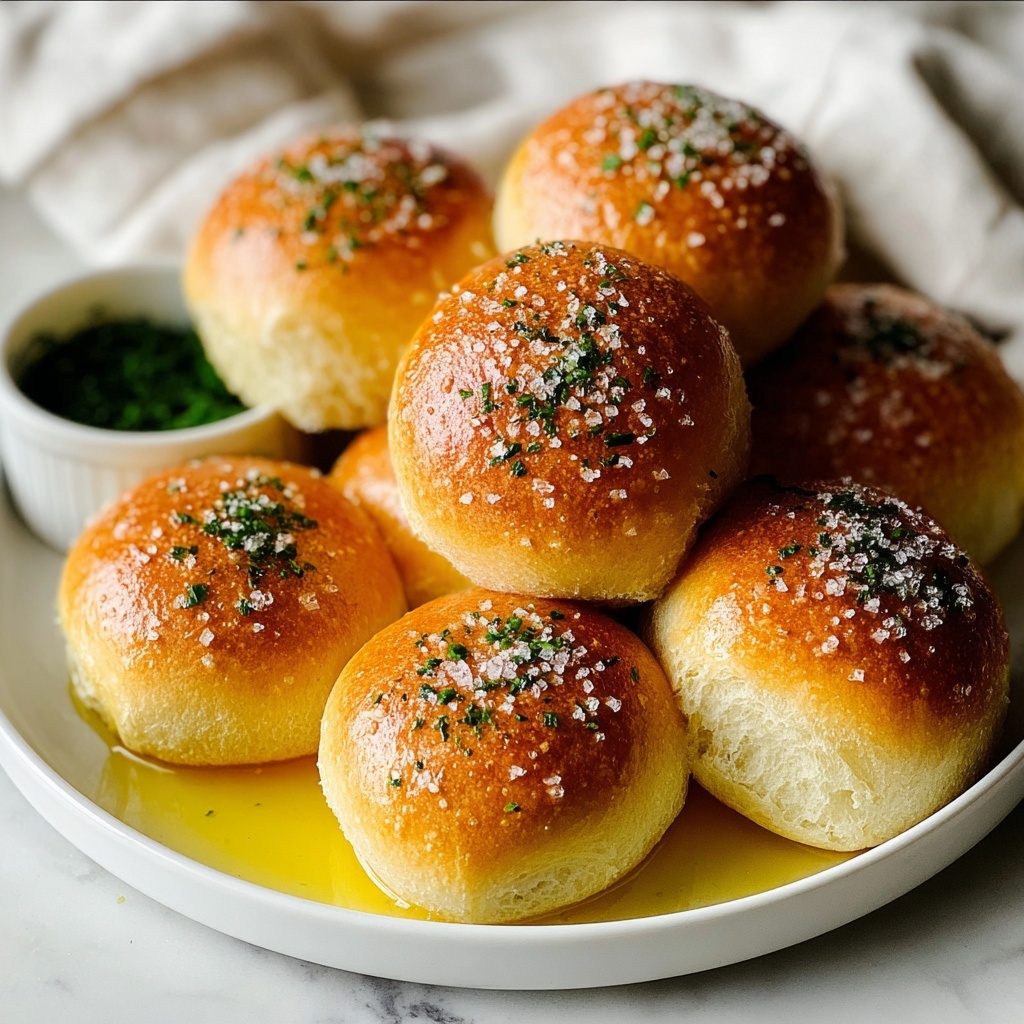
If you’ve been searching for a warm, comforting bake that feels like a big hug straight from the oven, this Garlic Butter Bread Rolls Recipe is exactly what you need. These soft, pillowy rolls bursting with rich garlic butter flavor are not only incredibly satisfying but also surprisingly simple to make. Whether you’re serving them at a family dinner or a casual get-together, these rolls have the magical ability to bring everyone to the table and keep them coming back for more.
Ingredients You’ll Need
Gathering ingredients for this Garlic Butter Bread Rolls Recipe is a breeze, and each item plays an essential role in creating the perfect texture, flavor, and golden color you crave. From the yeast that ensures a soft rise to the fresh parsley that offers a lovely pop of color, everything comes together beautifully.
- 4 cups all-purpose flour: Provides structure and a tender crumb to your rolls.
- 2 1/4 teaspoons active dry yeast: The key to that fluffy, airy texture.
- 1 tablespoon sugar: Feeds the yeast and adds a hint of sweetness.
- 1 teaspoon salt: Balances flavors and enhances overall taste.
- 1/4 cup unsalted butter, melted: Adds richness and moisture to the dough.
- 1 cup warm milk (about 110°F): Creates the perfect warm environment for yeast activation.
- 1/4 cup water at room temperature: Helps loosen the dough for a soft, manageable texture.
- 1 egg: Contributes to the dough’s elasticity and gives it a beautiful golden hue.
- 1/2 cup unsalted butter, melted (for garlic butter): The star ingredient that coats the rolls for that irresistible buttery finish.
- 4 cloves garlic, minced: Infuses the butter with an aromatic punch that garlic lovers will adore.
- 1 tablespoon fresh parsley, chopped: Adds a fresh, vibrant flavor and a pop of color to the garlic butter.
- 1/2 teaspoon salt: Balances the garlic butter perfectly for a savory coating.
How to Make Garlic Butter Bread Rolls Recipe
Step 1: Activate the Yeast
Start by dissolving the sugar into the warm milk, then sprinkle your yeast on top. This gentle soaking lets your yeast wake up and get frothy within 5 to 10 minutes—an essential step that guarantees your rolls will rise beautifully. Watching those bubbles form is a little bit of magic you get every time.
Step 2: Mix Wet Ingredients
Once your yeast is active and frothy, mix in the melted butter, salt, and the egg. These ingredients enrich the dough with flavor, tenderness, and color. Make sure everything is well combined for a smooth, even base before you add the flour.
Step 3: Add Flour Gradually
Add your flour one cup at a time while stirring with a wooden spoon. This gradual addition helps prevent the dough from becoming too stiff too quickly, setting you up for a wonderfully soft texture. The dough will start to pull together, signaling you’re almost ready for kneading.
Step 4: Knead the Dough
Transfer your dough onto a floured surface and knead with intent for about 8 to 10 minutes. This step is crucial because it develops the gluten, giving your rolls their classic chewy yet tender bite. When the dough turns smooth and elastic, you know you’ve nailed it.
Step 5: First Rise
Place the dough in a greased bowl, cover it with a damp cloth, and let it relax somewhere cozy and warm for about an hour. This is when the yeast does its work and your dough doubles in size, becoming marvelously light and airy.
Step 6: Prepare Garlic Butter
While the dough is rising, treat yourself by making the garlic butter topping. Melt the butter, then mix in minced garlic, fresh parsley, and salt. This fragrant spread will turn your rolls from good to unforgettable.
Step 7: Punch Down and Divide
After the dough has doubled, gently punch it down to release excess air. Knead it lightly, then divide it into 16 equal pieces. Pro tip: use a kitchen scale if you have one, to ensure consistent roll sizes for even baking.
Step 8: Shape the Rolls
Shape each piece into a smooth, round ball and arrange them close together on a parchment-lined baking sheet. Their cozy closeness encourages soft sides — an essential feature of these perfect rolls.
Step 9: Second Rise
Cover the rolls with a damp cloth again and let them proof for another 30 minutes. This final rise is what gives the rolls their lofty, tender crumb.
Step 10: Preheat the Oven
Set your oven to 375°F (190°C) so it’s perfectly hot and ready by the time the rolls have risen to fluffy perfection.
Step 11: Brush with Garlic Butter
Generously brush the rolls with half of your garlic butter mixture. This adds flavor during baking and starts building that glorious golden crust.
Step 12: Bake to Golden Perfection
Bake the rolls for 15 to 20 minutes, until they’re beautifully golden brown and have a wonderful aroma that will fill your kitchen with garlic and butter goodness.
Step 13: Final Butter Brush
Right after they come out of the oven, brush the rolls immediately with the remaining garlic butter. This final step locks in moisture and maximizes flavor so every bite is buttery and garlicky heaven.
Step 14: Cool Slightly and Enjoy
Allow your rolls to cool for just a bit—warm, but not piping hot. This makes them easier to handle and lets the flavors settle, ensuring every roll is a bite of pure satisfaction.
How to Serve Garlic Butter Bread Rolls Recipe
Garnishes
To elevate your Garlic Butter Bread Rolls Recipe even further, sprinkle them with a touch of freshly chopped parsley or a light dusting of flaky sea salt. It adds just enough freshness and texture to make those buttery, garlicky flavors pop even more. You can also sprinkle grated Parmesan for an indulgent twist that everyone will rave about.
Side Dishes
These rolls pair wonderfully with a range of dishes. They’re perfect alongside creamy soups like tomato bisque or broccoli cheddar. For heartier meals, serve them with roasted chicken, pasta dishes, or even a zesty salad. Their buttery richness complements both simple and elaborate meals with ease, making them a versatile and crowd-pleasing choice.
Creative Ways to Present
Want to impress your guests? Arrange the bread rolls in a rustic basket lined with linen or fan them out on a wooden board alongside small bowls of herb-infused olive oil and flavored butters. For a playful twist, slice each roll in half and make mini garlic bread sandwiches with melted mozzarella or slices of fresh tomato and basil. Presentation can be fun and just as delicious!
Make Ahead and Storage
Storing Leftovers
If you find yourself lucky enough to have leftovers, store them in an airtight container at room temperature for up to two days. This keeps the rolls soft and tasty while preventing them from drying out—though truthfully, they rarely last that long once made!
Freezing
Garlic Butter Bread Rolls Recipe is a fantastic candidate for freezing. Cool your rolls completely before wrapping them tightly in plastic wrap and then in foil or placing them in a freezer bag. They can last up to 3 months frozen, ready to be thawed and enjoyed whenever you crave that comforting garlic butter goodness.
Reheating
To bring your frozen or leftover rolls back to life, warm them in an oven preheated to 350°F (175°C) for about 10 minutes. Brushing them with a little extra garlic butter before reheating helps restore their moist, flavorful goodness. Avoid microwaving if you want to keep the rolls tender and avoid sogginess.
FAQs
Can I use dry parsley instead of fresh in the garlic butter?
Yes, you can use dried parsley if fresh isn’t available. Since dried herbs are more concentrated, use about one-third of the fresh amount and add it with the melted butter to infuse better flavor.
Is it possible to make this recipe without eggs?
You can substitute the egg with a flaxseed “egg” (1 tablespoon ground flaxseed mixed with 3 tablespoons water), or simply omit it. Keep in mind that the texture might be slightly different, potentially a bit less rich and tender.
How do I ensure my rolls rise properly?
Make sure your milk is warm but not too hot—around 110°F is ideal. Also, yeast freshness is crucial, so check the expiration date. Providing a warm and draft-free spot for your dough to rise will give you the fluffiest results.
Can I add cheese inside the rolls?
Absolutely! For an indulgent surprise, press small cubes of mozzarella or cheddar into each dough ball before shaping. As they bake, the cheese melts, creating gooey pockets that elevate the Garlic Butter Bread Rolls Recipe wonderfully.
What’s the best way to make the garlic flavor mild for those who prefer less pungency?
To tone down the garlic intensity, roast the garlic cloves before mincing or use garlic powder for a subtler hint. Roasting brings out a sweeter, milder flavor that still enhances the butter without overpowering.
Final Thoughts
Whipping up the Garlic Butter Bread Rolls Recipe is one of those cooking adventures that brings instant joy to your kitchen and your table. The combination of fluffy rolls and that indulgent garlic butter is simply irresistible. Whether you’re a seasoned home baker or just starting out, this recipe is approachable and endlessly rewarding. So grab your ingredients, roll up your sleeves, and get ready to create a delicious batch of bread rolls that everyone will love and remember.
Print
Garlic Butter Bread Rolls Recipe
- Prep Time: 0h 30m
- Cook Time: 0h 20m
- Total Time: 1h 50m
- Yield: 16 rolls
- Category: Bread
- Method: Baking
- Cuisine: American
Description
These Garlic Butter Bread Rolls are soft, fluffy, and packed with rich garlic and butter flavor. Perfect as a side for any meal or as a savory snack, these homemade rolls are easy to make with a simple yeast dough, generously brushed with a delightful garlic butter blend before and after baking to maximize flavor and aroma.
Ingredients
Dough
- 4 cups all-purpose flour
- 2 1/4 teaspoons active dry yeast
- 1 tablespoon sugar
- 1 teaspoon salt
- 1/4 cup unsalted butter, melted
- 1 cup warm milk (about 110°F)
- 1/4 cup water at room temperature
- 1 egg
Garlic Butter
- 1/2 cup unsalted butter, melted
- 4 cloves of garlic, minced
- 1 tablespoon fresh parsley, chopped
- 1/2 teaspoon salt
Instructions
- Activate Yeast: In a large mixing bowl, dissolve the sugar in warm milk. Sprinkle the yeast over the milk and let it rest until frothy, about 5-10 minutes. This step ensures the yeast is active and ready to leaven the dough.
- Mix Wet Ingredients: Add melted butter, salt, and the egg to the yeast mixture, whisking until combined. This creates a smooth, rich liquid base for the dough.
- Add Flour: Gradually add the flour, one cup at a time, stirring with a wooden spoon until the dough begins to form. This helps develop the dough’s structure without lumps.
- Knead Dough: Transfer the dough onto a lightly floured surface and knead for about 8-10 minutes until the dough is smooth and elastic. Proper kneading develops gluten for a fluffy texture.
- First Rise: Place the dough in a lightly greased bowl, cover with a damp cloth, and let it rise in a warm place until it has doubled in size, about 1 hour. This fermentation improves flavor and volume.
- Prepare Garlic Butter: While the dough is rising, combine melted butter, minced garlic, chopped parsley, and salt in a small bowl. This mixture will add flavor to the rolls.
- Punch and Divide Dough: Once the dough has risen, punch it down to release air and knead lightly for a minute on a floured surface. Divide the dough into 16 equal pieces for even rolls.
- Shape Rolls: Shape each piece into a small roll and place them onto a baking sheet lined with parchment paper, placing the rolls close together to promote soft sides.
- Second Rise: Cover the rolls with a damp cloth and let them rise again in a warm place for 30 minutes until they double in size. This final proofing ensures lightness.
- Preheat Oven: Preheat your oven to 375°F (190°C) to prepare for baking.
- Brush with Garlic Butter: Generously brush the rolls with half of the garlic butter mixture to infuse flavor and promote a golden crust.
- Bake Rolls: Bake the rolls in the preheated oven for 15-20 minutes or until golden brown. Baking cooks the dough and develops a flavorful crust.
- Brush with Remaining Butter: Remove the rolls from the oven and immediately brush them with the remaining garlic butter to keep them moist and flavorful.
- Cool Slightly: Allow the rolls to cool slightly before serving to enhance texture and prevent burning your mouth.
Notes
- Ensure the milk is warm but not hot when activating yeast, ideally around 110°F, to avoid killing the yeast.
- You can substitute all-purpose flour with bread flour for chewier rolls.
- For a richer flavor, consider adding a tablespoon of grated Parmesan to the garlic butter.
- These rolls freeze well; store cooled rolls in an airtight container or freezer bag for up to 3 months.
- Reheat frozen rolls wrapped in foil at 350°F for 10-15 minutes for a fresh-baked taste.

