
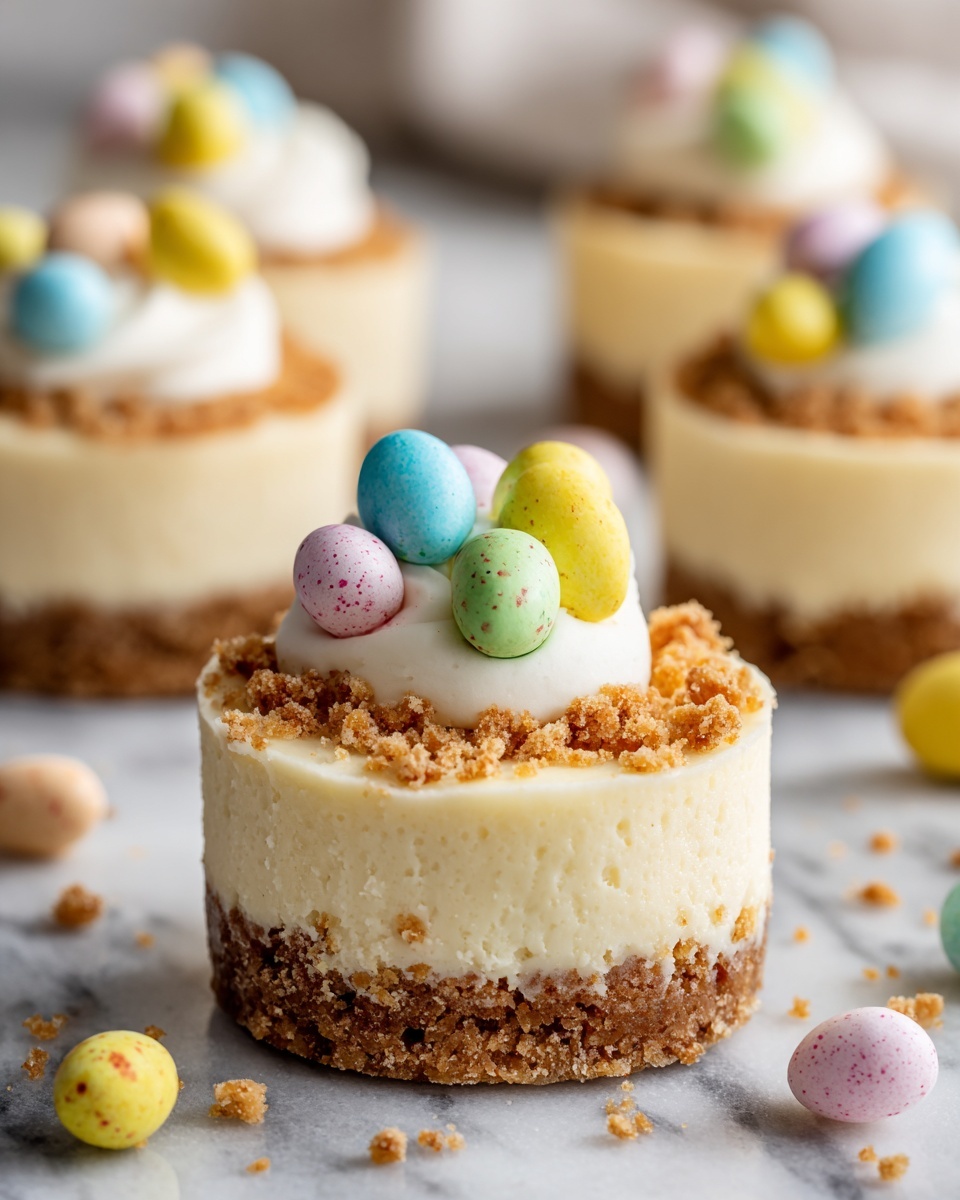
Bright, creamy, and utterly charming, the Easter No-Bake Mini Cheesecakes Recipe is a delightful way to celebrate spring and add a colorful twist to your dessert table. These bite-sized treats blend a crisp graham cracker crust with a luscious, fluffy cream cheese filling that’s tinted in soft pastel hues, perfect for Easter festivities. No oven required and no fuss involved, making these mini cheesecakes an irresistible crowd-pleaser that brings both taste and festive cheer to any gathering.
Ingredients You’ll Need
The beauty of the Easter No-Bake Mini Cheesecakes Recipe lies in its simple, wholesome ingredients that each play an essential role in achieving that perfect balance of texture, flavor, and festive color. From the crunchy base to the rich filling and decorative toppings, every component works in harmony to create magic.
- 1 1/2 cups graham cracker crumbs: Provides a crunchy and buttery crust base that’s key for structure and flavor.
- 1/4 cup granulated sugar: Adds just the right amount of sweetness to the crust.
- 6 tablespoons unsalted butter, melted: Binds the crust together and gives it that rich, golden touch.
- 16 oz cream cheese, softened: The creamy, tangy heart of the cheesecake filling, ensuring a smooth texture.
- 1 cup powdered sugar: Sweetens the filling without any grittiness, keeping it silky.
- 1 teaspoon vanilla extract: Brings warmth and depth, enhancing all the other flavors.
- 1 cup heavy whipping cream: Whipped to stiff peaks, it lightens the filling for a fluffy, airy finish.
- Pastel food coloring (pink, yellow, blue, green): Adds playful, festive colors for that classic Easter vibe.
- Mini chocolate eggs or Easter candy for topping: Offers a delightful finishing touch that’s both decorative and delicious.
- Whipped cream for garnish (optional): Adds an extra dollop of creaminess if you want that wow factor on top.
How to Make Easter No-Bake Mini Cheesecakes Recipe
Step 1: Prepare the Crust
Start by lining a muffin tin with paper cupcake liners – this makes popping out the mini cheesecakes a breeze. In a medium bowl, combine the graham cracker crumbs, granulated sugar, and melted butter until the mixture resembles wet sand. Spoon about 1 to 2 tablespoons of this crumbly mixture into each liner, pressing firmly to create a solid base that will hold the creamy filling beautifully.
Step 2: Make the Cream Cheese Filling
Next, beat the softened cream cheese in a large bowl until completely smooth and free of lumps. Add the powdered sugar and vanilla extract and continue beating until everything is well incorporated. This mixture is the delicious foundation of your cheesecake’s rich and tangy flavor.
Step 3: Whip the Cream
In a separate chilled bowl, whip the heavy whipping cream until stiff peaks form. This fluffy whipped cream is what will give your cheesecake filling a light, airy texture that’s delightful to bite into.
Step 4: Fold and Color
Carefully fold the whipped cream into the cream cheese mixture, gently combining them to keep that fluffy texture intact. Divide the filling evenly into 3 or 4 separate bowls and add pastel food coloring to each, stirring gently to create soft springtime shades perfect for Easter celebration.
Step 5: Layer and Chill
Using spoons or piping bags, layer or swirl the different colored fillings into the prepared crusts for a charming marbled effect. Smooth the tops with a spatula for a polished look. Place the mini cheesecakes in the refrigerator to chill for at least 4 hours, allowing them to set beautifully without baking.
Step 6: Decorate and Serve
Once set, top each mini cheesecake with mini chocolate eggs or your favorite Easter candies. If you want to add a little extra creaminess, garnish with a small swirl of whipped cream. Now they are ready to bring joy and sweetness to your holiday table!
How to Serve Easter No-Bake Mini Cheesecakes Recipe

Garnishes
Decorating these mini cheesecakes with pastel-colored candies or delicate edible flowers can instantly elevate their festive appeal. Mini chocolate eggs are a classic, but feel free to experiment with shredded coconut dyed in pastel colors or a sprinkle of colorful sugar crystals for added texture and appeal.
Side Dishes
These mini cheesecakes pair beautifully with fresh berries or a light fruit salad. Their creamy richness balances the natural acidity of fruits like strawberries or raspberries, making for a well-rounded dessert experience that’s refreshing and indulgent at the same time.
Creative Ways to Present
Serve these bite-sized treats in decorative Easter-themed paper cups or on a tiered cake stand for a stunning dessert display. You could also package them individually in clear boxes tied with pastel ribbons, turning them into beautiful edible gifts or party favors that everyone will adore.
Make Ahead and Storage
Storing Leftovers
If you find yourself with leftovers, no worries! Keep your mini cheesecakes stored in an airtight container in the refrigerator. They will stay fresh and creamy for up to 3 days, making it easy to enjoy the festive flavor beyond your initial celebration.
Freezing
These cheesecakes freeze really well, which is excellent for prepping ahead. Wrap each mini cheesecake tightly in plastic wrap and store them in a freezer-safe container. When frozen, they can last up to 2 months without compromising their texture or flavor.
Reheating
Since this is a no-bake dessert best enjoyed chilled, reheating is not recommended. Instead, allow frozen cheesecakes to thaw overnight in the refrigerator before serving to maintain their perfect consistency and flavor.
FAQs
Can I make this recipe gluten-free?
Absolutely! Simply swap out regular graham cracker crumbs for your favorite gluten-free variety to keep the crust just as delicious and crumbly without any gluten.
What if I don’t have pastel food coloring?
You can skip the food coloring altogether or use natural alternatives like beet powder for pink or turmeric for yellow. The filling will taste just as wonderful even without the extra color pop.
How long do these mini cheesecakes need to chill?
We recommend chilling for at least 4 hours to ensure the filling sets properly and is firm enough to hold its shape when served. Overnight chilling works great too if you want to prepare ahead.
Can I use flavored extracts instead of vanilla?
Definitely! Almond, lemon, or even coconut extract can add an exciting twist to the flavor profile. Just use about 1 teaspoon, similar to vanilla, and adjust to taste if you prefer a stronger flavor.
Will the mini cheesecakes hold their shape without baking?
Yes! The combination of cream cheese and whipped cream sets firmly in the fridge. Just be sure to chill them long enough and handle them gently when removing from the liners.
Final Thoughts
If you’re looking for a charming, colorful dessert that’s as fun to make as it is to eat, the Easter No-Bake Mini Cheesecakes Recipe is calling your name. With no oven needed and endless ways to customize the colors and toppings, these little delights bring sweet joy to any spring celebration. So gather your ingredients, invite some friends, and enjoy making this festive treat together – your taste buds will thank you!
Print
Easter No-Bake Mini Cheesecakes Recipe
- Prep Time: 25 minutes
- Cook Time: 0 minutes
- Total Time: 4 hours 25 minutes
- Yield: 12 mini cheesecakes
- Category: Dessert
- Method: No-Cook
- Cuisine: American
- Diet: Vegetarian
Description
Delight in these festive Easter No-Bake Mini Cheesecakes, featuring creamy, pastel-colored layers atop a buttery graham cracker crust. Perfectly sized for individual servings, these light and fluffy cheesecakes are topped with mini chocolate eggs or Easter candies, making them a charming spring dessert that requires no baking and minimal prep time.
Ingredients
Crust
- 1 1/2 cups graham cracker crumbs
- 1/4 cup granulated sugar
- 6 tablespoons unsalted butter, melted
Filling
- 16 oz cream cheese, softened
- 1 cup powdered sugar
- 1 teaspoon vanilla extract
- 1 cup heavy whipping cream
- Pastel food coloring (pink, yellow, blue, green)
Toppings
- Mini chocolate eggs or Easter candy
- Whipped cream for garnish (optional)
Instructions
- Prepare the muffin tin: Line a muffin tin with paper cupcake liners to ensure easy removal and neat presentation of the mini cheesecakes.
- Make the crust: In a medium bowl, combine the graham cracker crumbs, granulated sugar, and melted butter. Mix until the texture resembles wet sand. Press about 1 to 2 tablespoons of this crust mixture firmly into the bottom of each cupcake liner to form a solid base.
- Prepare the cream cheese mixture: In a large mixing bowl, beat the softened cream cheese until smooth and creamy. Add powdered sugar and vanilla extract, continuing to beat until fully incorporated and silky.
- Whip the cream: In a separate bowl, whip the heavy cream until stiff peaks form. Gently fold the whipped cream into the cream cheese mixture to create a light and fluffy filling.
- Color the filling: Divide the filling evenly into 3 or 4 separate bowls. Tint each portion with a different pastel food coloring for a colorful and festive look.
- Assemble the cheesecakes: Spoon or pipe portions of each colored filling into the prepared cupcake liners, layering or swirling the colors to achieve a marbled effect. Smooth the tops using a spoon or offset spatula.
- Chill: Refrigerate the assembled mini cheesecakes for at least 4 hours, or until they are firm and set.
- Garnish and serve: Before serving, top each mini cheesecake with mini chocolate eggs or Easter candies and add a dollop of whipped cream if desired.
Notes
- These mini cheesecakes can be made a day in advance and stored in the refrigerator until ready to serve.
- For a gluten-free version, substitute regular graham crackers with gluten-free graham crackers.
- Ensure the cream cheese is softened to prevent lumps and achieve a smooth filling.
- Be gentle when folding the whipped cream into the cream cheese mixture to maintain the light texture.


