
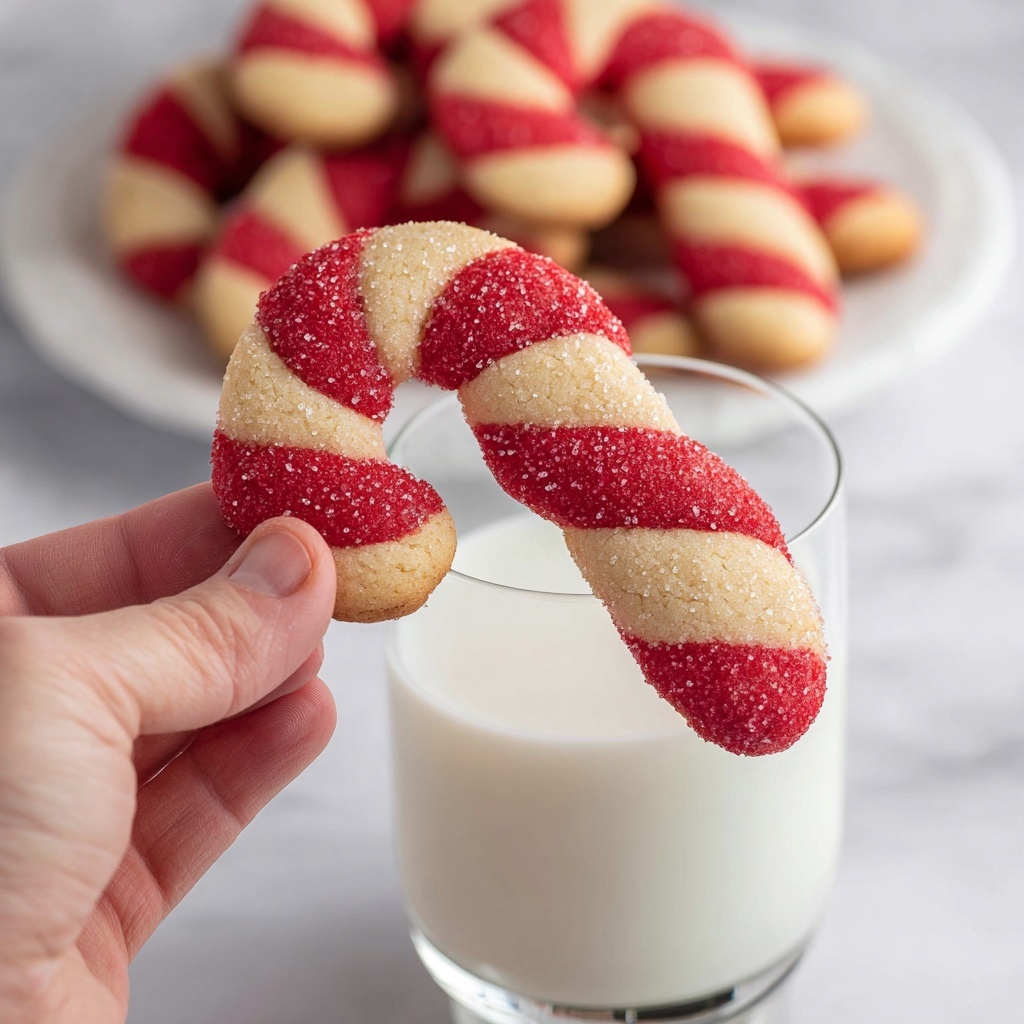
If you are on the lookout for a festive treat that captures the joyful spirit of the holidays, this Candy Cane Cookies Recipe is an absolute must-try. These delightful cookies bring together the classic flavors of peppermint and vanilla in a tender, buttery dough, shaped into charming candy cane forms that are as fun to make as they are to eat. Perfectly balanced with a pop of red food coloring and a sprinkle of white sanding sugar, these cookies not only taste heavenly but also brighten up any holiday cookie platter with their iconic swirl. Whether you’re baking for family, friends, or a holiday party, this Candy Cane Cookies Recipe will quickly become a beloved seasonal tradition.

Ingredients You’ll Need
Simple, straightforward ingredients make this Candy Cane Cookies Recipe a breeze to prepare, yet each one plays a crucial role in creating those perfect cookies with their cozy texture and unmistakable flavor.
- Milk (1/4 cup + 1 tablespoon, divided): The milk adds moisture to the dough, while a little extra is used for brushing to help the sanding sugar stick.
- White vinegar (3/4 teaspoon): Reacts with the baking powder to give the cookies a slight lift and a tender crumb.
- Sugar (1 cup): Sweetens the dough and contributes to the cookie’s crisp edges once baked.
- Unsalted butter (3/4 cup, softened): Provides richness and a tender texture without overpowering the peppermint flavor.
- Egg (1): Acts as a binder for the ingredients and adds structure to the cookie dough.
- Peppermint extract (2 teaspoons): Delivers that unmistakable minty brightness reminiscent of candy canes.
- Vanilla extract (1 teaspoon): Rounds out the flavor and deepens the sweetness.
- Flour (3 1/2 cups): The main structure builder, ensuring these cookies hold their shape perfectly.
- Baking powder (1 1/2 teaspoons): Helps the cookies rise just enough for softness without losing their iconic crunchy edges.
- Salt (1/2 teaspoon): Balances the sweetness and enhances all the other flavors.
- Red gel food coloring (1 teaspoon): Gives the candy canes their classic striped appearance with vivid, festive red color.
- White sanding sugar (1-2 tablespoons): Adds sparkle and a touch of extra sweetness after baking.
How to Make Candy Cane Cookies Recipe
Step 1: Prepare the Milk and Vinegar Mixture
Start by combining 1/4 cup milk with white vinegar, stirring well, and letting it sit while you prep everything else. This mixture curdles slightly and works like homemade buttermilk, adding softness to the cookies that’s truly magical.
Step 2: Preheat the Oven and Line Baking Sheets
Get your oven warmed to 350 degrees Fahrenheit and line your baking sheets with parchment paper. This setup makes it easy to slide your beautifully twisted candy canes on and off without worry, and it ensures even baking.
Step 3: Cream Butter and Sugar, Add Flavors and Wet Ingredients
In a large bowl, cream the softened butter and sugar together until light and fluffy – this step is essential for the perfect texture. Then add the egg, peppermint extract, and vanilla extract, blending everything evenly. Follow by mixing in the milk and vinegar mixture to bring it all together.
Step 4: Combine Dry Ingredients
In a separate medium bowl, whisk together the flour, baking powder, and salt. This step guarantees even distribution of the leavening agents and seasoning, which is key to consistent cookies.
Step 5: Mix the Dry and Wet Ingredients to Form Dough
Gradually add the dry ingredients to the wet mixture. Stir gently until your dough comes together into a smooth, pliable ball – you want it soft but not sticky so it’s easy to handle for shaping.
Step 6: Divide Dough and Add Color
Split your dough into two equal parts. To one half, knead in the red gel food coloring until the color is evenly distributed. This contrast will give you those iconic candy cane stripes.
Step 7: Shape Into Candy Canes
Scoop out one tablespoon-sized piece from each colored dough, roll each into 5-inch ropes, and then twist them together gently. Pinch the ends and curve one end to create that perfect candy cane shape before placing them on the lined sheet.
Step 8: Brush and Sugar
Lightly brush the shaped candy canes with the reserved tablespoon of milk. This keeps the sugar in place and adds a beautiful shine. Then sprinkle the white sanding sugar over each cane for delightful sparkle and extra sweetness.
Step 9: Bake and Cool
Bake the cookies for 10 to 11 minutes or until they just begin to turn golden on the bottom. Let them cool on the baking sheet for five minutes for sturdiness before transferring to a wire rack to cool completely. This cooling step ensures the right crispness and texture.
How to Serve Candy Cane Cookies Recipe
Garnishes
These cookies shine on their own, but adding a few festive extras makes serving even more fun. Try pairing with a light dusting of powdered sugar for a snowy effect or a drizzle of white chocolate for extra indulgence. A sprig of fresh mint alongside adds a lovely aroma that complements the peppermint in the cookie perfectly.
Side Dishes
Candy Cane Cookies Recipe pairs wonderfully with a mug of hot cocoa or warm spiced tea. The warmth of the drink harmonizes beautifully with the crisp, minty cookies, making your holiday snack or dessert feel cozy and decadent. You can also serve these cookies alongside a rich peppermint fudge for an unforgettable holiday spread.
Creative Ways to Present
For holiday parties, arrange the candy cane cookies standing up in a festive jar or wrapped individually in clear cellophane tied with red and white ribbons. They also make charming edible gifts nestled in a decorative tin with tissue paper or presented on a tiered serving tray next to other holiday treats for a wow-worthy display.
Make Ahead and Storage
Storing Leftovers
If you have leftovers from your Candy Cane Cookies Recipe, store them in an airtight container at room temperature. They will stay fresh and crisp for about a week, making it easy to enjoy them throughout the holiday season without any loss of flavor or texture.
Freezing
You can freeze the baked candy cane cookies for up to two months. Place them in a single layer on a baking sheet to freeze first, then transfer them to a freezer-safe bag or container. This method prevents them from sticking together and lets you enjoy fresh-tasting cookies anytime you like.
Reheating
To refresh the cookies’ crunch and warmth, pop them in a preheated oven at 300 degrees Fahrenheit for 5 minutes. Avoid microwaving if possible, since it can make the cookies soft instead of delightfully crisp. Warmed cookies bring out the peppermint aroma even more beautifully.
FAQs
Can I use regular vinegar instead of white vinegar for the Candy Cane Cookies Recipe?
While white vinegar is preferred for its neutral flavor, you can use apple cider vinegar as an alternative. Just make sure to use the same amount to maintain the cookie’s texture without altering the flavor.
Is there a substitute for peppermint extract in this recipe?
If you don’t have peppermint extract, you can use vanilla extract alone or add a small amount of crushed peppermint candies to the dough for a similar effect. However, peppermint extract gives these cookies their signature minty kick.
How do I prevent the red food coloring from bleeding?
Use gel or paste food coloring since it’s less watery and more concentrated, which helps prevent bleeding. Mixing the color thoroughly and chilling the dough slightly before shaping can also reduce bleeding during baking.
Can I make the dough ahead of time?
Yes! You can prepare the dough up to a day in advance, wrap it tightly in plastic wrap, and refrigerate it. When ready to bake, let it soften just enough to roll and shape, then proceed with the recipe as usual.
What is the best way to shape the candy cane cookies evenly?
Using the same size spoonfuls for each color of dough helps keep the ropes uniform. Rolling to the same length and twisting gently but firmly ensures neat, consistent candy cane shapes every time.
Final Thoughts
Ready to embrace the holiday spirit in your kitchen? This Candy Cane Cookies Recipe offers a joyful baking experience and a delicious treat that’s sure to bring smiles all around. They’re perfect for sharing, gifting, or simply savoring with your favorite festive drink. Don’t wait to make these charming, minty cookies part of your seasonal celebrations—they might just become your new holiday tradition!
Print
Candy Cane Cookies Recipe
- Prep Time: 45 minutes
- Cook Time: 10-11 minutes
- Total Time: 56 minutes
- Yield: 24 cookies
- Category: Dessert
- Method: Baking
- Cuisine: American
- Diet: Vegetarian
Description
Delight in the festive spirit with these Candy Cane Cookies, featuring a perfect blend of peppermint and vanilla flavors swirled into classic red and white dough twisted into charming candy cane shapes. These soft, buttery cookies are baked to golden perfection and sprinkled with white sanding sugar for a sweet, sparkling finish—an ideal treat for holiday celebrations.
Ingredients
Wet Ingredients
- 1/4 cup milk (+ 1 tablespoon – divided)
- 3/4 teaspoon white vinegar
- 3/4 cup unsalted butter, softened
- 1 egg
- 2 teaspoons peppermint extract
- 1 teaspoon vanilla extract
Dry Ingredients
- 1 cup sugar
- 3 1/2 cups all-purpose flour
- 1 1/2 teaspoons baking powder
- 1/2 teaspoon salt
Additional Ingredients
- 1 teaspoon red gel food coloring
- 1–2 tablespoons white sanding sugar
Instructions
- Prepare Milk and Vinegar Mixture: Add white vinegar to 1/4 cup milk, stir well, and set aside to create a buttermilk substitute that adds moisture and tenderness to the cookies.
- Preheat the Oven: Set the oven to 350°F (175°C) and line baking sheets with parchment paper to prevent sticking and ensure even baking.
- Cream Butter and Sugar: In a large bowl, cream together the softened butter and sugar until the mixture is light and fluffy, which helps incorporate air for a tender cookie texture.
- Add Eggs and Extracts: Beat in the egg, peppermint extract, and vanilla extract into the creamed butter and sugar mixture until thoroughly combined for flavor infusion.
- Combine Wet Ingredients: Mix the prepared milk and vinegar mixture into the wet ingredients, ensuring a smooth batter.
- Mix Dry Ingredients: In a separate medium bowl, whisk the all-purpose flour, baking powder, and salt to evenly distribute the leavening and seasoning.
- Form Cookie Dough: Gradually add the dry ingredients to the wet mixture, mixing until a cohesive dough forms, being careful not to overmix to keep cookies tender.
- Divide and Color Dough: Split the dough into two equal parts. Add red gel food coloring to one portion and knead until the color is evenly incorporated to create vibrant red dough while keeping the other portion white.
- Shape Candy Canes: Scoop out 1 to 2 tablespoon portions from each dough color, roll each into 5-inch ropes. Twist one red and one white rope together, pinch ends lightly to seal, then shape into a candy cane curve. Place shaped cookies on prepared baking sheets, about 10 per sheet to allow space for baking.
- Brush and Sprinkle: Lightly brush the candy canes with 1 tablespoon of milk to help the sanding sugar adhere, then sprinkle the white sanding sugar evenly over each cookie to add a festive sparkle and texture.
- Bake the Cookies: Bake in the preheated oven for 10 to 11 minutes, or until the bottoms turn light golden brown, indicating they are cooked through but still soft.
- Cool the Cookies: Let the cookies cool on the baking sheet for 5 minutes to firm up, then transfer them to a wire rack to cool completely before serving or storing.
Notes
- For best results, use gel food coloring as it does not affect the dough’s consistency compared to liquid food coloring.
- Ensure the butter is softened but not melted to achieve the proper creaming texture.
- The vinegar-milk mixture acts as a buttermilk substitute to tenderize the cookies.
- Handle the dough gently during mixing to keep the cookies tender and prevent them from becoming tough.
- These cookies can be stored in an airtight container at room temperature for up to one week or frozen for longer storage.
- Experiment with different extracts or omit the peppermint if preferred, though this will alter the classic flavor profile.

