
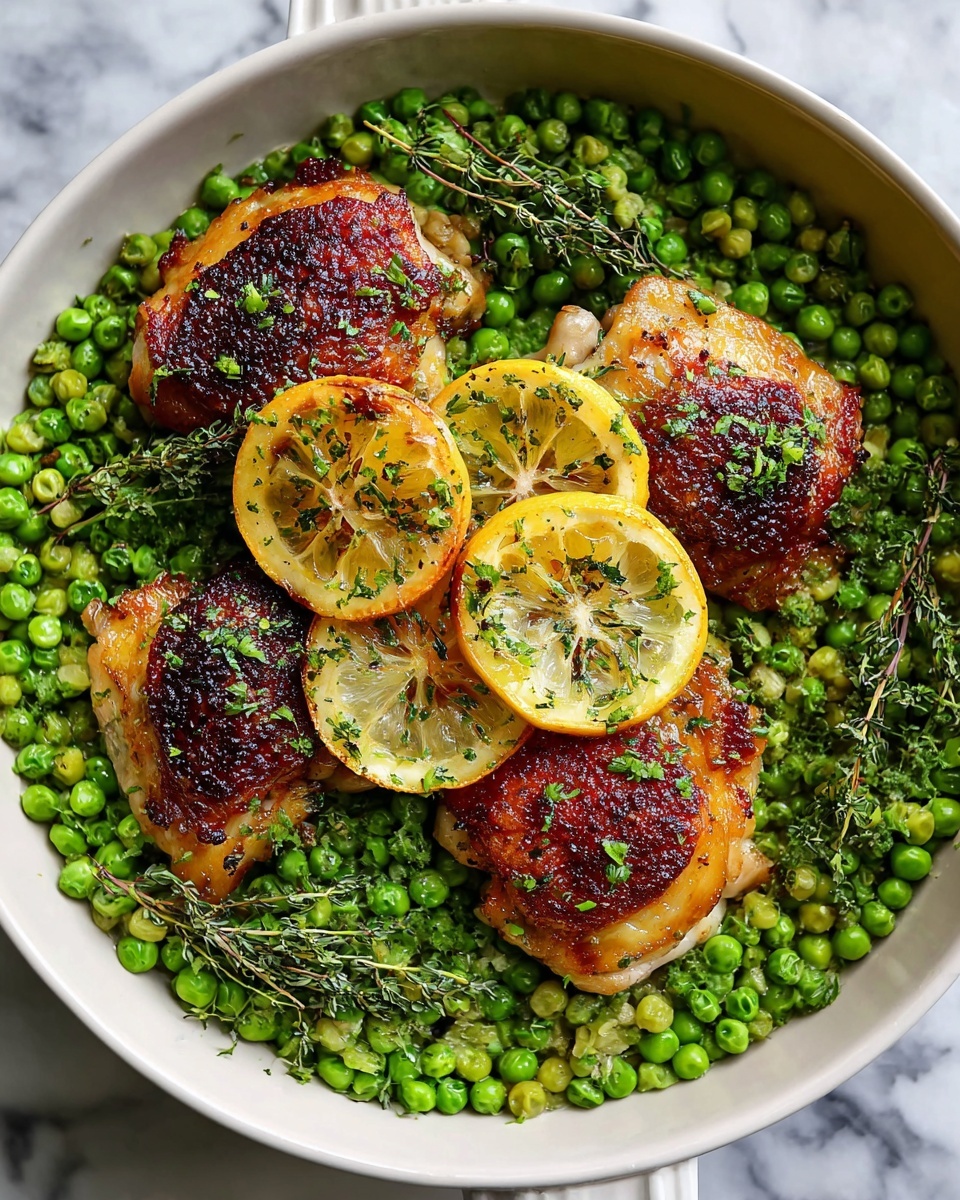
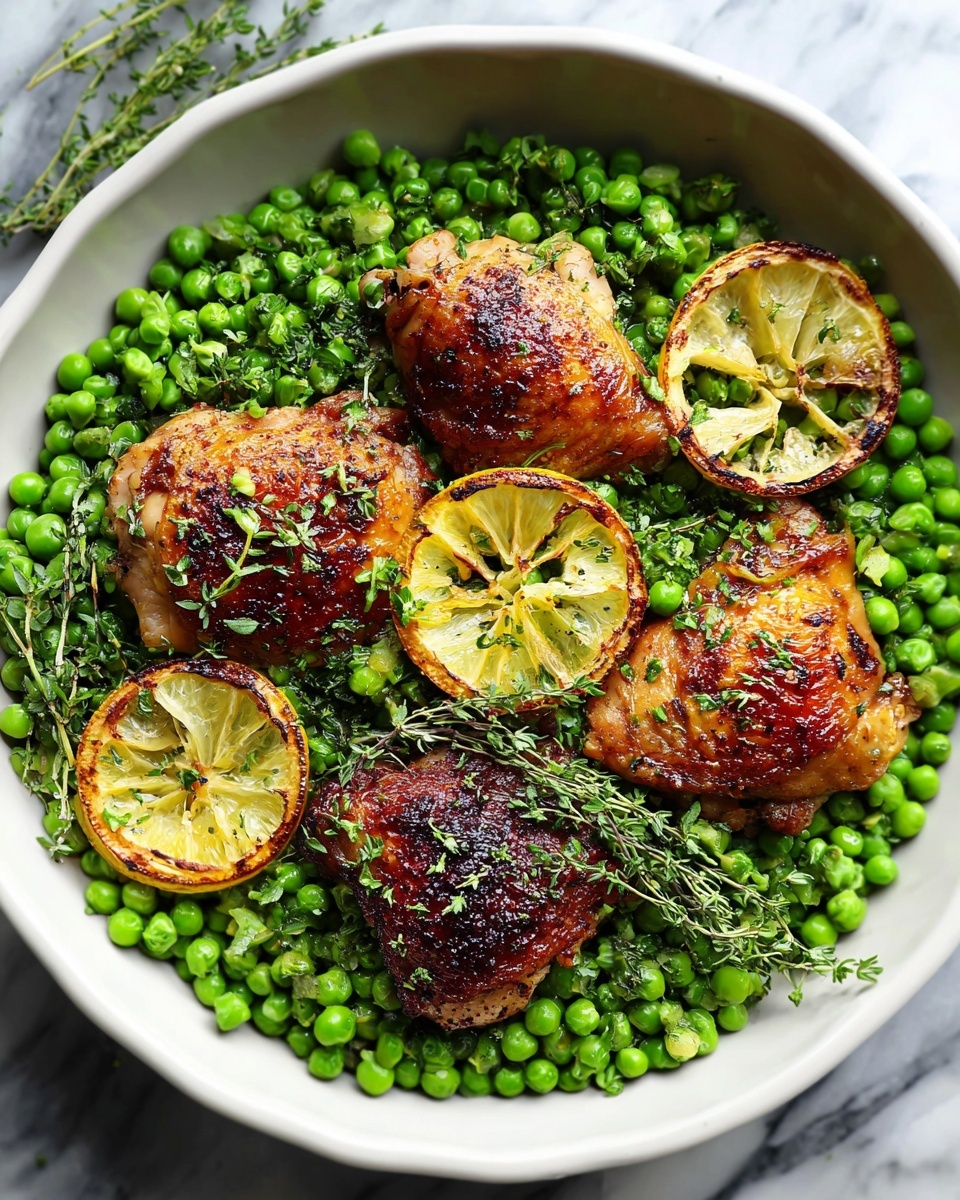
If you’re craving a dish that hits all the right notes of texture and flavor, this Crispy Chicken Thighs with Fresh Smashed Peas Recipe is your next kitchen win. Picture irresistibly golden, crispy-skinned chicken thighs paired with vibrant, buttery smashed peas brightened with a squeeze of fresh lemon. It’s comfort food with a fresh twist, easy enough for weeknights but impressive enough for guests. Every bite delivers a satisfying crunch balanced by the soft, lively peas, making this recipe a total crowd-pleaser that you’ll find yourself coming back to again and again.
Ingredients You’ll Need
The beauty of this Crispy Chicken Thighs with Fresh Smashed Peas Recipe lies in its simplicity. Each ingredient plays a clear role — from the crispy, flavor-packed chicken skin to the fresh, velvety texture of the peas enhanced by butter and lemon. Here’s what you’ll need to bring this delightful dish to life:
- 4 pieces bone-in, skin-on chicken thighs: The skin crisps up beautifully for that irresistible crunch, and the bone adds extra flavor and moisture.
- 2 tablespoons extra virgin olive oil: Perfect for searing the chicken to a golden crisp without sticking.
- 1 teaspoon kosher salt: Essential for seasoning and drawing flavor into every bite.
- 0.5 teaspoon freshly ground black pepper: Adds a subtle heat and depth to the chicken.
- 3 cloves minced garlic: Infuses the chicken with aromatic warmth and enhances savory notes.
- 2 cups fresh peas (shelled): Their natural sweetness and bright color make the peas a vibrant sidekick to the dish.
- 1 lemon: The juice adds a zesty brightness that lifts the richness of the butter and chicken.
- 1 tablespoon unsalted butter: Brings creaminess and smoothness to the smashed peas, making them irresistibly comforting.
How to Make Crispy Chicken Thighs with Fresh Smashed Peas Recipe
Step 1: Preheat and Prepare
Start by preheating your oven to 425°F (220°C). Getting your oven hot right away ensures that once your chicken goes in, it roasts quickly and crisply, locking in the juiciness you want.
Step 2: Season the Chicken
Pat your chicken thighs dry with paper towels — this step is key for crispiness. Then season both sides generously with salt and pepper, making sure every piece is evenly coated to build that perfect flavor base.
Step 3: Sear the Chicken
Warm the olive oil in a large oven-safe skillet over medium-high heat. Place the chicken thighs skin side down and sear them until the skin turns a gorgeous golden brown, about 5-7 minutes. This step is where the magic of crispy skin really starts.
Step 4: Add Garlic
Flip the chicken thighs over, then quickly stir in the minced garlic. Let it cook for about 30 seconds until fragrant—this adds an incredible aroma and subtle garlic flavor that complements the chicken perfectly.
Step 5: Roast to Perfection
Transfer your skillet to the oven and roast for 25-30 minutes. This slow finish in the oven ensures the chicken cooks through while the skin stays crisp and the meat remains juicy. Use a thermometer to check for an internal temperature of 165°F (75°C).
Step 6: Cook the Peas
While the chicken roasts, bring a pot of water to a boil and add your fresh peas. Cook them just 2-3 minutes until they turn bright green and tender. The quick cook keeps their fresh sweetness alive for the smashed peas.
Step 7: Smash and Season Peas
Drain the peas and return them to the pot. Add butter and a generous squeeze of lemon juice, then smash the peas to your desired texture — whether you like them roughly chunky or smooth. Season with salt and pepper to taste.
Step 8: Rest the Chicken
Once the chicken is out of the oven, let it rest for 5 minutes. This step lets the juices redistribute, keeping every bite moist and flavorful.
Step 9: Serve and Enjoy
Plate the crispy chicken thighs alongside a hearty scoop of fresh smashed peas. Don’t forget to drizzle some of those lovely skillet juices over the top for an extra burst of flavor. This is truly a dish that feels like a warm hug on a plate.
How to Serve Crispy Chicken Thighs with Fresh Smashed Peas Recipe
Garnishes
A sprinkle of fresh chopped parsley or some lemon zest will brighten this dish and add a pop of color. A light drizzle of extra virgin olive oil can also add a silky finish to the peas and chicken.
Side Dishes
This Crispy Chicken Thighs with Fresh Smashed Peas Recipe pairs beautifully with crusty bread to soak up all those juices. For a heartier meal, serve it alongside roasted baby potatoes or a simple mixed green salad with a lemon vinaigrette.
Creative Ways to Present
Try serving the chicken thighs on a wooden board with the smashed peas spread underneath as a rustic bed. Or for a more elegant presentation, spoon the peas in neat quenelles beside each thigh, garnished with microgreens and a lemon wedge for a vibrant plate.
Make Ahead and Storage
Storing Leftovers
Store leftover chicken and smashed peas in airtight containers in the refrigerator for up to 3 days. Keeping the chicken skin separate helps maintain some crispness, but the peas stay creamy and delicious even after chilling.
Freezing
You can freeze the chicken and peas, but the texture of the peas might change slightly. Freeze in separate containers for up to 2 months. Thaw overnight in the fridge before reheating to preserve flavor and texture as much as possible.
Reheating
Reheat the chicken in a preheated oven at 350°F (175°C) for about 10-15 minutes to help the skin regain some crispness. Warm the peas gently on the stovetop or in the microwave, stirring occasionally to keep their creamy, fresh taste.
FAQs
Can I use boneless chicken thighs for this recipe?
Absolutely! Boneless thighs will cook faster, so adjust your roasting time accordingly to avoid overcooking. You may lose a bit of juiciness and crispiness that the bone adds, but it will still be delicious.
What if I don’t have fresh peas? Can I use frozen?
Frozen peas work perfectly as a substitute. Just adjust the boiling time as frozen peas cook more quickly. This is a great option when fresh peas aren’t in season.
How can I make the chicken extra crispy?
Patting the chicken dry and allowing it to rest uncovered in the fridge for an hour before cooking can help dry out the skin, resulting in an even crispier texture when seared and roasted.
Is there a way to add more flavor to the peas?
For an extra boost, stir in some fresh mint or basil leaves right before serving. These herbs add a fresh, vibrant note that pairs wonderfully with the lemon and butter.
Can I make this recipe gluten-free?
Yes! This Crispy Chicken Thighs with Fresh Smashed Peas Recipe is naturally gluten-free as long as you use gluten-free olive oil and butter. It’s a tasty and safe option for those avoiding gluten.
Final Thoughts
This Crispy Chicken Thighs with Fresh Smashed Peas Recipe is a treasure for any home cook looking to impress without fuss. It brings together simple ingredients with straightforward techniques to create a meal bursting with flavor and texture. I can’t wait for you to try it and make it a cherished favorite in your rotation as well!
Print
Crispy Chicken Thighs with Fresh Smashed Peas Recipe
- Prep Time: 15 minutes
- Cook Time: 30 minutes
- Total Time: 45 minutes
- Yield: 4 servings
- Category: Main Course
- Method: Roasting
- Cuisine: American
Description
This recipe features crispy oven-roasted chicken thighs with a flavorful sear, paired with fresh smashed peas enhanced with lemon juice and butter for a bright, creamy side. Perfectly balanced and easy to prepare, it delivers a satisfying meal with a crispy skin and tender, juicy meat alongside vibrant smashed peas.
Ingredients
Chicken Thighs
- 4 pieces bone-in, skin-on chicken thighs (Approximately 1.5 pounds)
- 2 tablespoons extra virgin olive oil (For searing the chicken)
- 1 teaspoon kosher salt (Or to taste)
- 0.5 teaspoon freshly ground black pepper (For seasoning)
- 3 cloves minced garlic (For flavor)
Smashed Peas
- 2 cups fresh peas (Shelled)
- 1 piece lemon (Juice for brightness)
- 1 tablespoon unsalted butter (For creaminess in peas)
Instructions
- Preheat Oven: Preheat your oven to 425°F (220°C) to prepare for roasting the chicken thighs evenly and achieve a crispy finish.
- Season Chicken: Pat the chicken thighs dry with paper towels to ensure crispiness, then season both sides with salt and freshly ground black pepper.
- Sear Chicken: Heat olive oil in a large oven-safe skillet over medium-high heat and place the chicken thighs skin side down. Sear for 5-7 minutes until the skin is golden brown and crispy.
- Add Garlic: Flip the chicken thighs, add the minced garlic to the skillet, and sauté for about 30 seconds until the garlic becomes fragrant, infusing the chicken with aroma.
- Roast Chicken: Transfer the skillet to the preheated oven and roast the chicken for 25-30 minutes or until the internal temperature reaches 165°F (75°C), ensuring it is cooked through and juicy.
- Cook Peas: While the chicken roasts, bring a pot of water to a boil. Add the fresh peas and cook for 2-3 minutes until they are bright green and tender. Drain and return them to the pot.
- Prepare Smashed Peas: Add butter and lemon juice to the hot peas, then smash them with a potato masher or fork to your desired consistency. Season with salt and pepper to taste.
- Rest Chicken: Remove the chicken from the oven and let it rest for 5 minutes to allow juices to redistribute and maintain moisture.
- Serve: Plate the crispy chicken thighs alongside the smashed peas and drizzle with the flavorful skillet juices for an enhanced savory finish.
Notes
- Ensure chicken skin is dry before searing for maximum crispiness.
- Use an oven-safe skillet to avoid transferring the chicken to another dish for roasting.
- Adjust seasoning of the peas after smashing to balance flavor and acidity.
- Internal chicken temperature should reach 165°F (75°C) for safe consumption.
- Fresh peas can be substituted with thawed frozen peas if fresh are unavailable.


