
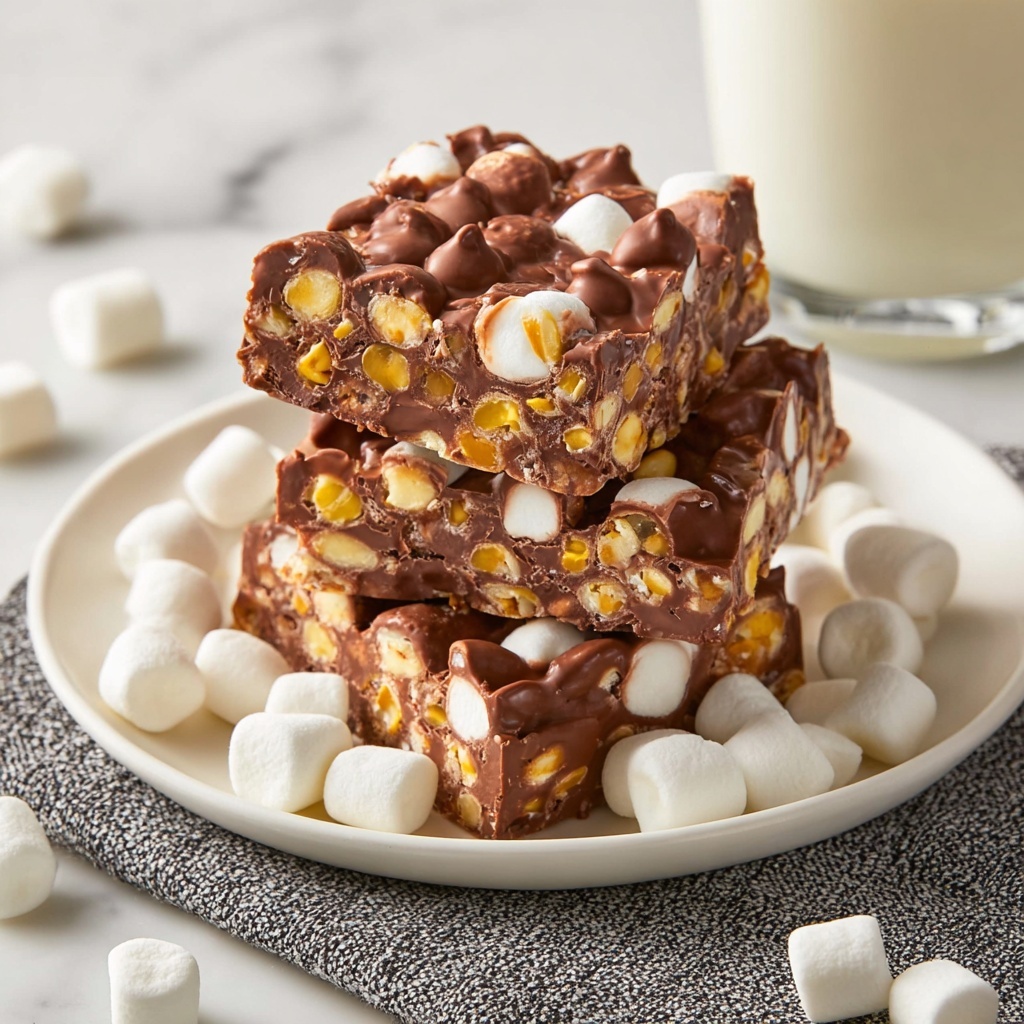
If you’re craving a sweet treat that delivers a perfect mix of creamy chocolate, crunchy nuts, and fluffy marshmallows, this Rocky Road Candy Recipe is your new best friend in the kitchen. It’s delightfully simple to make yet incredibly satisfying, combining the smooth richness of butterscotch and semi-sweet chocolate with the fun texture of almonds and mini marshmallows. Whether you’re making it for a festive gathering or a cozy night in, this Rocky Road candy is guaranteed to bring smiles and a little bit of magic to every bite.
Ingredients You’ll Need
Getting the ingredients just right is the first step to nailing this Rocky Road Candy Recipe. Each component brings its own special touch — from the silky melt of chocolate chips to the satisfying crunch of almonds and the chewy fun of marshmallows.
- Butterscotch chips: Adds a rich, buttery sweetness that beautifully complements the chocolate.
- Semi-sweet chocolate chips: The base flavor that provides a smooth, slightly bitter balance to the candy.
- Peanut butter: Brings creaminess and a touch of savory depth that enriches the overall flavor.
- Salted roasted almonds, coarsely chopped: Adds a crunchy texture and a salty bite to contrast the sweetness.
- Mini marshmallows: Brings a soft, chewy texture that lights up every bite and adds a whimsical touch.
How to Make Rocky Road Candy Recipe
Step 1: Prepare Your Pan
Start by lining an 8×8 or 9×9 inch pan with parchment paper. This step makes sure your candy won’t stick and makes cleanup a breeze. It’s a simple setup, but absolutely necessary for perfect results.
Step 2: Melt the Chocolate, Butterscotch, and Peanut Butter
Combine the chocolate chips, butterscotch chips, and peanut butter in a large, microwave-safe bowl. Microwave in 30 second bursts, stirring each time until everything is melted and silky smooth. Let it cool for about 5 to 10 minutes so the mixture thickens slightly — this ensures your mix-ins won’t sink to the bottom.
Step 3: Fold in the Almonds and Marshmallows
Gently stir in your coarsely chopped salted roasted almonds and mini marshmallows. This is where the candy really starts to look like Rocky Road — full of texture and bursting with flavor in every bite.
Step 4: Chill the Candy
Pour the mixture into your prepared pan. If you love extra marshmallow fluff, sprinkle some more on top. Pop it in the fridge for about one hour, allowing it to firm up and become sliceable.
Step 5: Slice and Enjoy!
Once chilled, lift the entire block out of the pan using the parchment edges, slice into 16 generous pieces, and get ready to indulge. Sharing is optional — though highly recommended!
How to Serve Rocky Road Candy Recipe

Garnishes
For an extra festive touch, top each piece with a sprinkle of crushed almonds or a drizzle of melted white chocolate. This adds a lovely contrast in color and a little extra flair when serving to guests.
Side Dishes
Rocky Road candy pairs wonderfully with a simple dessert like vanilla ice cream or a glass of cold milk. These sides help balance the richness of the candy and make each bite feel even more indulgent.
Creative Ways to Present
Try cutting the Rocky Road candy into bite-sized cubes and serving them on a decorative platter with colorful cocktail picks. You can also wrap individual pieces in cellophane and tie them with ribbon to make adorable edible gifts or party favors.
Make Ahead and Storage
Storing Leftovers
Store your Rocky Road Candy in an airtight container at room temperature or in the fridge for up to a week. Keeping it sealed ensures the marshmallows stay soft and the texture stays perfect.
Freezing
If you want to keep this deliciousness longer, Rocky Road candy freezes wonderfully. Wrap it tightly in plastic wrap and place it in a freezer-safe bag. It’ll keep well for up to 2 months. Just thaw completely before serving to keep the textures intact.
Reheating
This candy is best enjoyed cold or at room temperature, so reheating isn’t usually necessary. But if it softens too much, simply pop it briefly in the refrigerator for a few minutes to firm back up.
FAQs
Can I substitute peanuts or other nuts for the almonds?
Absolutely! Walnuts, pecans, or even cashews can work beautifully in this Rocky Road Candy Recipe. Just make sure to chop them coarsely to maintain that delightful crunch.
Is this recipe gluten-free?
Yes, all the ingredients used here are naturally gluten-free. However, always check the packaging of your peanut butter and chocolate chips to ensure no cross-contamination if you’re serving someone with gluten sensitivity.
Can I use dark chocolate instead of semi-sweet chocolate?
Definitely! Dark chocolate will give your Rocky Road candy a richer, more intense flavor. It pairs wonderfully with the butterscotch and peanut butter for a more sophisticated twist.
How long does Rocky Road candy keep fresh?
When stored properly in an airtight container, Rocky Road candy will stay fresh for up to one week at room temperature or refrigerated. Beyond that, texture and flavor might start to change.
Can I double this recipe?
You can double the ingredients easily! Just use a larger pan to accommodate the extra mixture and keep all ingredient proportions the same to maintain the perfect balance of flavors and textures.
Final Thoughts
This Rocky Road Candy Recipe is truly one of those desserts that feels like a warm hug — sweet, comforting, and irresistibly fun to eat. It only takes a few simple ingredients and a bit of patience, but the results are incredibly rewarding. Next time you want to treat yourself or impress friends, give this recipe a try. I promise it won’t disappoint!
Print
Rocky Road Candy Recipe
- Prep Time: 10 minutes
- Cook Time: 0 minutes
- Total Time: 1 hour 10 minutes
- Yield: 16 pieces
- Category: Candy
- Method: No-Cook
- Cuisine: American
Description
This Rocky Road Candy recipe is a delightful no-bake treat combining rich semi-sweet chocolate, creamy butterscotch, crunchy almonds, and fluffy mini marshmallows. Easy to make and perfect for satisfying your sweet tooth, this candy is a crowd-pleaser that sets quickly in the fridge, making it a great homemade gift or snack.
Ingredients
Chocolate Mixture
- 1 cup butterscotch chips
- 12 ounce package semi sweet chocolate chips
- ⅓ cup peanut butter
Add-ins
- 1 cup salted roasted almonds, coarsely chopped
- 10 ounce package mini marshmallows
Instructions
- Prepare Pan: Line an 8×8 or 9×9 inch pan with parchment paper to prevent sticking and set it aside.
- Melt Ingredients: In a large microwave-safe bowl, combine the semi-sweet chocolate chips, butterscotch chips, and peanut butter. Microwave in 30-second increments, stirring between each, until completely melted and smooth. Let the mixture cool for 5-10 minutes until slightly warm but not hot.
- Mix Add-ins: Stir the chopped almonds and mini marshmallows into the melted chocolate mixture until they are evenly distributed.
- Set the Candy: Pour the mixture into the prepared pan. If desired, add extra mini marshmallows on top for decoration. Place the pan in the refrigerator and chill for 1 hour until firm.
- Serve: Once set, remove from the fridge and slice into 16 equal pieces. Serve and enjoy your homemade Rocky Road Candy!
Notes
- Use parchment paper to easily lift the candy out of the pan once set.
- You can substitute roasted unsalted almonds if preferred; just add a pinch of salt if desired.
- For a nut-free version, replace almonds with additional marshmallows or your favorite seeds.
- Store leftovers in an airtight container in the refrigerator for up to 2 weeks.
- Let the melted mixture cool slightly before adding marshmallows to prevent them from melting too much.


