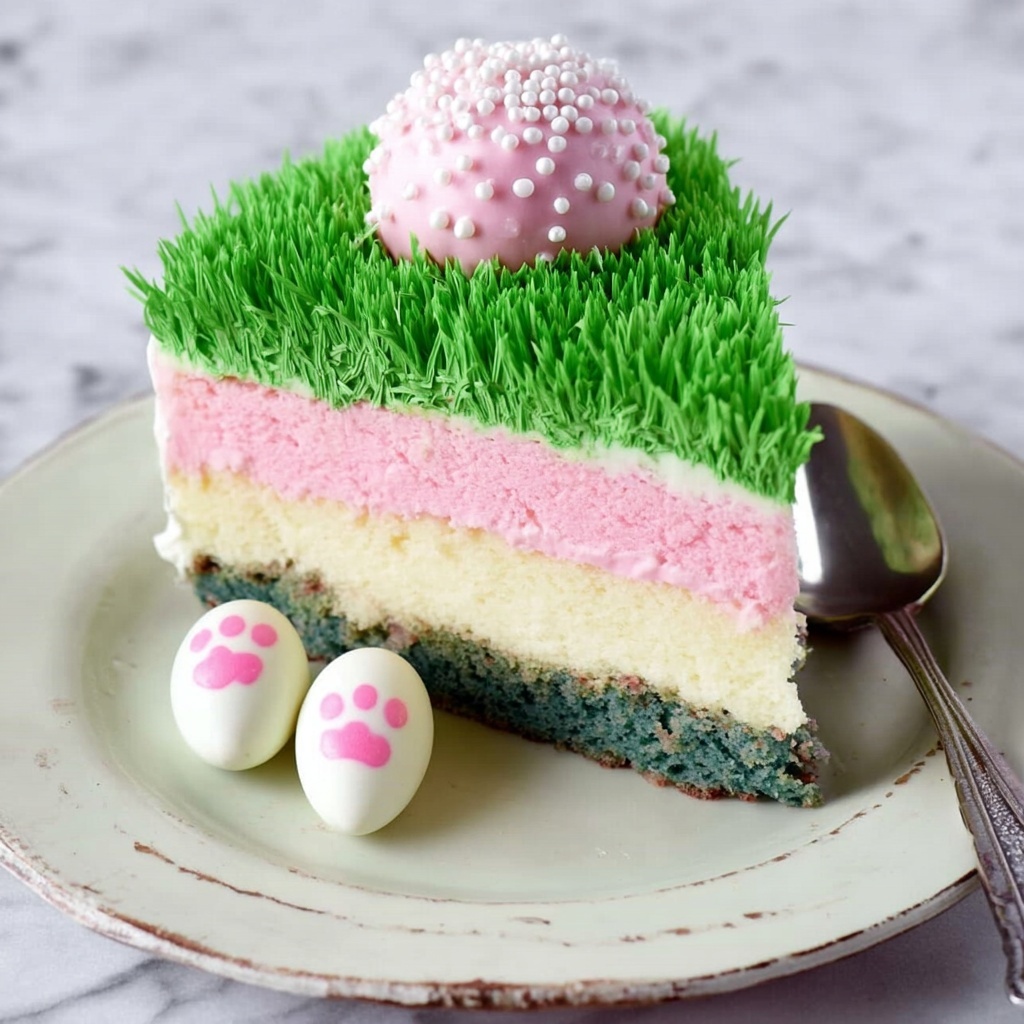
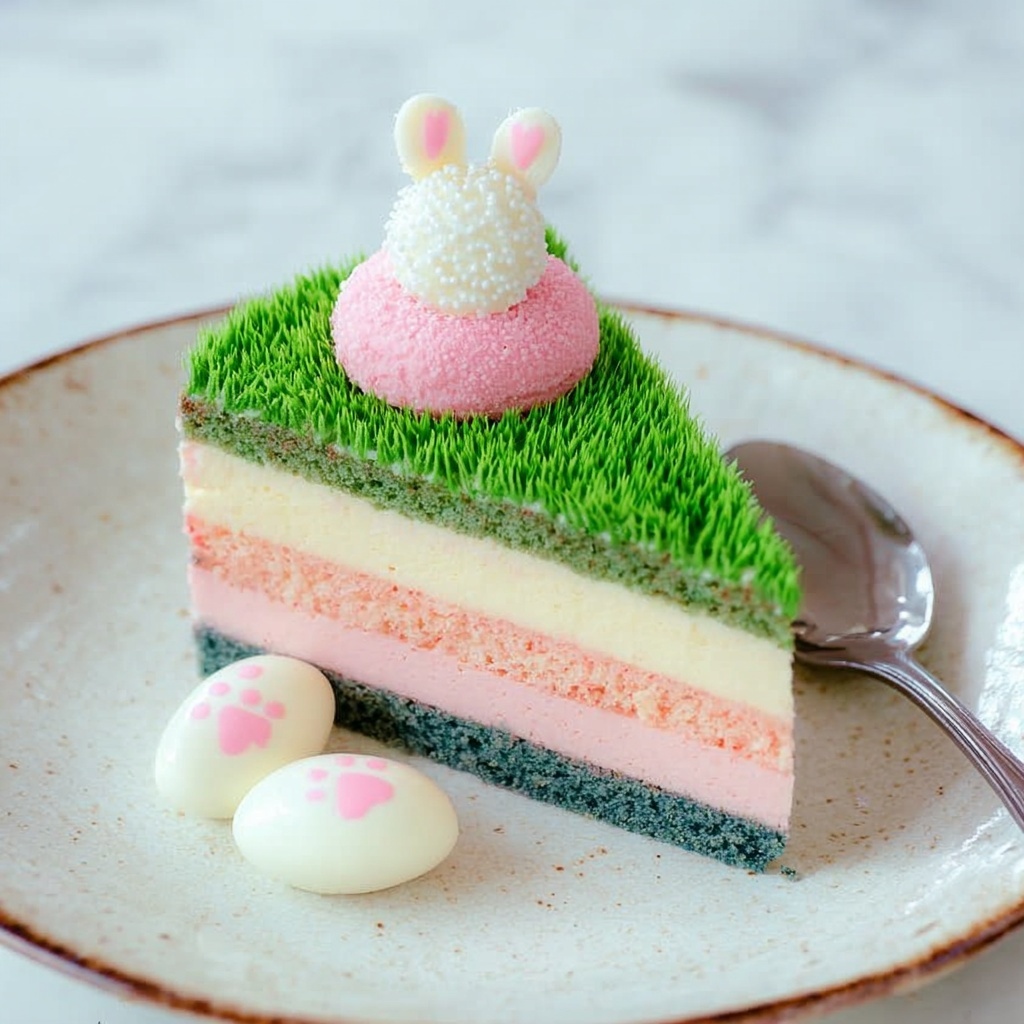
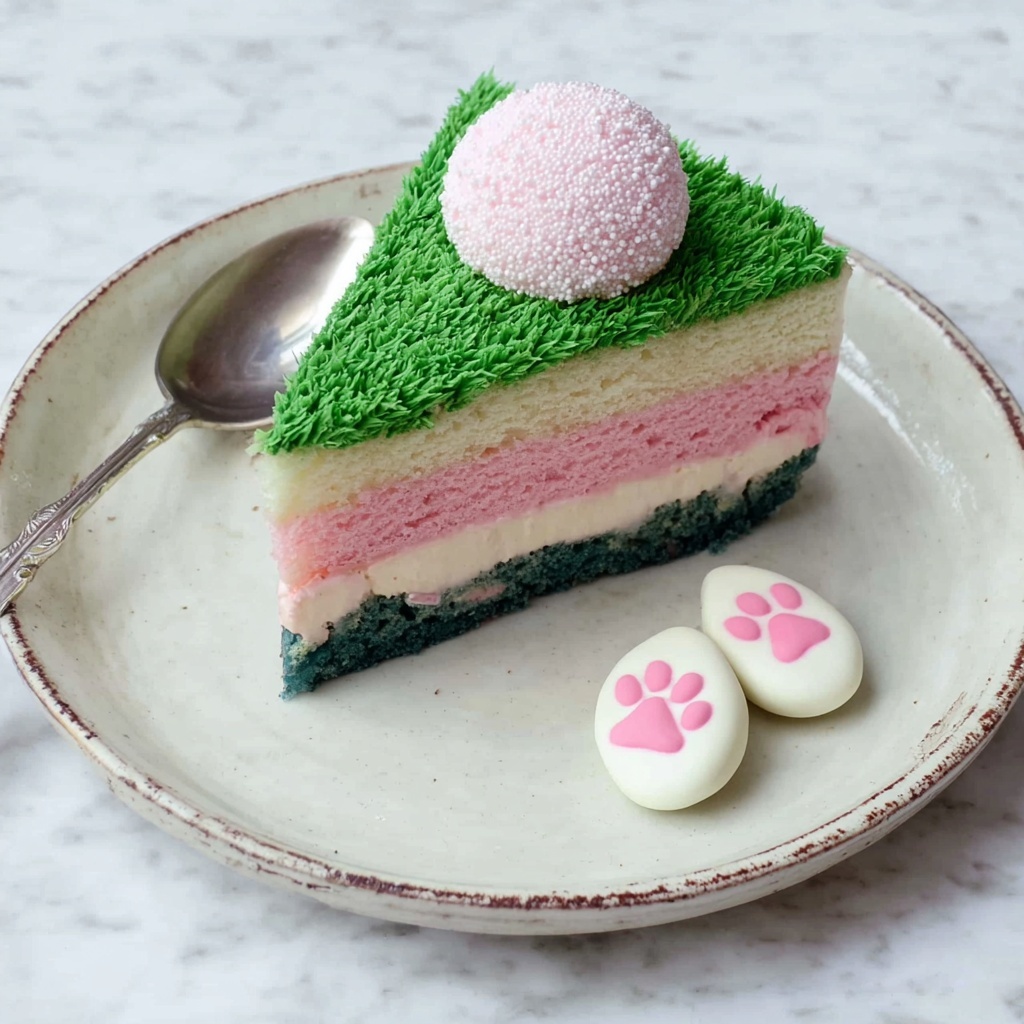
If you’re on the hunt for a cheesecake that’s whimsical, colorful, and downright delightful, let me introduce you to the Bunny Butt Cheesecake Recipe. This charming dessert layers vibrant pinks, crisp whites, and a splash of aqua-teal to create a sweet treat that’s as playful as it is delicious. With a buttery graham cracker crust tinted in eye-catching color and fluffy cream cheese layers, this cheesecake is perfect for celebrations or anytime you want to brighten up the day with some irresistible sweetness.
Ingredients You’ll Need
These ingredients are refreshingly simple but bring together so beautifully to give the Bunny Butt Cheesecake its creamy texture, colorful layers, and unforgettable flavor. Each element plays a vital role, from the buttery crust to the vibrant food coloring that makes this cheesecake pop with personality.
- Graham Crackers (1 1/2 sleeves): The base for your crust, crushed finely for a crisp, buttery foundation.
- Sugar (1 tsp): Adds just enough sweetness to the crust to balance the richness of the cheese layers.
- Butter, melted (6 Tbsp): Binds the crust crumbs together, ensuring a firm, flavorful base.
- Food Coloring (Aqua/Teal): Gives the crust that stunning, unexpected pop of color.
- Cream Cheese (4 packages, 8 oz. each): The heart of the cheesecake, providing that silky, rich texture everyone loves.
- Heavy Whipping Cream (1 1/2 cups): Whipped to stiff peaks for airy lightness in the filling.
- Sugar (1 cup): Sweetens the cream cheese mixture to perfection.
- Powdered Sugar (1/2 cup): Smoothly blends in for a delicate sweetness that won’t grain.
- Vanilla (2 tsp): Infuses the cheesecake with warm, comforting flavor.
- Food Coloring (Pink): The key to the vibrant layers that give this cheesecake its signature look.
- Vanilla Frosting (1 large container): Adds an extra layer of creamy sweetness and decoration potential.
- Food Coloring (Green): Perfect for creating leafy or grassy accents in your presentation.
- Snoball Cupcakes (Hostess Brand): These charming cupcakes add texture and whimsy, perfect for bunny details.
- Wilton Candy Bunny Feet: Essential for giving your cheesecake that adorable “bunny butt” finish.
- White Chocolate (to melt): Used for decoration and binding elements together.
- White Nonpareils: Little sprinkles to add texture and extra sweetness to your design.
How to Make Bunny Butt Cheesecake Recipe
Step 1: Create the Colored Graham Cracker Crust
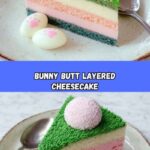
Start by melting your butter in a small bowl right in the microwave — quick and easy. In a food processor or blender, crush the graham crackers into fine crumbs. Sprinkle in a teaspoon of sugar, then pulse to mix evenly. Pour in the melted butter and pulse again until the crumbs are coated beautifully. Now, this is where the magic happens: add a few drops of aqua/teal food coloring gel and blend until the crumbs turn the perfect shade you love. Press this colorful crust firmly into a 7-inch springform pan lined with parchment paper. Get the base absolutely even with the back of a spoon, then pop it into the freezer to chill while you prepare the cheesecake layers.
Step 2: Whip Up the Creamy Cheesecake Batter
Using a stand mixer with a whisk attachment, combine the heavy cream, sugar, and vanilla, whipping until stiff peaks form — this makes your filling light and airy. Next, add the cream cheese packages one at a time along with the powdered sugar, blending until the mixture is smooth, fluffy, and irresistible. Scoop out one-third of this batter and place it in the fridge—it will become your pristine white middle layer. Add a few drops of pink food coloring gel into the remaining cheesecake batter and mix well, adjusting until you get that perfect blush pink hue.
Step 3: Layer and Freeze Your Cheesecake
Remove your colored crust from the freezer and gently pour or spoon half of the pink cheesecake batter over it, spreading evenly. Return the pan to the freezer until the pink layer is firm enough to touch, about 2 to 3 hours. Once set, pour the refrigerated white layer on top and freeze again until this layer firms up. Finally, add the remaining pink batter layer on top and let it chill in the freezer overnight for the best, cleanest layers. Patience here pays off with those beautiful, distinct layers that will impress anyone who sees your Bunny Butt Cheesecake Recipe come to life.
Step 4: Decorate Your Bunny Butt
Once the cheesecake is completely set, it’s time to bring on the fun decorations! Carefully remove your cheesecake from the springform pan and place it on your serving plate. Use the white frosting tinted with green food coloring to pipe grassy details around the base, adding a fresh garden feel. Arrange the Hostess Snoball cupcakes as the bunny’s fluffy body parts, use melted white chocolate to affix Wilton Candy Bunny Feet in place, and sprinkle white nonpareils for a touch of sugary sparkle. The result will be a charming and utterly adorable Bunny Butt Cheesecake that’s sure to steal hearts.
How to Serve Bunny Butt Cheesecake Recipe
Garnishes
Adding garnishes to your Bunny Butt Cheesecake Recipe elevates the whimsy and flavor. Consider fresh mint leaves or edible flowers for a natural, spring-like touch, or a light dusting of powdered sugar for that fresh-from-the-morning-dew look. The green frosting acts like a mini meadow, and those candy bunny feet are the ultimate cute surprise to top it off.
Side Dishes
This cheesecake pairs wonderfully with light, fresh sides. Serve it alongside fresh berries or a fruit compote to balance the rich creaminess. For an extra indulgent celebration, a scoop of lemon sorbet or a dollop of freshly whipped cream complements the Bunny Butt Cheesecake Recipe beautifully without overpowering its delicate sweetness.
Creative Ways to Present
Presentation is everything with this playful dessert! Try placing the cheesecake on a cake stand surrounded by pastel-colored napkins and fresh mini carrots for a delightful Easter-inspired table. Use small bouquets of daisies or baby’s breath around the platter to create a whimsical garden scene. If serving at a party, individual slices garnished with mini bunny ears made from sliced almonds or fondant add a personal, charming touch.
Make Ahead and Storage
Storing Leftovers
This cheesecake stays fresh and creamy best when stored in an airtight container in the refrigerator. Keep it chilled, and consume within 3 to 5 days to enjoy the bright colors and delicate flavors at their peak. Covering it well prevents the cheesecake from absorbing any other fridge aromas.
Freezing
You can freeze slices of your Bunny Butt Cheesecake Recipe wrapped tightly in plastic wrap and aluminum foil for up to a month. When you’re ready to enjoy, thaw slices overnight in the fridge to maintain texture and flavor. Freezing is a great way to prepare ahead for a party or to savor a little sweetness later on.
Reheating
Because this cheesecake is served chilled, reheating is not necessary. If you want to soften it a bit for easier slicing, simply let it stand at room temperature for 10 to 15 minutes before serving. This lets the delicious layers shine through without losing that delightful, refreshing coolness.
FAQs
Can I use regular graham crackers instead of flavored ones for the crust?
Absolutely! Regular graham crackers work perfectly, and adding the aqua/teal food coloring to the crust crumbs gives you that fun pop of color no matter the type of cracker you choose.
Is it necessary to use food coloring in this recipe?
While the food coloring is what makes the Bunny Butt Cheesecake Recipe visually striking and whimsical, you can skip it for a more traditional look. However, the colors add a lot to the overall charm and presentation.
Can I make this cheesecake without a stand mixer?
Yes, you can! Use a hand mixer or even beat the ingredients by hand with a whisk, though it might take a bit longer to achieve those stiff peaks and smooth batter consistency.
What if I don’t have a springform pan?
A springform pan is best for easy removal of the cheesecake without ruining the layers, but if you don’t have one, line a regular cake pan with parchment paper and be very gentle when unmolding.
How do I get the layers so even and distinct in the Bunny Butt Cheesecake Recipe?
Freezing each layer until firm before adding the next is key. Taking your time here ensures crisp lines between the colors and a beautiful, professional-looking result.
Final Thoughts
I cannot recommend enough giving the Bunny Butt Cheesecake Recipe a try, especially if you adore desserts that bring joy not just in flavor but also in creativity. Its playful layers, delightful colors, and adorable bunny-themed details turn an everyday cheesecake into an unforgettable centerpiece. Whether for a special occasion or just because, this recipe is sure to bring smiles and maybe even a little hop of happiness to your table!
Print
Bunny Butt Cheesecake Recipe
- Prep Time: 30 minutes
- Cook Time: 0 minutes
- Total Time: overnight (includes freezing times: approx 8-10 hours total)
- Yield: 8 to 8 slices
- Category: Dessert
- Method: No-Cook
- Cuisine: American
Description
Bunny Butt Cheesecake is a fun and whimsical no-bake layered cheesecake featuring colorful cream cheese layers on a tinted graham cracker crust. Finished with frosted Snoball cupcakes and adorable candy bunny feet, this dessert is perfect for spring or Easter celebrations.
Ingredients
Crust
- 1 1/2 sleeves Graham Crackers
- 1 tsp Sugar
- 6 Tbsp Butter, melted
- Food Coloring (Aqua/Teal)
Cheesecake Filling
- 4 (8 oz.) packages Cream Cheese
- 1 1/2 cups Heavy Whipping Cream
- 1 cup Sugar
- 1/2 cup Powdered Sugar
- 2 tsp Vanilla Extract
- Food Coloring (Pink)
Decorations
- 1 large container Vanilla Frosting
- Food Coloring (Green)
- 1 package Snoball Cupcakes (Hostess Brand)
- Wilton Candy Bunny Feet
- White Chocolate (for melting)
- White Nonpareils
Instructions
- Prepare the Crust: In a small bowl, melt the butter in the microwave. Place the graham crackers in a food processor or blender and pulse until crumbed finely. Sprinkle sugar over the crumbs and pulse to combine. Pour the melted butter over crumbs and pulse to coat evenly. Remove the lid and add several drops of aqua/teal food coloring gel, replace lid and pulse to blend the color into the crumbs. Continue adding drops until desired color is reached. Line the bottom of a 7-inch springform pan with parchment paper, then press the colored crumbs evenly into the bottom of the pan using a spoon. Place the pan in the freezer to set.
- Make the Cheesecake Batter: In the bowl of a stand mixer fitted with the whisk attachment, combine heavy cream, sugar, and vanilla. Whip until stiff peaks form. Add cream cheese packages one at a time along with powdered sugar and mix until smooth and fluffy. Remove about one third of this batter and refrigerate; this will be the white middle layer. Add several drops of pink food coloring gel to the remaining batter in the mixer and mix well, adding more if necessary to reach the desired pink shade.
- Layer the Cheesecake: Remove the pan with crust from the freezer, pour or spoon half of the pink cheesecake batter over the crust evenly, then return to the freezer. Once the pink layer is firm to the touch (approximately 2 to 3 hours), remove the white batter from the refrigerator and pour it evenly on top of the pink layer. Return the pan to the freezer until the white layer is set (2 to 3 hours). Finally, pour the remaining pink batter on top of the white layer and freeze overnight for best results.
- Decorate the Cheesecake: After the cheesecake layers have fully set, frost the top with vanilla frosting tinted green using food coloring. Melt white chocolate and decorate the top with white nonpareils to mimic bunny tails or fur texture. Arrange Snoball cupcakes around to imitate bunny butts and attach Wilton candy bunny feet to complete the playful bunny theme dessert.
Notes
- The cheesecake is a no-bake recipe but requires multiple freezing steps to set properly.
- Use gel food coloring for the best vibrant color without changing the texture.
- Allow sufficient freezing time between layers to avoid mixing of colors.
- For easiest removal, chill the springform pan in the freezer and run a hot knife around the edges before releasing.
- Decorations can be customized or omitted based on preference.

