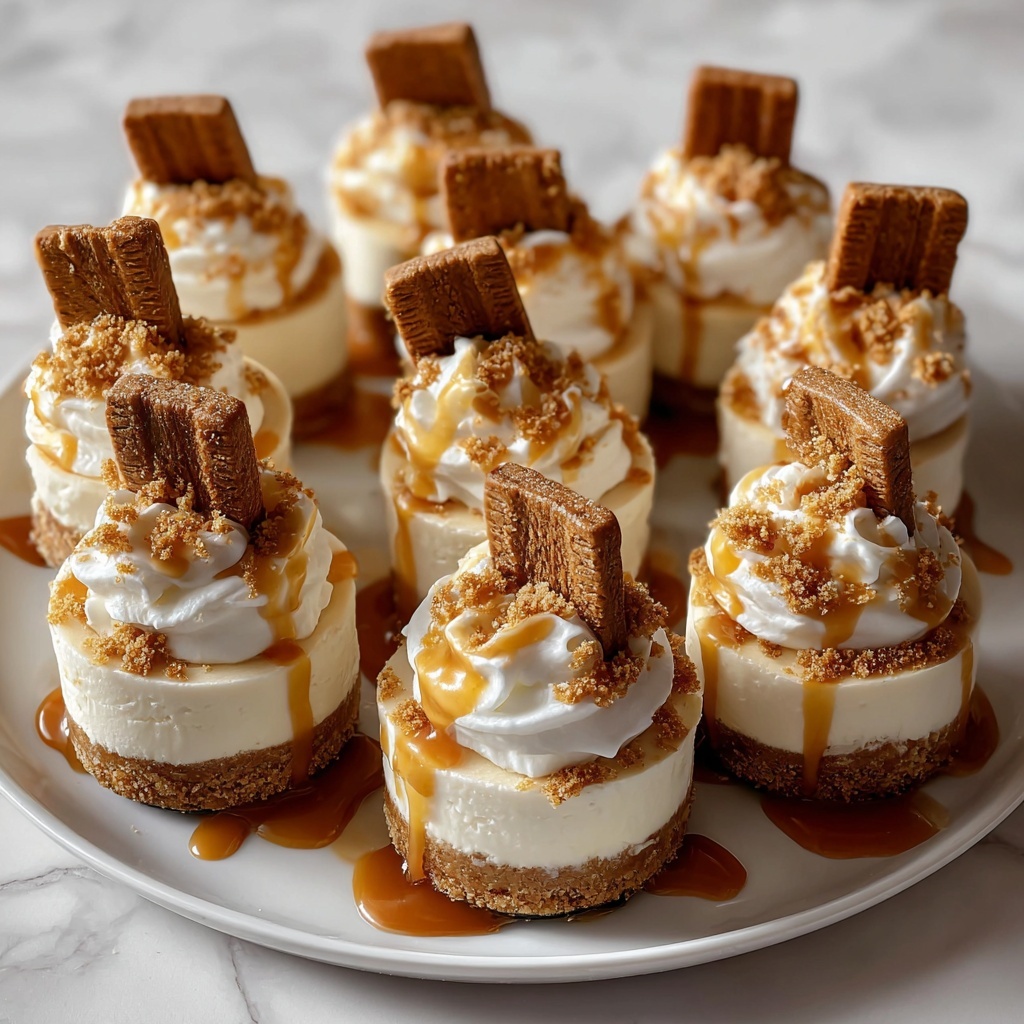
There is something irresistibly wonderful about these No Bake Mini Biscoff Cheesecakes Recipe that makes them a standout treat for any occasion. Each petite cheesecake is bursting with that warm, caramelized Biscoff flavor wrapped in a creamy, dreamy texture that just melts in your mouth. The beauty of this recipe lies not only in its incredible flavor but also in its simplicity – no oven required, just a little time to let them set, and you’ll have bite-sized indulgences that everyone will love. Whether you’re a longtime Biscoff fan or new to this luscious spread, these mini cheesecakes deliver a satisfying combination of crunch, cream, and spice that feels both special and comforting.
Ingredients You’ll Need
Gathering these ingredients is a breeze, and each one plays a starring role in creating the perfect balance of texture and flavor. From the buttery biscuit base to the light, fluffy cream cheese filling, every component is thoughtfully chosen to make this dessert shine.
- Biscoff biscuits (200 g, approx. 20 biscuits): These provide that signature spicy sweetness and a crunchy base that’s essential for structure.
- Unsalted butter (85 g, melted): Helps bind the biscuit base with a rich, smooth finish.
- Cream cheese (250 g, room temperature): The creamy heart of the cheesecake, offering softness and tanginess.
- Powdered sugar (100 g): Adds sweetness without any graininess, blending seamlessly into the filling.
- Heavy cream (200 ml): Whipped to perfection to lighten the filling, creating a cloud-like texture.
- Biscoff spread (150 g): Infuses the filling with that iconic caramelized cookie flavor, intensifying the dessert’s personality.
- Vanilla extract (1 teaspoon): Enhances all the rich flavors with a subtle vanilla undertone.
- Extra crushed Biscoff biscuits: To sprinkle on top, adding a delightful crunch and decorative touch.
- Whipped cream (optional): Perfect for topping and adding a luscious, creamy finish.
How to Make No Bake Mini Biscoff Cheesecakes Recipe
Step 1: Prepare the Biscuit Base
First, crush the Biscoff biscuits into fine crumbs. You can use a food processor for a quick, uniform texture or place the biscuits in a sealed plastic bag and gently pound them with a rolling pin. This crumbly base is what sets the stage for your cheesecake’s satisfying crunch.
Step 2: Combine Crumbs and Butter
In a mixing bowl, combine the crushed biscuits with the melted unsalted butter. Stir everything together well so the crumbs absorb the butter, which will help the base hold its shape once pressed into the pans.
Step 3: Form the Base in the Muffin Pan
Press the biscuit mixture evenly into the bottom of each slot of your silicone muffin pan. Use your fingers or the back of a spoon to firmly compact it, creating a sturdy and even foundation for the creamy topping.
Step 4: Beat the Cream Cheese
Using an electric mixer, beat the cream cheese in a large bowl until it’s completely smooth with no lumps. This step ensures your cheesecake filling will be silky and uniform in texture.
Step 5: Add Sweetness and Biscoff Flavor
Mix in the powdered sugar, vanilla extract, and Biscoff spread with the cream cheese. Blend them until the mixture is rich, smooth, and beautifully creamy. The Biscoff spread infuses the filling with that unforgettable warm spice flavor, marrying perfectly with the tangy cream cheese.
Step 6: Whip the Heavy Cream
In a separate bowl, whisk the heavy cream until stiff peaks form. This fluffy whipped cream will lighten the cheesecake filling, giving it an airy, melt-in-your-mouth quality that elevates every bite.
Step 7: Fold Cream into Cream Cheese Mixture
Gently fold the whipped cream into the Biscoff cream cheese mixture. Stir carefully so you maintain as much volume as possible, keeping the filling light and airy.
Step 8: Assemble the Cheesecakes
Spoon the luscious creamy mixture over the biscuit bases in the muffin pan. Smooth the tops with the back of a spoon or spatula, creating an even, inviting surface ready to set.
Step 9: Chill Until Set
Place the pan in the refrigerator and chill for at least 4 hours. This crucial resting time lets the cheesecakes firm up and develop that perfect sliceable texture without baking.
Step 10: Remove and Garnish
Once the mini cheesecakes are nicely set, gently pop them out of the silicone pan. Top each one with some extra crushed Biscoff biscuits and a dollop of whipped cream if you like, adding an extra layer of texture and cupboard-fresh sweetness just before serving.
How to Serve No Bake Mini Biscoff Cheesecakes Recipe
Garnishes
The crushed Biscoff biscuits on top add a delightful crunch and vivid look, while a swirl of whipped cream creates an elegant, fluffy crown. For a little something special, sprinkle a pinch of cinnamon or drizzle some caramel sauce to echo those warm spice notes.
Side Dishes
Pair these mini cheesecakes with fresh berries or a tangy fruit compote to cut through the richness and brighten the palate. A hot cup of coffee or chai tea also makes a wonderful companion, balancing the sweetness and enhancing the Biscoff flavor experience.
Creative Ways to Present
Serve your No Bake Mini Biscoff Cheesecakes Recipe on a beautiful dessert platter lined with fresh mint leaves or edible flowers for a pop of color. You could also place them in glass jars or clear cups layered with crushed biscuits for a trendy, make-ahead dessert parfait.
Make Ahead and Storage
Storing Leftovers
Keep any leftover cheesecakes refrigerated in an airtight container to maintain their creamy texture and fresh flavor. They’ll stay delicious for up to 3 days, making them a perfect treat to prepare ahead of time for gatherings or indulgent snacks.
Freezing
If you want to extend their shelf life, you can freeze these mini cheesecakes. Place them on a tray to freeze individually for a couple of hours first, then transfer to a freezer-safe container or bag. When ready to enjoy, thaw overnight in the fridge to preserve texture and flavor beautifully.
Reheating
Since this is a no-bake chilled dessert, it’s best served cold and not reheated. If you prefer the filling slightly less firm, simply let your cheesecake sit at room temperature for 10-15 minutes before serving to soften it gently.
FAQs
Can I use regular cookies instead of Biscoff biscuits?
Absolutely! While Biscoff biscuits give this cheesecake its distinctive spicy caramel flavor, you can substitute with graham crackers or digestive biscuits for a different but still delicious twist.
Is it possible to make these mini cheesecakes vegan?
Yes, you can experiment with dairy-free cream cheese and coconut cream to replicate the creamy texture, and use vegan Biscoff-style cookies if available. The texture will be slightly different but still tasty!
How long do these cheesecakes need to chill?
A minimum of 4 hours is ideal to allow the filling to fully set. Overnight chilling is even better to achieve perfect firmness and ease of removal.
Can I make larger cheesecakes using this recipe?
Definitely! Just multiply the ingredients accordingly and use a larger mold or springform pan. Keep in mind the chilling time might increase due to the larger size.
Can I prepare the biscuit base in advance?
Yes, preparing the biscuit base a day before assembling can save time. Store the pressed bases in the fridge, covered with plastic wrap to keep them from drying out.
Final Thoughts
If you love Biscoff and crave an easy yet impressive dessert, this No Bake Mini Biscoff Cheesecakes Recipe is guaranteed to become a favorite. It’s straightforward to make, wonderfully flavorful, and charmingly portable in its mini form. Give it a try and watch everyone ask for seconds — I promise it’s worth every creamy, crumbly bite!
Print
No Bake Mini Biscoff Cheesecakes Recipe
- Prep Time: 0h 20m
- Cook Time: 0h 0m
- Total Time: 4h 20m
- Yield: 12 mini cheesecakes
- Category: Dessert
- Method: No-Cook
- Cuisine: American
Description
Delight in these creamy, no-bake mini Biscoff cheesecakes that perfectly combine crunchy biscuit bases with a smooth, fluffy Biscoff-infused filling. Ideal for an easy dessert, these individual cheesecakes come together quickly without baking, offering a luscious treat topped with whipped cream and extra crushed Biscoff biscuits for added texture and flavor.
Ingredients
Crust
- 200 g Biscoff biscuits (approximately 20 biscuits)
- 85 g unsalted butter, melted
Filling
- 250 g cream cheese, room temperature
- 100 g powdered sugar
- 1 teaspoon vanilla extract
- 150 g Biscoff spread
- 200 ml heavy cream
Garnish
- Extra crushed Biscoff biscuits, for garnish
- Whipped cream, for topping (optional)
Instructions
- Crush Biscuits: Crush the Biscoff biscuits into fine crumbs using a food processor or by placing them in a sealed plastic bag and pounding with a rolling pin until finely ground.
- Mix Crust: In a bowl, combine the crushed biscuits with the melted unsalted butter, mixing well to ensure the crumbs are evenly coated.
- Form Base: Evenly distribute the biscuit mixture into the bottoms of a silicone muffin pan, pressing down firmly using the back of a spoon or your fingers to create a compact base layer for each cheesecake.
- Beat Cream Cheese: In a separate large bowl, beat the cream cheese with an electric mixer until smooth and free of lumps, ensuring a creamy texture.
- Add Sweeteners and Flavor: Add powdered sugar, vanilla extract, and Biscoff spread to the cream cheese, mixing thoroughly until the mixture is smooth, uniform, and creamy.
- Whip Cream: In another clean bowl, whip the heavy cream using a mixer until stiff peaks form, indicating firm but light whipped cream.
- Fold Cream: Gently fold the whipped cream into the cream cheese and Biscoff mixture, taking care to maintain the light, airy texture by folding softly rather than stirring vigorously.
- Assemble Cheesecakes: Spoon the creamy Biscoff filling evenly over the biscuit bases in the muffin pan, smoothing the tops with the back of a spoon or spatula for an even, neat finish.
- Chill: Refrigerate the assembled mini cheesecakes for at least 4 hours or until fully set and firm enough to hold their shape when removed from the pan.
- Remove Cheesecakes: Once set, carefully remove the mini cheesecakes from the silicone muffin pan to avoid breaking or damaging their shape.
- Garnish and Serve: Garnish the mini cheesecakes with extra crushed Biscoff biscuits and a dollop of whipped cream if desired, adding an appealing visual and additional flavor dimension before serving.
Notes
- For best results, use room temperature cream cheese to ensure smooth mixing without lumps.
- Press the biscuit base firmly but not too hard to maintain a slightly crumbly texture.
- Allow at least 4 hours of refrigeration, preferably overnight, for optimal firmness and flavor melding.
- These mini cheesecakes can be stored covered in the refrigerator for up to 3 days.
- Use a silicone muffin pan for easy removal; if using a metal pan, line with cupcake liners.
- Add a pinch of cinnamon to the crust mixture for a warm spicy note optional.

