
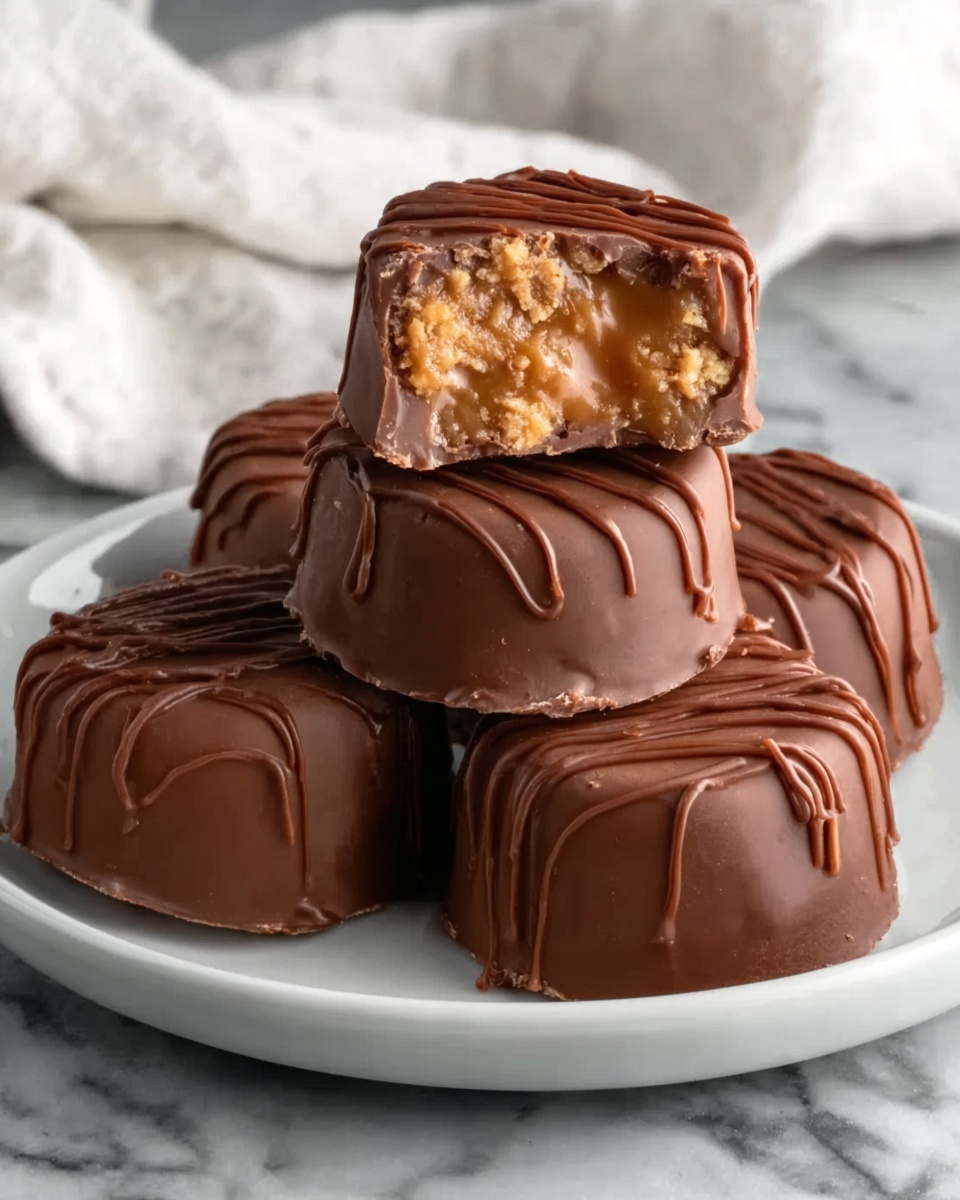
If you are looking for a delightful treat that combines the nostalgic flavors of Butterfinger with a wholesome twist, the Healthy Butterfinger Chocolate Easter Eggs Recipe is your new best friend. These little eggs are packed with crunchy cornflakes enveloped in creamy almond butter, then dipped in rich dark chocolate, making them the perfect guilt-free indulgence this Easter. Whether you want to enjoy them as a snack or share them with loved ones, this recipe brings together simple ingredients that create an irresistibly crunchy, sweet, and healthy Easter delight.

Ingredients You’ll Need
Gathering the right ingredients is what makes this recipe both simple and exceptional. Each component plays a vital role in achieving that perfect harmony of flavor, texture, and nutritional goodness.
- Natural almond butter: Provides creamy richness and a boost of healthy fats, or substitute with peanut butter for a more familiar taste.
- Coconut oil, melted: Adds smooth texture and helps bind the mixture while enhancing flavor.
- Maple syrup: A natural sweetener that gives the eggs just the right amount of sweetness without refined sugars.
- Vanilla extract: Imparts a warm, aromatic depth to the filling.
- Pinch of sea salt: Balances the sweetness and highlights the nutty flavors.
- Cornflakes, crushed: Introduces the iconic Butterfinger crunch with a light and crispy texture.
- Dark chocolate chips: For the luscious coating, choosing dark chocolate adds antioxidants and reduces sugar content.
- Extra coconut oil: Helps achieve a smooth, glossy chocolate coating that sets beautifully.
How to Make Healthy Butterfinger Chocolate Easter Eggs Recipe
Step 1: Make the Filling
Begin by whisking together natural almond butter, melted coconut oil, maple syrup, vanilla extract, and a pinch of sea salt in a mixing bowl until the mixture is smooth and well combined. Then gently fold in the crushed cornflakes, making sure every flake is evenly coated. The result should be a moldable dough that’s crunchy and slightly sticky, ready to be shaped into the perfect Easter eggs.
Step 2: Shape the Eggs
Using a tablespoon or small ice cream scoop, take about 1 to 2 tablespoons of the filling mixture and mold it into small egg shapes with your hands. This part is fun and therapeutic! Place each egg on a parchment-lined baking sheet and pop them into the freezer. Let them chill for 20 to 30 minutes until they are firm enough to handle without losing their shape.
Step 3: Melt the Chocolate
While your eggs chill, it’s time to prepare the chocolate coating. In a microwave-safe bowl or using a double boiler, melt the dark chocolate chips together with one tablespoon of coconut oil, stirring frequently until the mixture is silky smooth. Allow it to cool slightly; this step is important so that the melted chocolate coats the eggs evenly rather than running off.
Step 4: Dip the Eggs
Take the firm eggs out of the freezer and, using a fork, gently dip each egg into the melted chocolate. Allow any excess chocolate to drip back into the bowl, then carefully return the coated eggs to the parchment paper. If you want to add extra flair, sprinkle crushed cornflakes or a pinch of sea salt on top while the chocolate is still wet – it gives a lovely crunch and a flavor contrast.
Step 5: Chill to Set
Place the chocolate-coated eggs back into the freezer or refrigerator for 10 to 15 minutes. This chilling step hardens the chocolate shell, making the eggs look glossy and hold together perfectly. Once set, your healthy Butterfinger chocolate Easter eggs are ready to serve or store for later enjoyment.
How to Serve Healthy Butterfinger Chocolate Easter Eggs Recipe
Garnishes
Presentation can make these treats even more irresistible. Consider garnishing with finely chopped nuts, a light drizzle of white chocolate, or colorful edible sprinkles to match festive moods. Even a dusting of cocoa powder or powdered sugar can add a rustic charm while enhancing the taste.
Side Dishes
Although these eggs are a delightful standalone snack, pairing them with fresh berries or a small cup of herbal tea can elevate the tasting experience. Light fruit keeps things fresh on the palate, contrasting beautifully with the rich chocolate and crunchy filling.
Creative Ways to Present
For an Easter celebration, try packing these eggs in small pastel-colored boxes tied with ribbon, or nestle them in shredded paper grass inside mason jars. They also make wonderful edible gifts, so personalizing their presentation can add an extra special touch guaranteed to impress friends and family.
Make Ahead and Storage
Storing Leftovers
Keep your Healthy Butterfinger Chocolate Easter Eggs in an airtight container in the refrigerator to maintain freshness and prevent the chocolate from melting. They’ll stay delicious and crunchy for up to one week, making them perfect to prepare in advance for gatherings or just to enjoy throughout the week.
Freezing
To extend shelf life, freeze the eggs in a sealed container or freezer-safe bag. When well wrapped, they can last up to 2 months without sacrificing texture or flavor. Thaw them in the fridge before serving for the best taste and consistency.
Reheating
These eggs are best enjoyed cool and do not require reheating. If you prefer softer chocolate, let them sit at room temperature for 10 minutes before eating. Avoid microwaving, which may alter the texture and cause the chocolate to bloom.
FAQs
Can I use peanut butter instead of almond butter?
Absolutely! Peanut butter works wonderfully in this recipe, offering a familiar and slightly sweeter flavor. Just make sure it’s natural and unsweetened for the healthiest results.
Is it necessary to use dark chocolate?
Not necessarily, but dark chocolate provides a richer taste with less sugar, complementing the wholesome ingredients. You can use semi-sweet or milk chocolate if preferred, though it will change the nutritional profile.
How do I crush the cornflakes without making them too powdery?
Place the cornflakes in a sealed plastic bag and gently crush them with a rolling pin or bottom of a glass. The goal is to break them into small pieces, not powder, to preserve that signature crunch in your eggs.
Can I make these eggs vegan?
Yes! This recipe is already pretty close to vegan, especially if you use dark chocolate that contains no milk products. Verify your chocolate and maple syrup are vegan-friendly, and you’re good to go.
What if I don’t have a freezer? Can I chill them in the fridge only?
You can chill the eggs in the refrigerator instead, but it will take a bit longer—expect about an hour or so for them to firm up properly before dipping and after coating with chocolate.
Final Thoughts
This Healthy Butterfinger Chocolate Easter Eggs Recipe is a joyous way to celebrate the season while keeping things wholesome and delicious. With its perfect balance of crunch, creaminess, and chocolate goodness, you’ll find yourself coming back for more. I encourage you to try making these at home and watch how quickly they disappear—they might just become your new Easter tradition!
Print
Healthy Butterfinger Chocolate Easter Eggs Recipe
- Prep Time: 20 minutes
- Cook Time: 30 minutes
- Total Time: 50 minutes
- Yield: 10–12 eggs
- Category: Dessert
- Method: No-Cook
- Cuisine: American
- Diet: Vegetarian
Description
These Healthy Butterfinger Chocolate Easter Eggs are a delicious, guilt-free treat perfect for celebrating Easter or any occasion. Made with natural almond butter, crunchy cornflakes, and rich dark chocolate, these homemade eggs combine creamy, crunchy, and chocolatey flavors into a delightful and wholesome dessert.
Ingredients
Filling
- ½ cup natural almond butter (or peanut butter)
- 2 tablespoons coconut oil, melted
- ¼ cup maple syrup
- ½ teaspoon vanilla extract
- Pinch of sea salt
- 1¼ cups cornflakes, crushed into small pieces
Coating
- ¾ cup dark chocolate chips
- 1 tablespoon coconut oil
Instructions
- Make the Filling: In a bowl, whisk together almond butter, melted coconut oil, maple syrup, vanilla extract, and a pinch of sea salt until smooth. Stir in the crushed cornflakes until they are evenly coated and the mixture forms a moldable dough.
- Shape the Eggs: Scoop out 1–2 tablespoons of the mixture and shape each into small egg shapes using your hands. Place the shaped eggs on a parchment-lined baking sheet. Freeze for 20–30 minutes until they are firm and hold their shape.
- Melt the Chocolate: Using a microwave-safe bowl or a double boiler, gently melt the dark chocolate chips with 1 tablespoon of coconut oil, stirring until the mixture is smooth and glossy. Let the chocolate cool slightly but keep it fluid for dipping.
- Dip the Eggs: Remove the eggs from the freezer. Using a fork, dip each egg into the melted chocolate, allowing the excess chocolate to drip off before placing them back on the parchment-lined baking sheet. Optionally, sprinkle crushed cornflakes or a pinch of sea salt on top while the chocolate is still wet for added texture and flavor.
- Chill to Set: Place the dipped eggs in the refrigerator or freezer for 10–15 minutes until the chocolate coating is firm. Once set, serve immediately or store them in an airtight container in the fridge or freezer for later enjoyment.
Notes
- Use natural almond or peanut butter without added sugars for the healthiest option.
- Make sure the cornflakes are crushed to small pieces for better texture and binding.
- If you prefer a sweeter chocolate shell, you can use semi-sweet chocolate chips instead of dark chocolate.
- Store the finished eggs in the refrigerator to keep the chocolate firm and prevent melting.
- These eggs can be made vegan by ensuring the chocolate chips are dairy-free.


